Prefer to watch? Two short narrated videos walk through Trainly on real screens: the Streamer Guide and the Moderator Guide.
Testing Trainly for us? Trainly lives at www.trainlybynbhd.com. Follow the Tester guide: sign in with Twitch, set your timezone, join the community, take your slot and check My Trains, in about five minutes.
What is a raid train?
Who: Everyone1 minute read
A raid train is a relay of streams. Each streamer goes live for their time slot, then raids the next streamer on the list, so viewers ride the "train" from channel to channel.
A community runs the train. NBHD Demo is one example; you can belong to several.
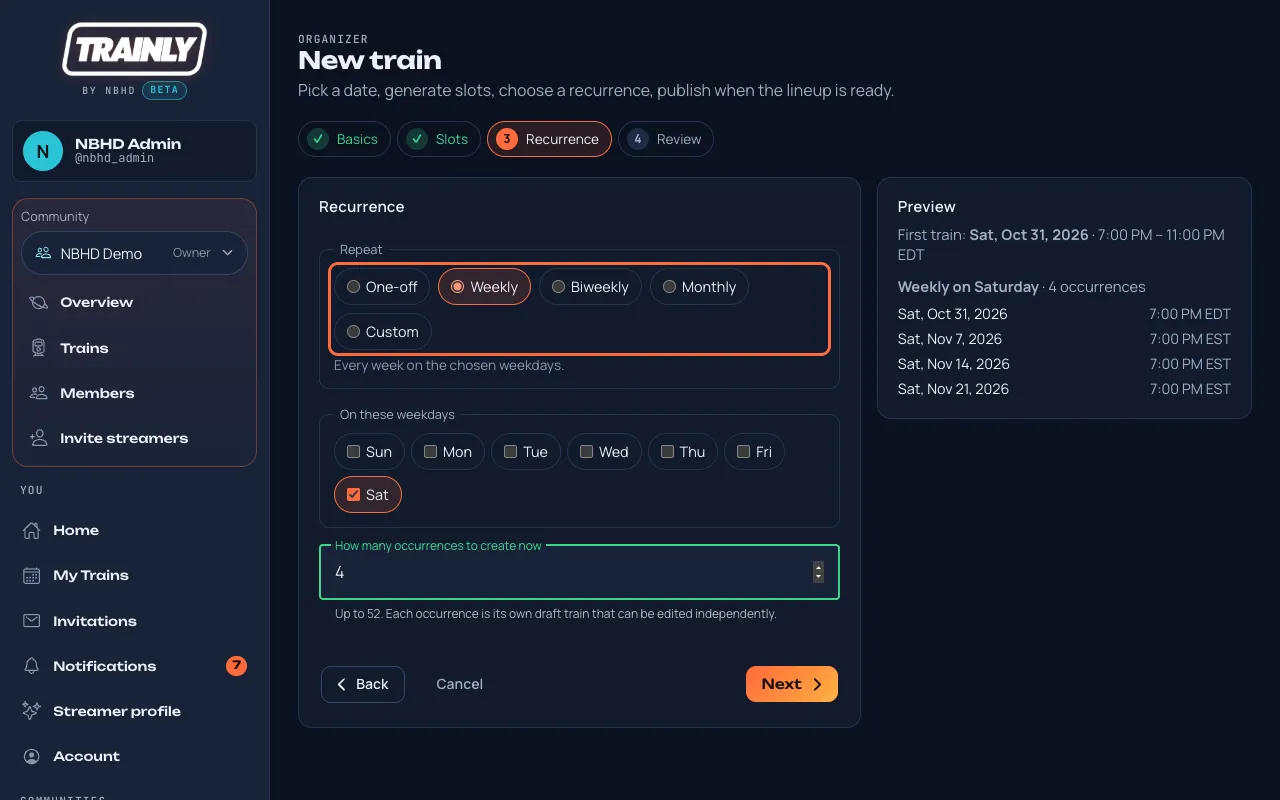
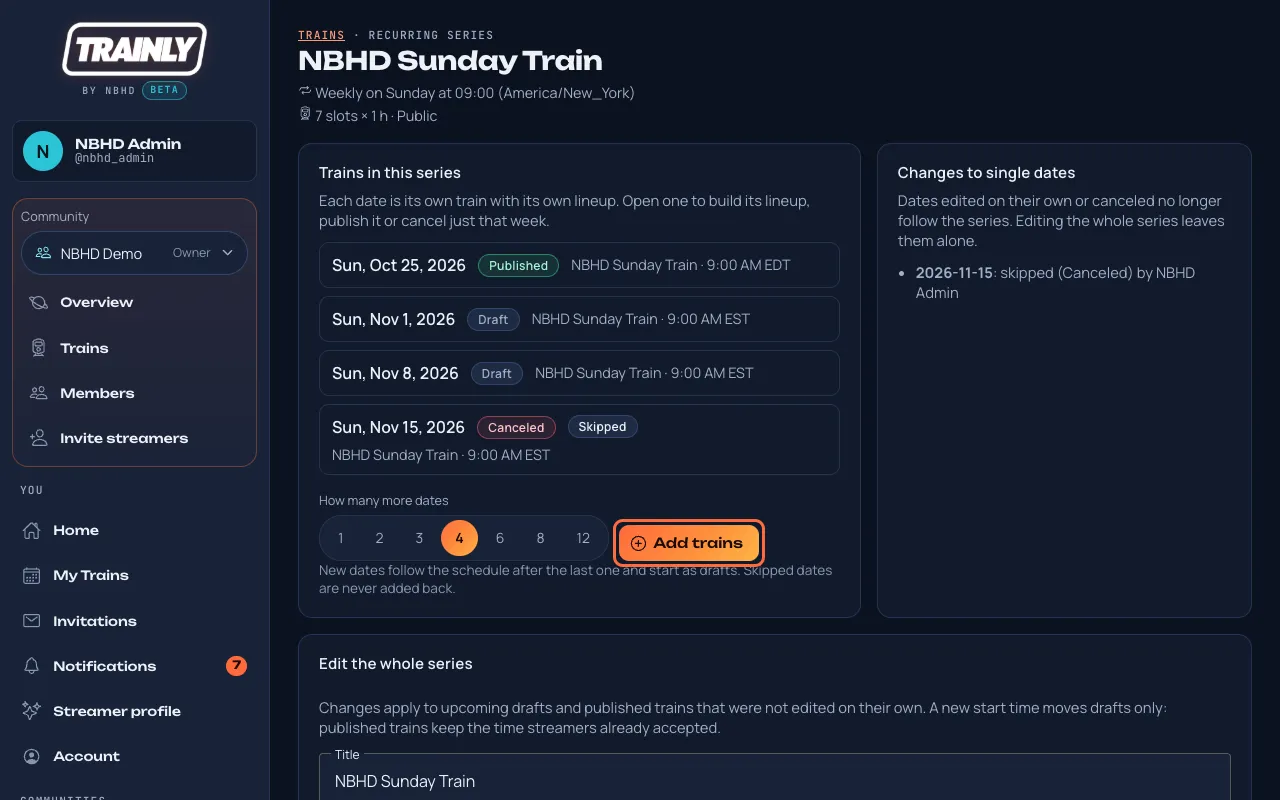
A train happens on a set date and time, for example every Sunday at 9:00 AM New York time.
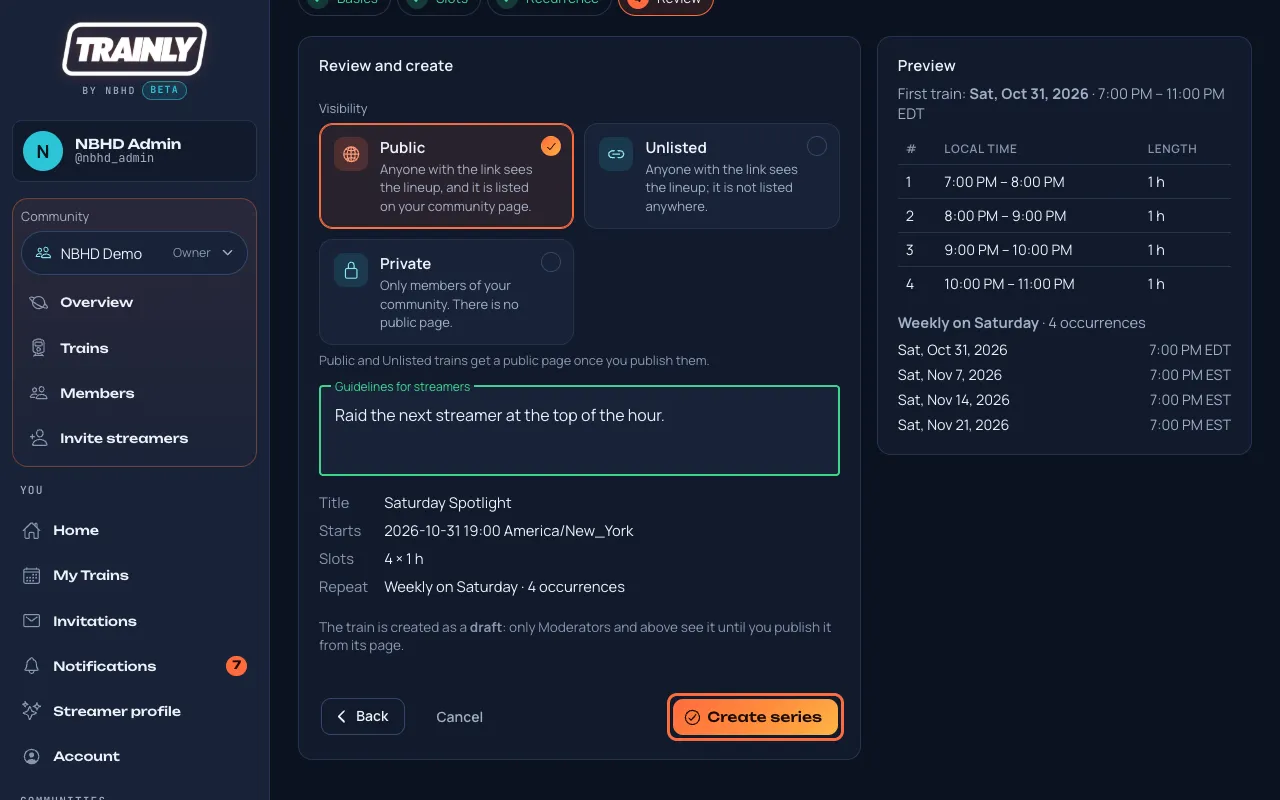
The train is split into slots, for example seven slots of one hour each.
The lineup is who streams in each slot, in order.
Good to know: Trainly shows when you are on and who comes next. You still start the raid yourself on Twitch; Trainly never raids for you.
How-to videos
Short narrated walkthroughs of the real Trainly screens. Each video has captions (press CC in the player) and a written transcript below it. Both also play from the front page, under Watch how it works.
Raid Train Streamer Guide (video)
Who: Streamers2 min 41 s
Watch a new streamer set up and take their first slots: timezone, profile, joining a community, an invitation, My Trains, the train page, Come aboard and the public page.
Shown on the demo community NBHD Demo with test accounts. Your own community and trains look the same. Download the video (MP4, 8 MB).Read the transcript
Raid Train Streamer Guide: 00:00 Welcome to the Raid Train Streamer Guide. In a few minutes, you'll see how Trainly helps you find raid trains, take a slot, and show up on time, with no spreadsheets and no time zone math.
Step 1 · Get started: 00:13 You sign in with your Twitch account. Home shows your upcoming trains, your communities, and a short checklist of what's left to set up.
Step 2 · Set your timezone: 00:22 Start with your timezone. Open Account, and press Use my device timezone. 00:28 Press Save account. From now on, every train time is shown in your own clock.
Step 3 · Your streamer profile: 00:33 Next, open Streamer profile, and tell organizers what you stream: a short bio, your category, your language, and how long you usually go live. 00:44 Press Save profile. Organizers read it when they pick streamers, so a complete profile gets you picked faster.
Step 4 · Join a community: 00:52 To join another community, open All communities, and search for it by name. 00:58 Open it to read what it's about, then press Join community. You're in right away. Some communities ask a moderator to approve you first.
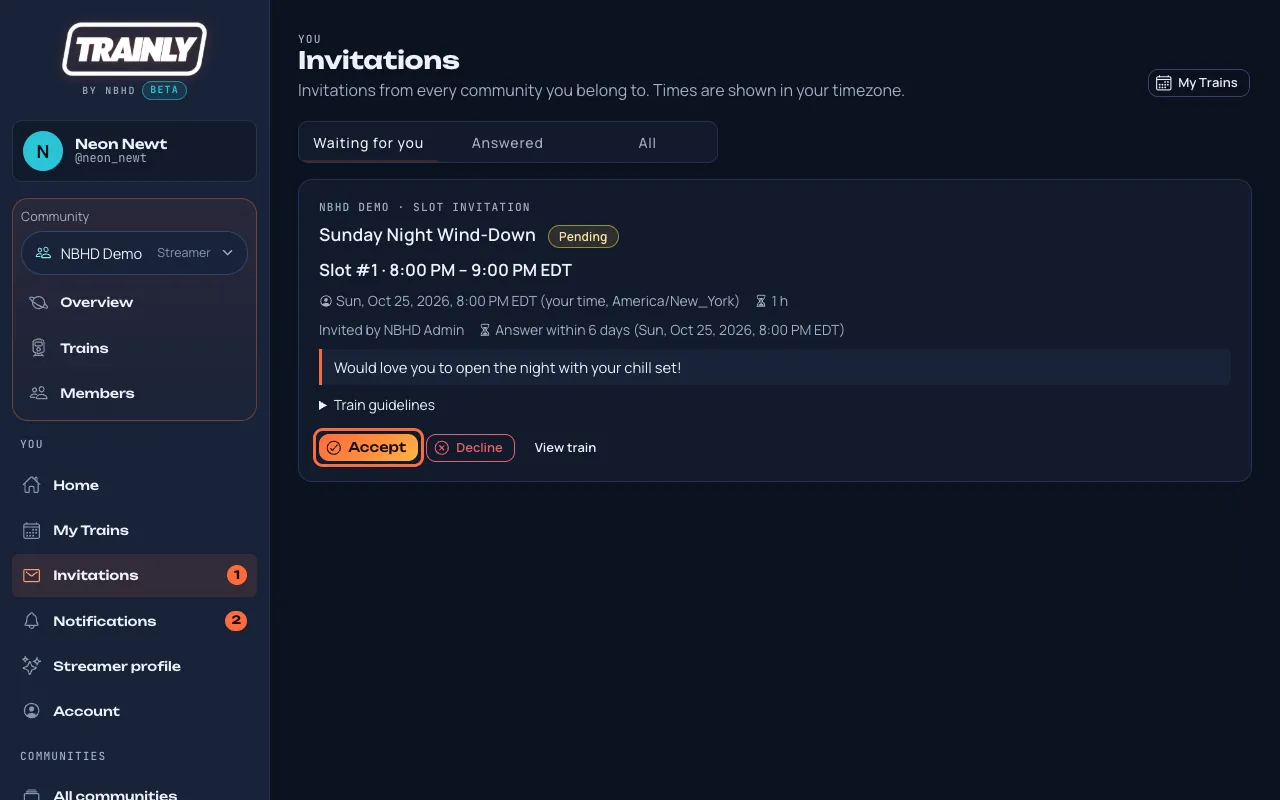
Step 5 · Answer an invitation: 01:07 When an organizer invites you, it shows up under Invitations, with the train, your slot, their message, and the time in your own timezone. 01:17 Press Accept, and the slot is yours. Trainly offers to add it to your calendar, so you get a reminder before you go live.
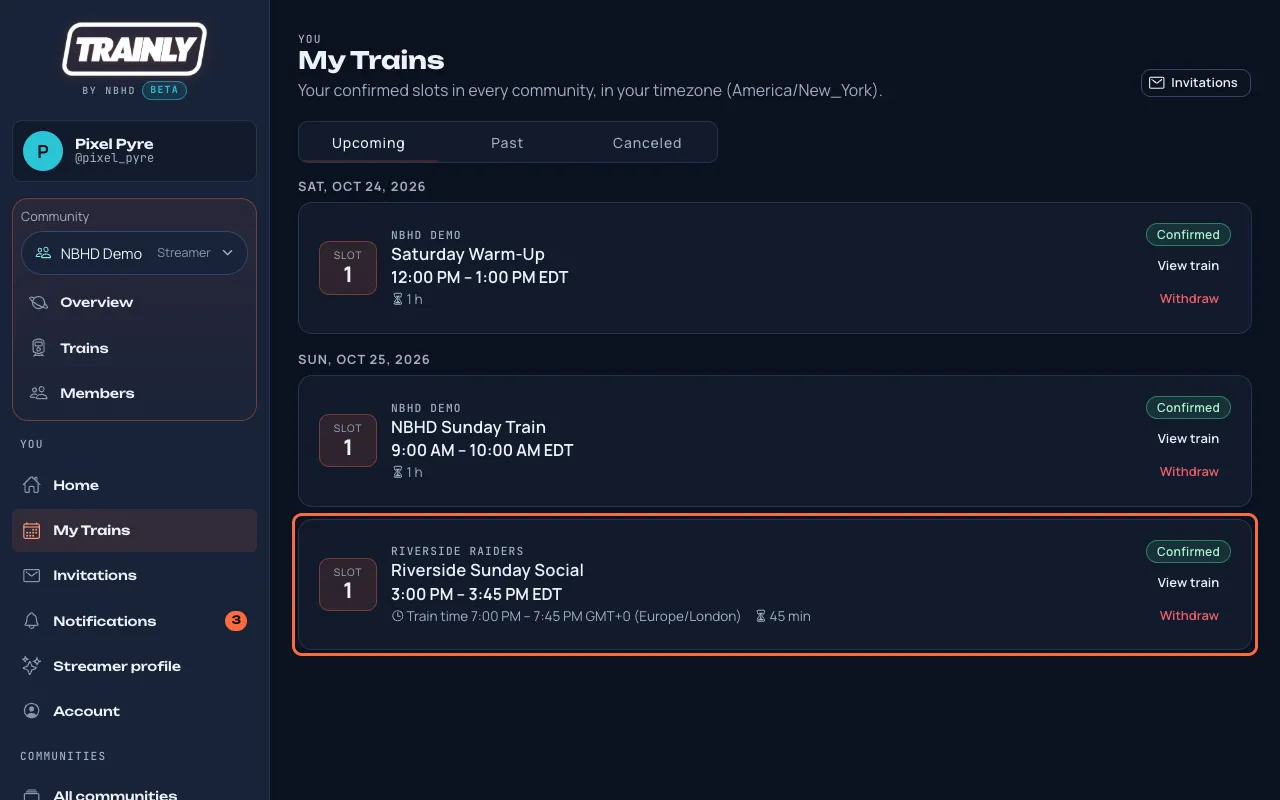
Step 6 · My Trains: 01:25 My Trains lists every slot you've accepted, in every community, in your own time. If your plans change, press Withdraw, and the organizers are told right away.
Step 7 · The train page: 01:36 Press View train to see the whole lineup. Times are in your timezone, and Train time switches to the organizer's clock. 01:44 If the organizers added a flyer and a lineup command, they're right below the lineup. Press Copy command, and paste it into your stream chat.
Step 8 · Come aboard: 01:54 Back on Home, open the Friday Night Train. See an open slot you'd love to take? Press Come aboard, and add a short message for the organizers. 02:06 Your request waits for an organizer to decide. If you change your mind, you can withdraw it.
Step 9 · Share with your viewers: 02:13 Want your viewers to follow the whole train? Press Copy public link, and share it anywhere. Anyone can open it, even without a Trainly account.
Step 10 · Notifications: 02:22 Notifications keep you in the loop. Here, the organizer just said yes to your request, so the Friday slot is yours too.
You're ready to ride: 02:30 That's it. Set your timezone, keep your profile fresh, and say yes to the trains you love. Trainly takes care of the rest, one raid at a time.
Tip: every step in the video has its own written guide under For streamers, with pictures.
Raid Train Moderator Guide (video)
Who: Moderators, organizers and owners3 min 7 s
Watch a community Moderator welcome new members and keep a train full: join requests, drafts, the flyer and lineup command, invitations, come-aboard requests, history, the public page and invite links.
Shown on the demo community NBHD Demo with test accounts. Download the video (MP4, 10 MB).Read the transcript
Raid Train Moderator Guide: 00:00 Welcome to the Raid Train Moderator Guide. In the next few minutes, you'll see how Trainly helps you, as a community moderator, keep every raid train full, on time, and friendly.
Step 1 · Get started: 00:12 When you sign in, Home shows the next trains in your community, and the menu shows your role. As a moderator, you get the tools to welcome new people and fill the lineup.
Step 2 · Notifications: 00:24 Notifications tell you when someone is waiting on you: a new person asking to join, or a streamer who wants a slot. Each one takes you straight to where you answer it.
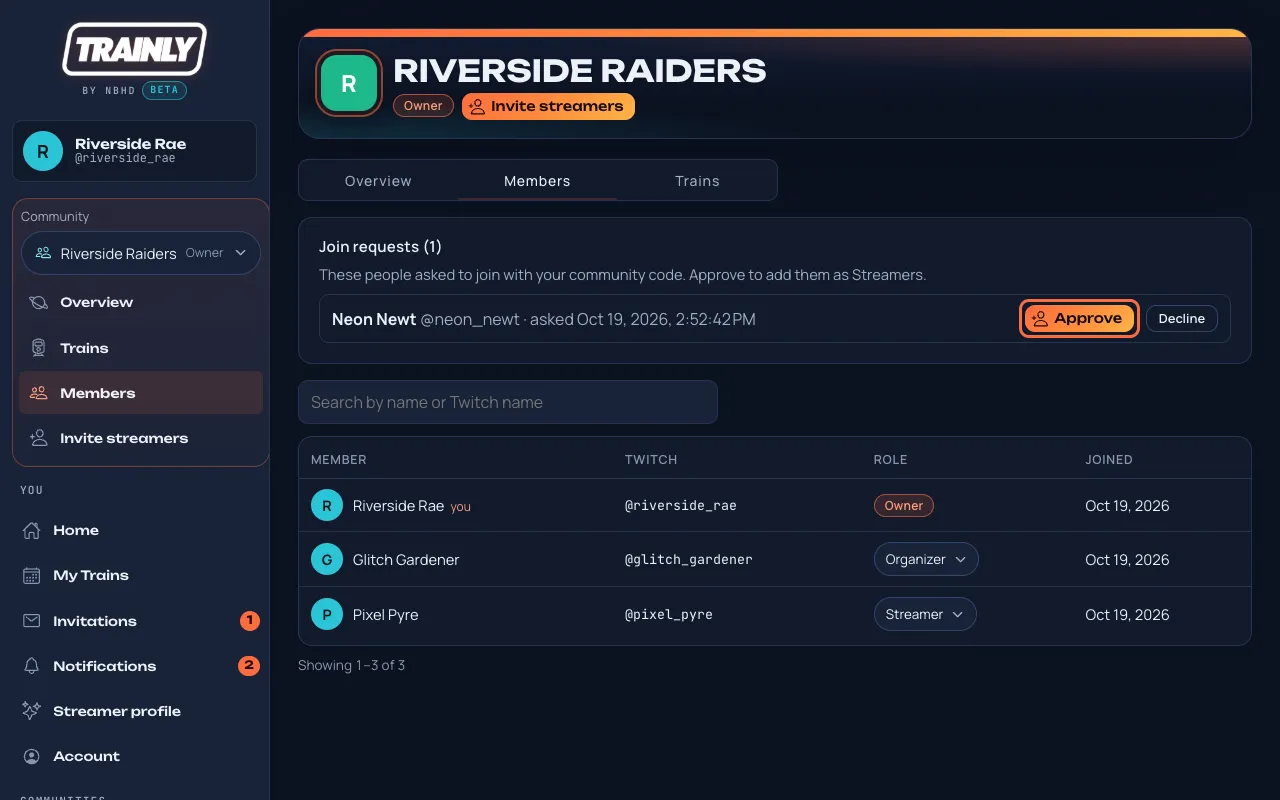
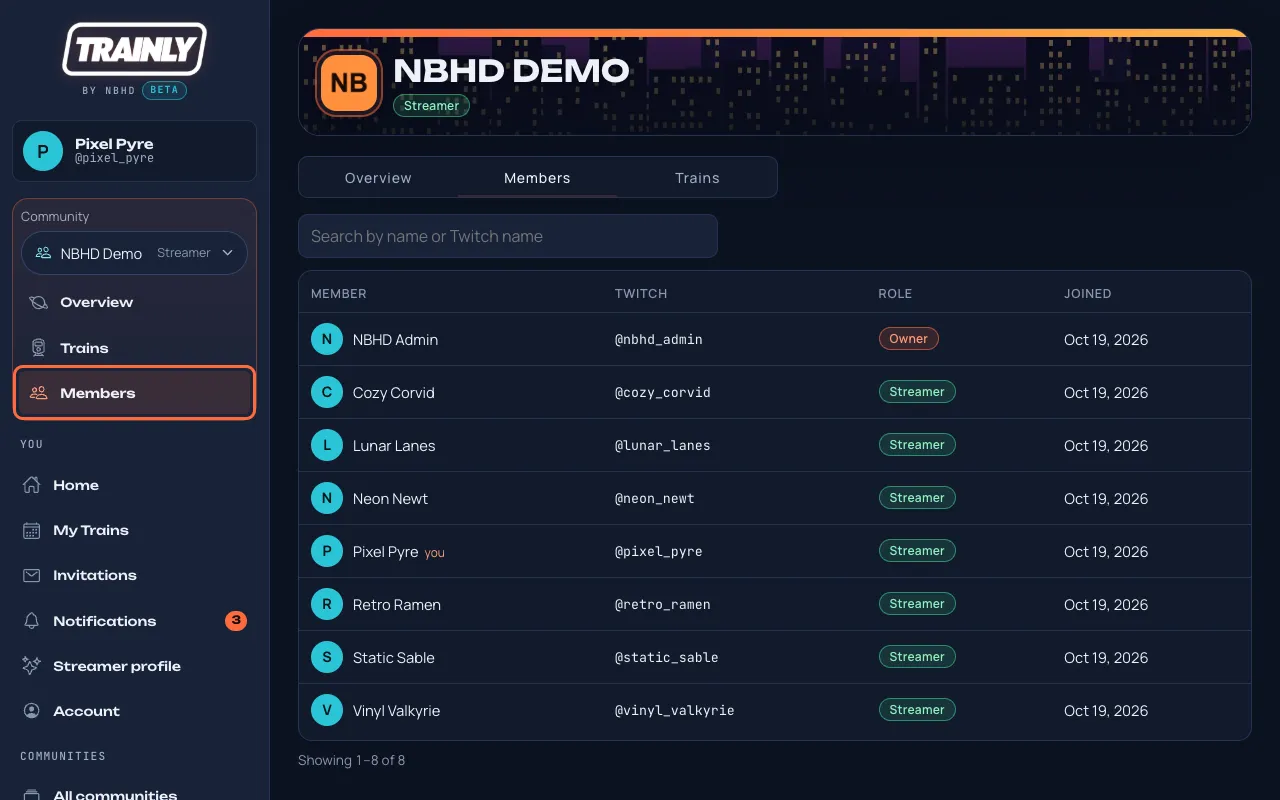
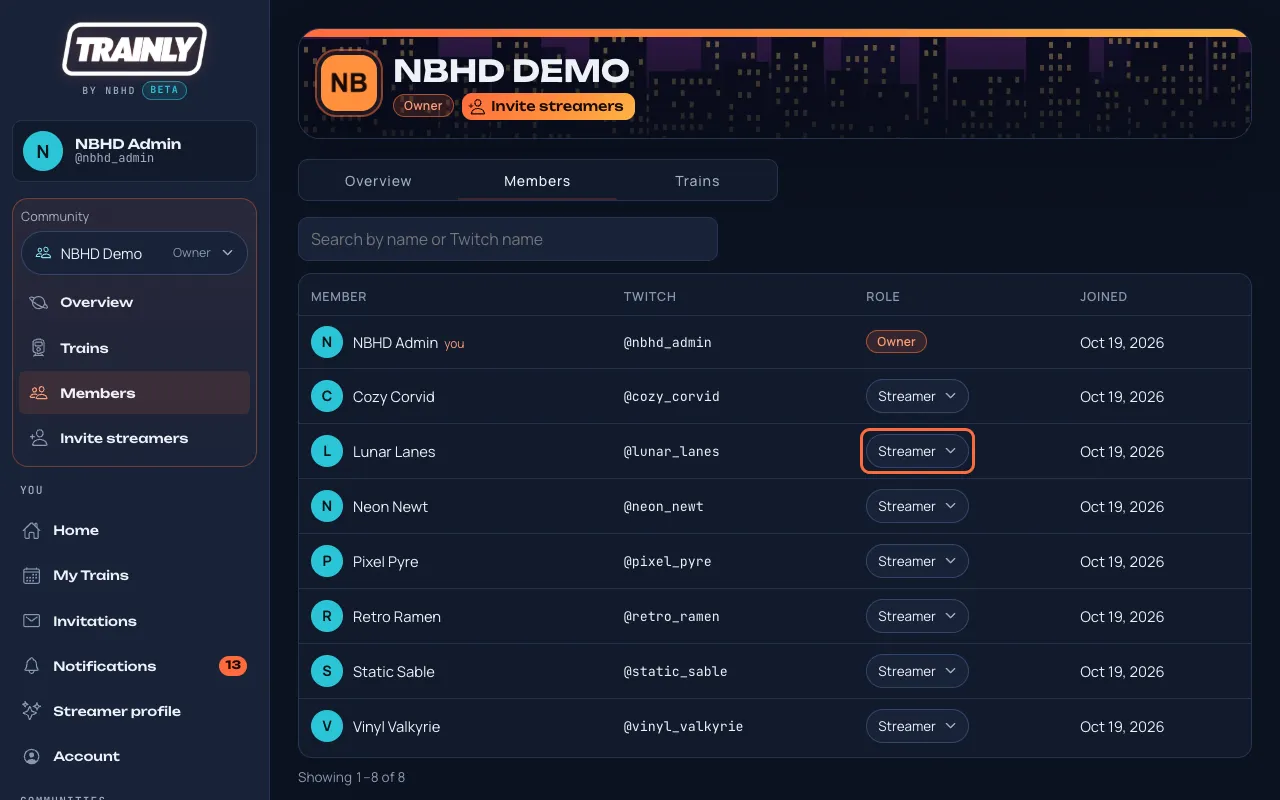
Step 3 · Approve join requests: 00:35 Open Members. Anyone waiting to join your community is listed at the top. 00:41 Press Approve, and they join as a streamer. Or press Decline. Either way, they get a notification.
Step 4 · See every train: 00:47 Trains lists everything your community has planned, including drafts that streamers can't see yet, so you're never surprised.
Step 5 · Flyer and lineup command: 00:56 After an organizer creates a train, they can attach a flyer and a lineup command. Open the train, and you'll find both right below the lineup. 01:05 Press Copy command, and paste it into your stream chat, so your viewers always know who's next.
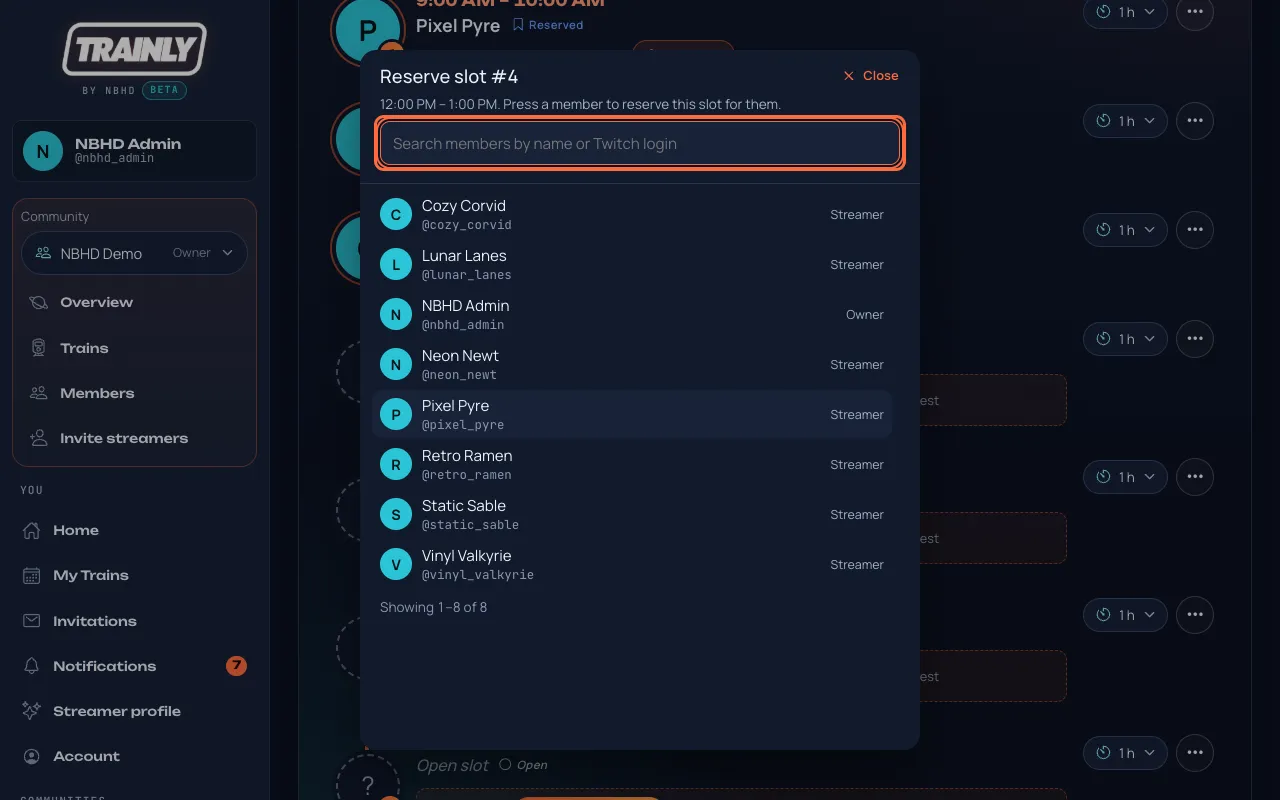
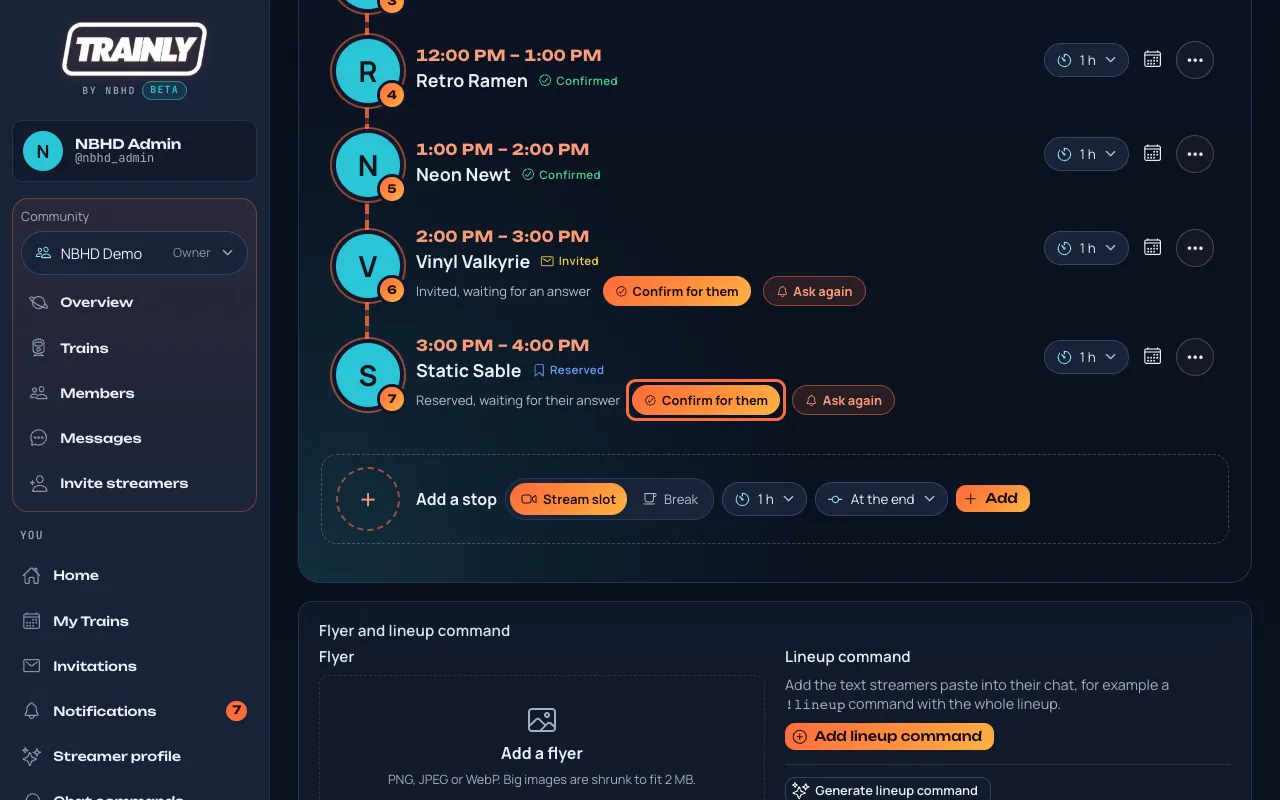
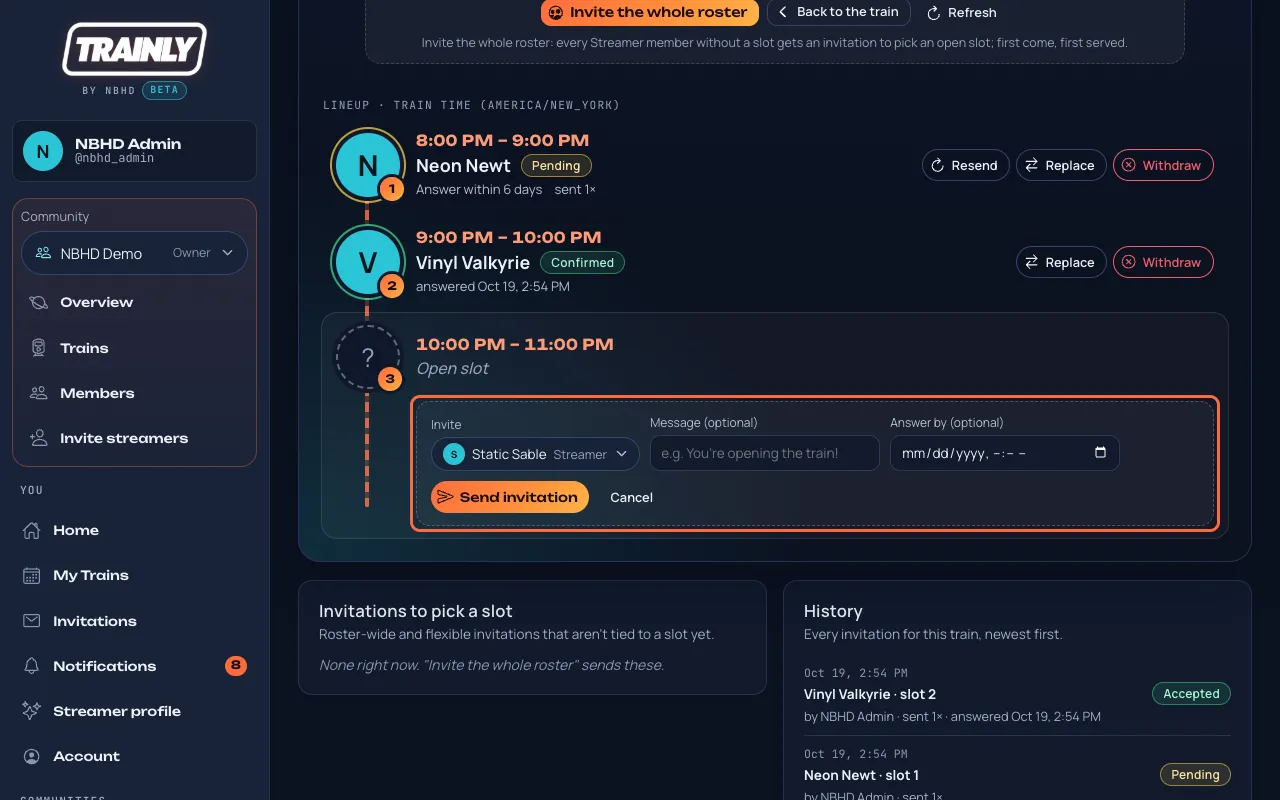
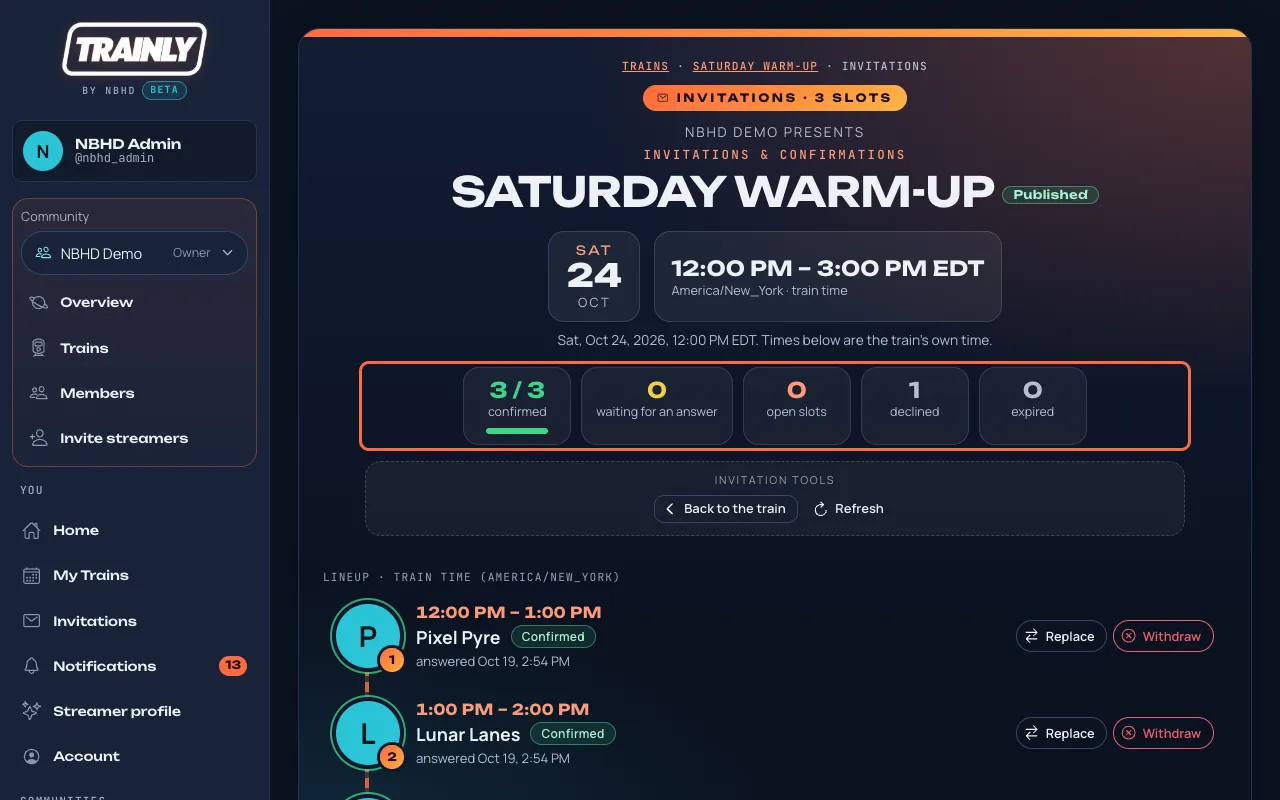
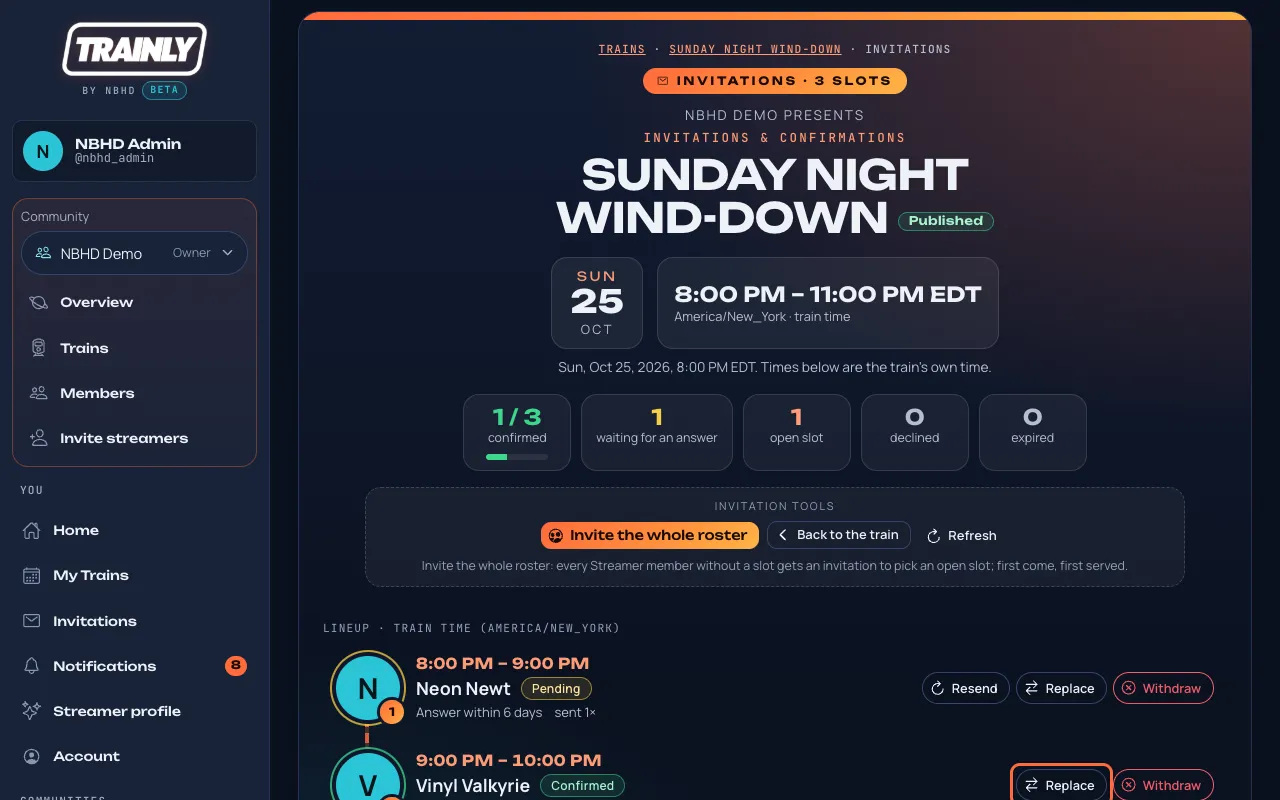
Step 6 · Invitations: 01:12 Now scroll back up, and press Invitations at the top of the train. 01:17 The boxes at the top count the confirmed slots, the invitations still waiting for an answer, and the slots that are still open. 01:25 Vinyl hasn't answered yet. Press Resend, and they get a fresh notification. 01:31 Static Sable had to drop out, and left a note. Press Fill vacancy, choose a member, and press Send invitation. 01:40 For last minute changes, Replace and Withdraw are right on each slot, and the streamer is always told.
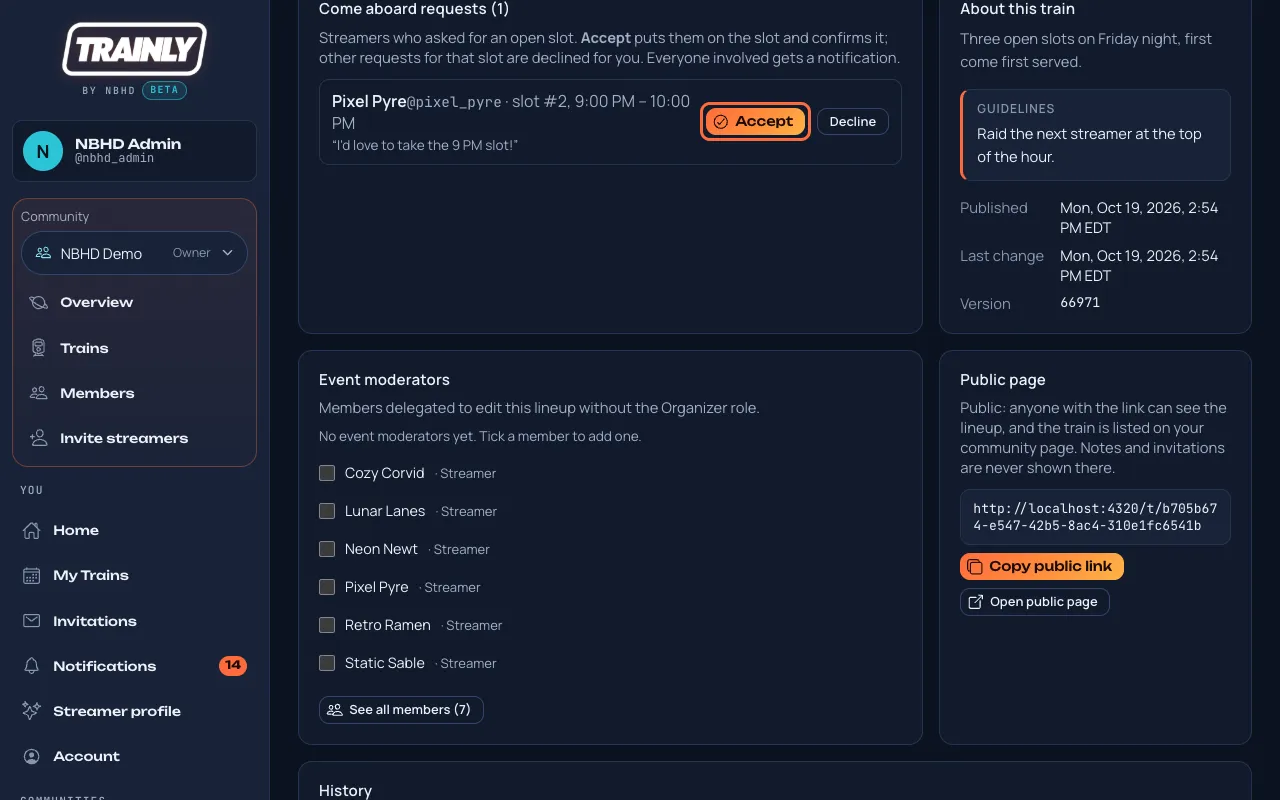
Step 7 · Come aboard requests: 01:48 Streamers can also ask for an open slot themselves. Their requests wait on the train page, under Come aboard requests. 01:56 Press Accept, and the slot is confirmed right away. There's no invitation to wait for.
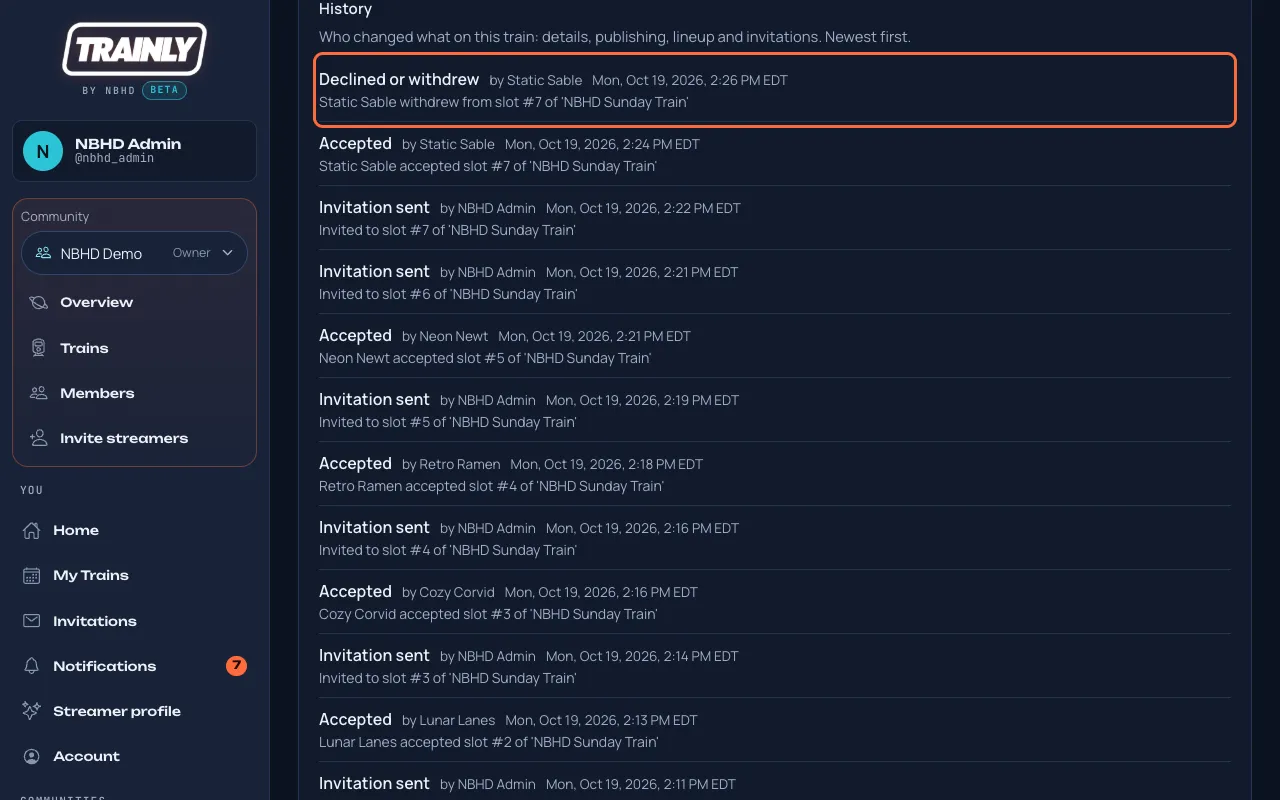
Step 8 · Train history: 02:03 Every change to a train is recorded. Press Show history to see who changed what, and when.
Step 9 · Public train page: 02:09 Every published train has a public page. Press Copy public link, and share it in Discord, on social media, or in your stream chat. 02:19 Anyone can open it, even without a Trainly account. They see the train time, the guidelines, and the confirmed lineup.
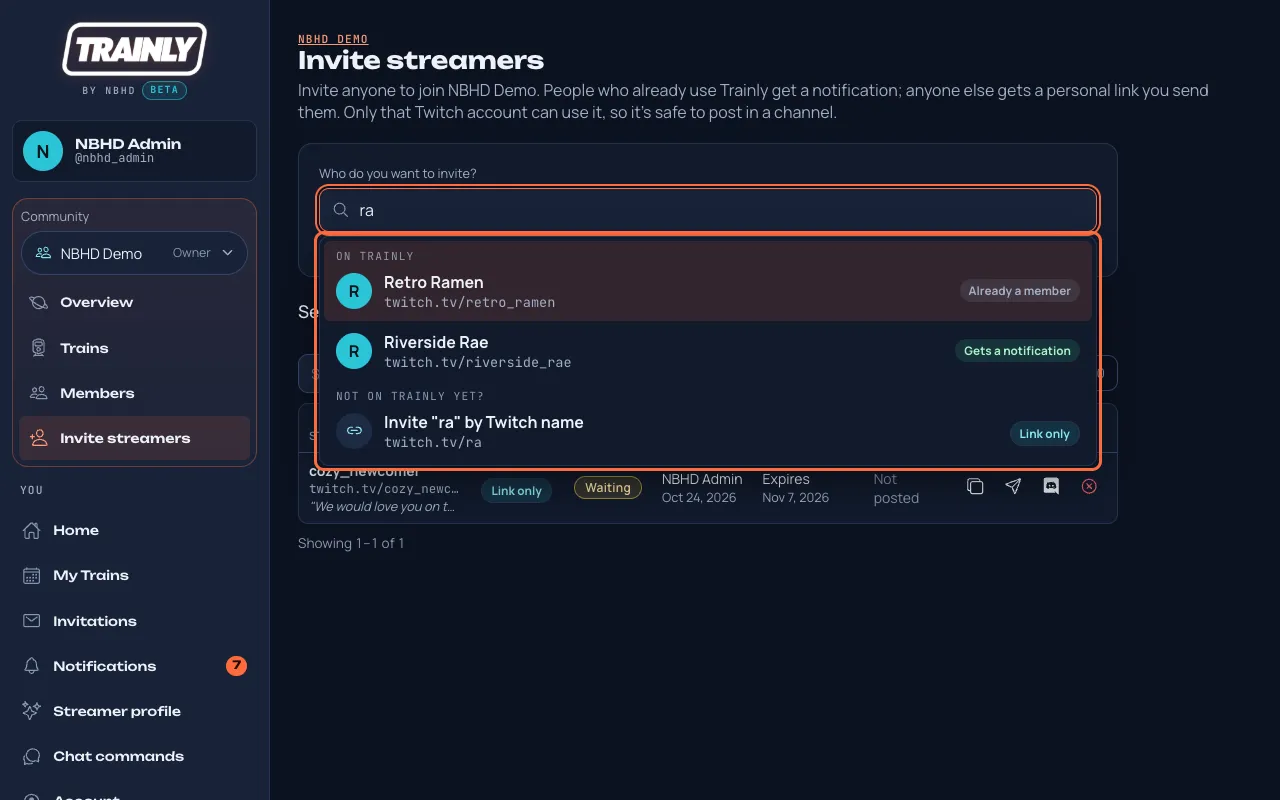
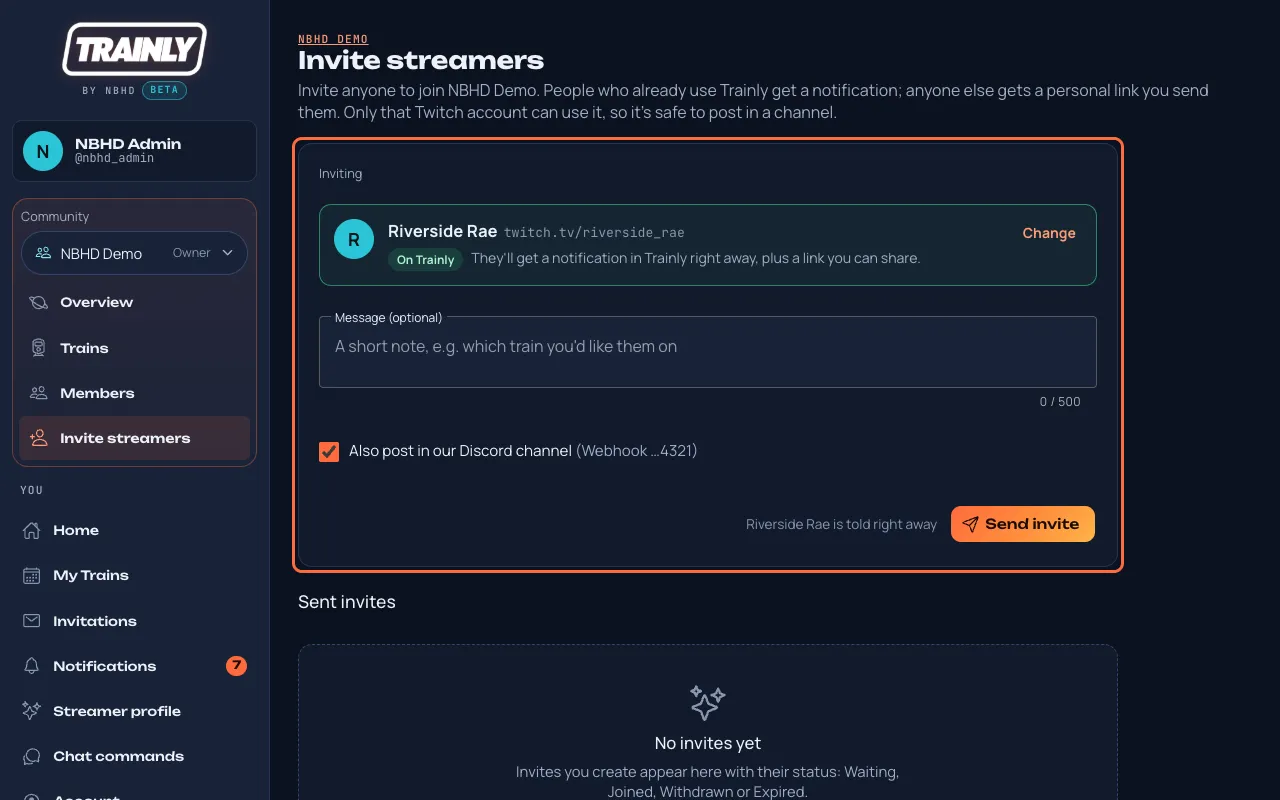
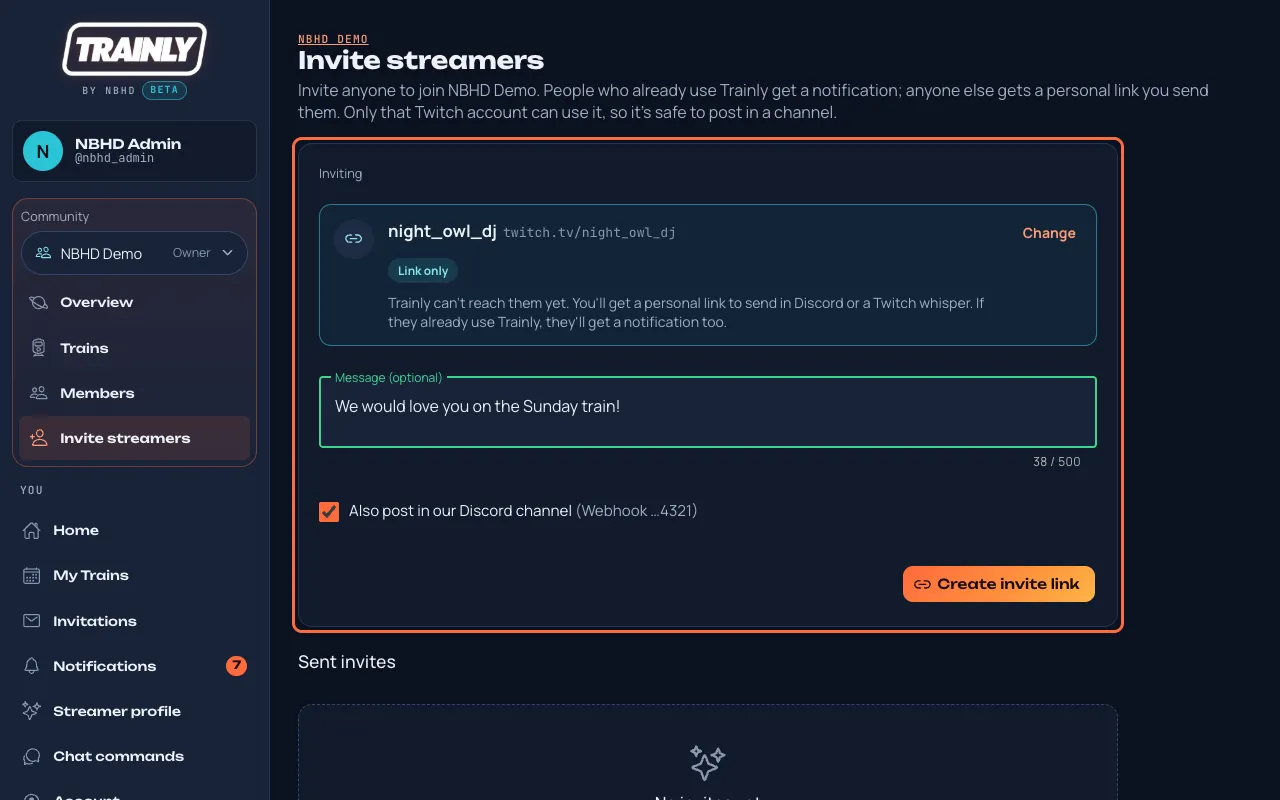
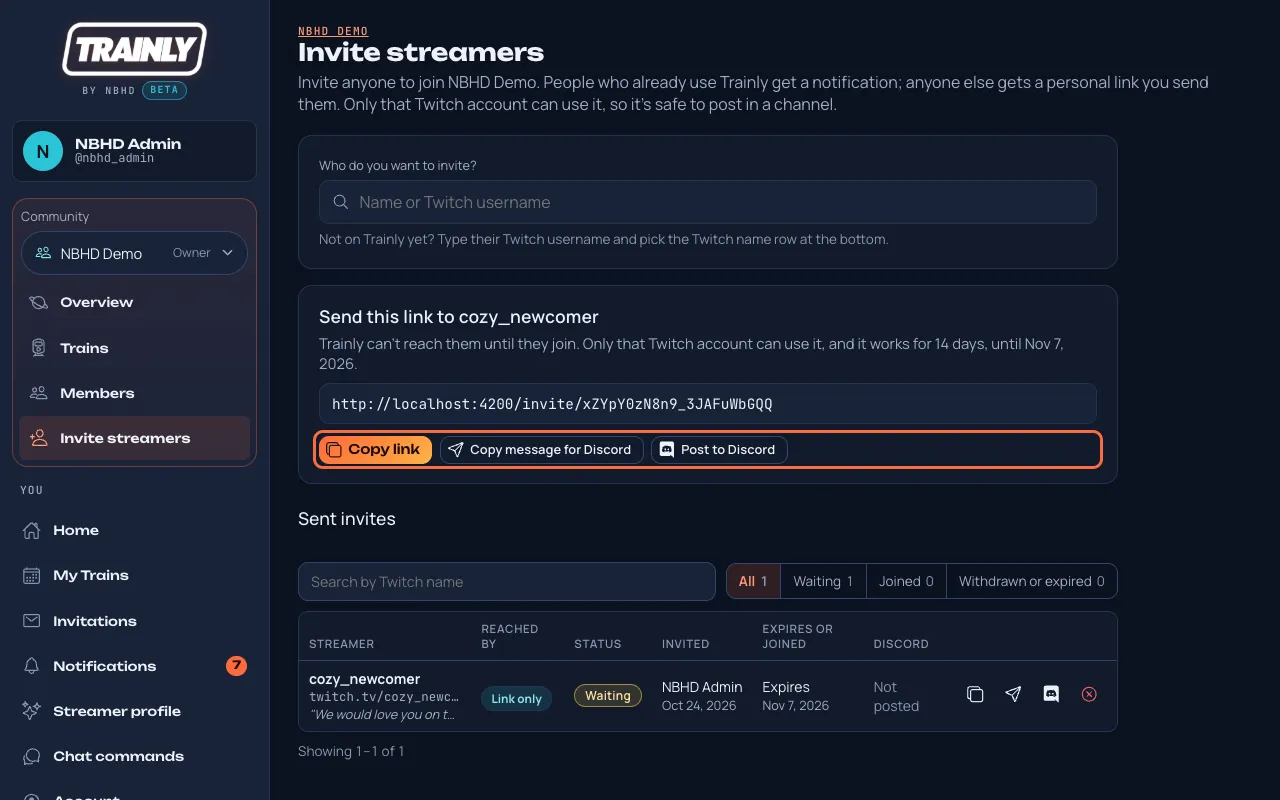
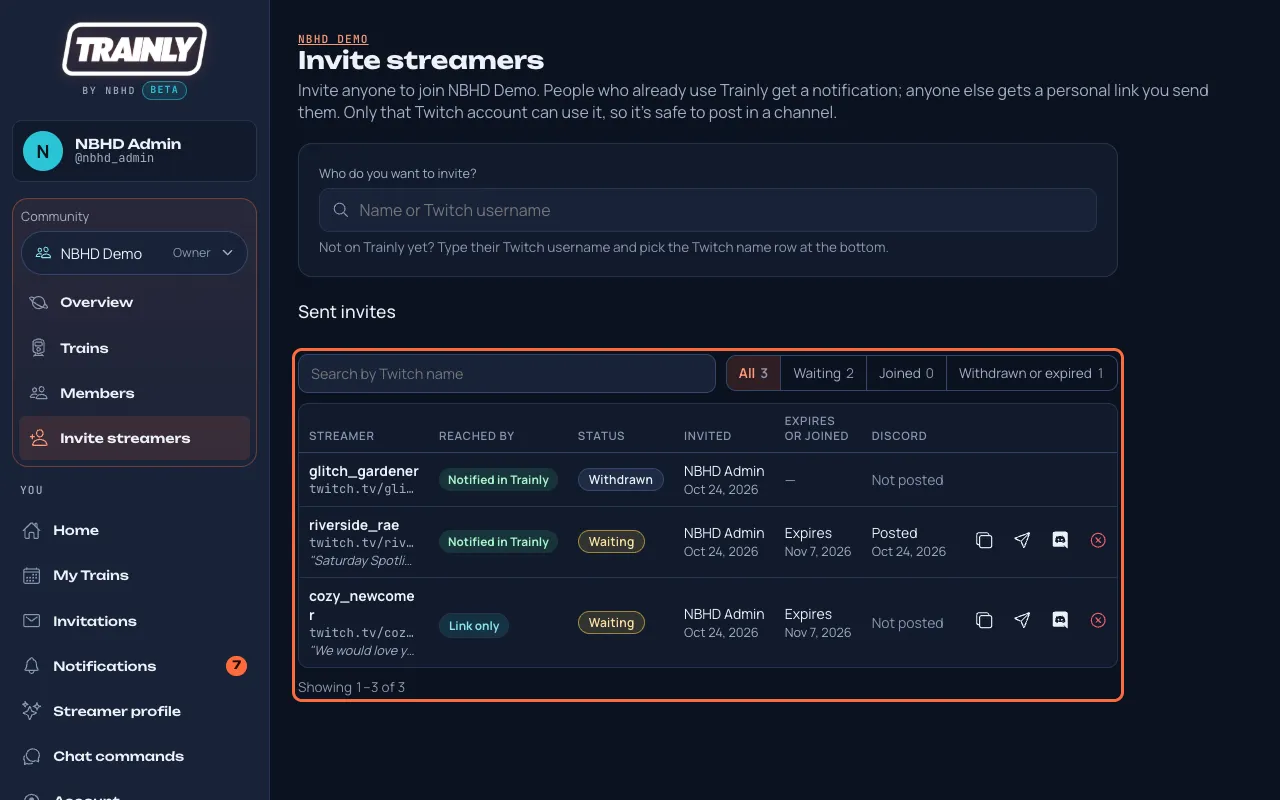
Step 10 · Invite new streamers: 02:27 To bring someone new into the community, open Invite streamers, and type their Twitch name. 02:33 Press Create invite link. Only that Twitch account can use it, so it's safe to paste in Discord, a whisper, or anywhere else.
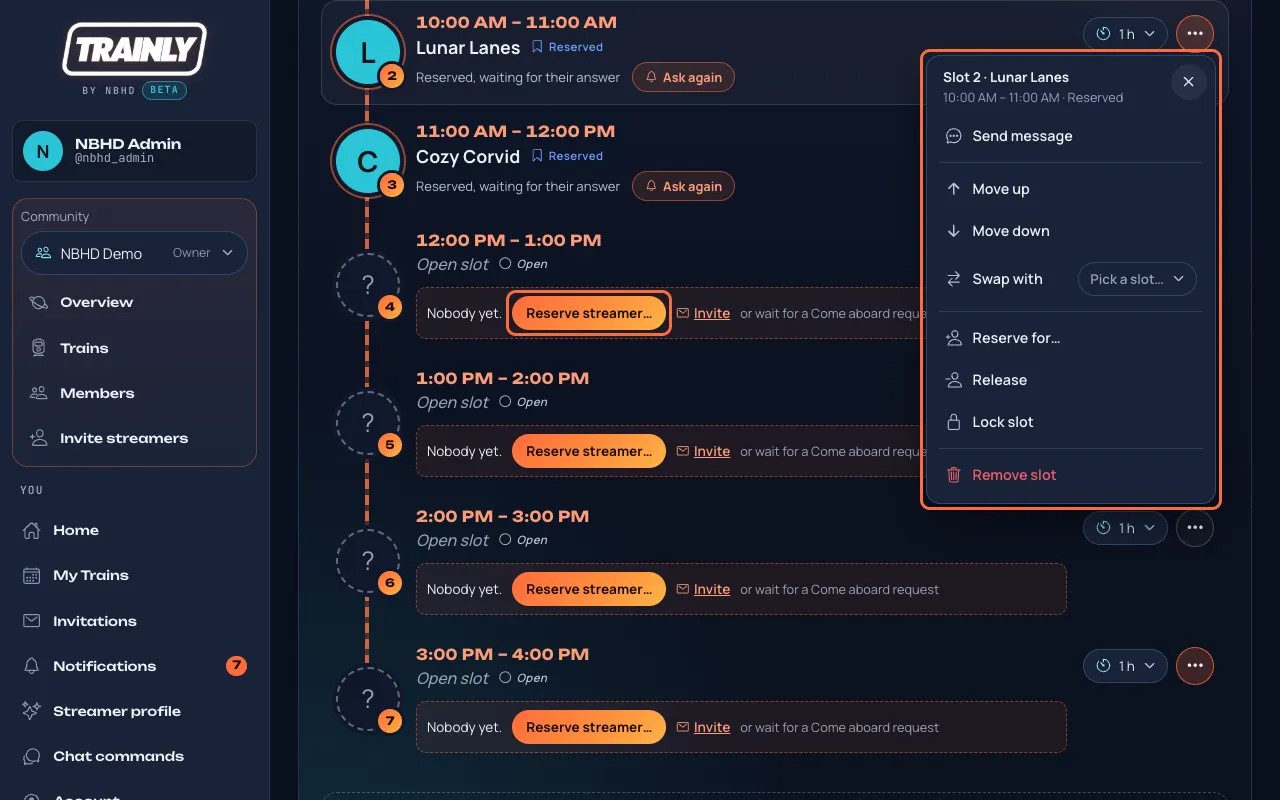
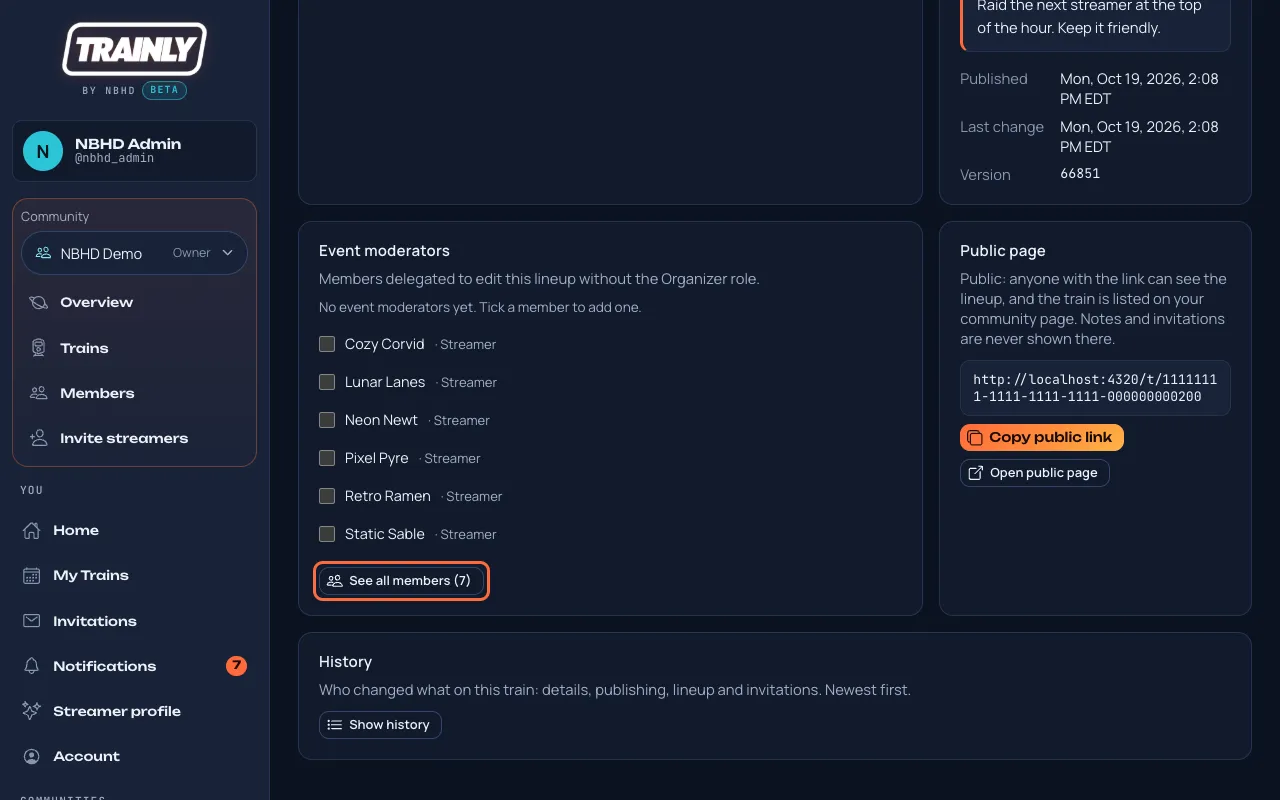
Step 11 · Event moderators: 02:42 If an organizer picks you as an event moderator for a train, you can arrange its lineup too: move slots up or down, swap them, or lock one in place.
You're ready to moderate: 02:55 That's the moderator toolkit. Welcome new members, keep every slot filled, and answer requests quickly. Trainly keeps everyone in the loop, one raid at a time.
Good to know: adding the flyer and lineup command, and creating or publishing trains, is for Organizers and Owners. Moderators edit a lineup only when an organizer picks them as an event moderator for that train. See Roles and permissions.
For streamers
Everything you need to get on a lineup. You only set up your profile once, and it works in every community you join.
Sign in to Trainly
Who: EveryoneAbout 1 minute
Your Trainly account is how communities find you and put you on a lineup. You sign in with your Twitch account, so there is no new password to remember.
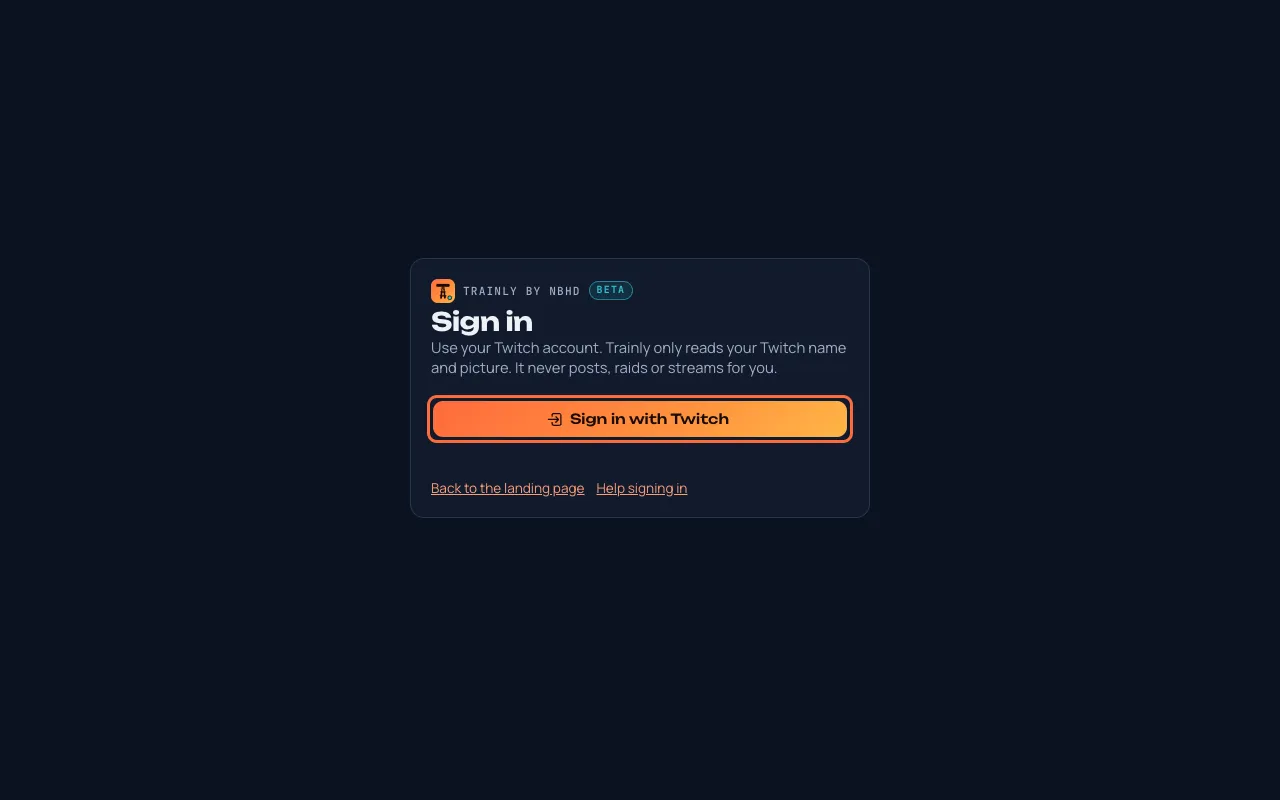
Open Trainly and press Sign in.
Press Sign in with Twitch.
The Sign in page on a Trainly site with Twitch sign-in. Press Sign in with Twitch (outlined in coral).
Twitch opens and asks whether Trainly may connect to your Twitch account. Check that it says Trainly, then approve it. If you aren't signed in to Twitch yet, Twitch asks you to sign in first.
Twitch sends you back to Trainly. You'll see "Signing you in…" for a moment, then Home. The first time, Trainly creates your account with your Twitch name and picture.
What Trainly can see: only your public Twitch name, display name and picture. Trainly never posts, chats, raids or streams for you, and it never sees your Twitch password. See Your Twitch connection to sync or disconnect.
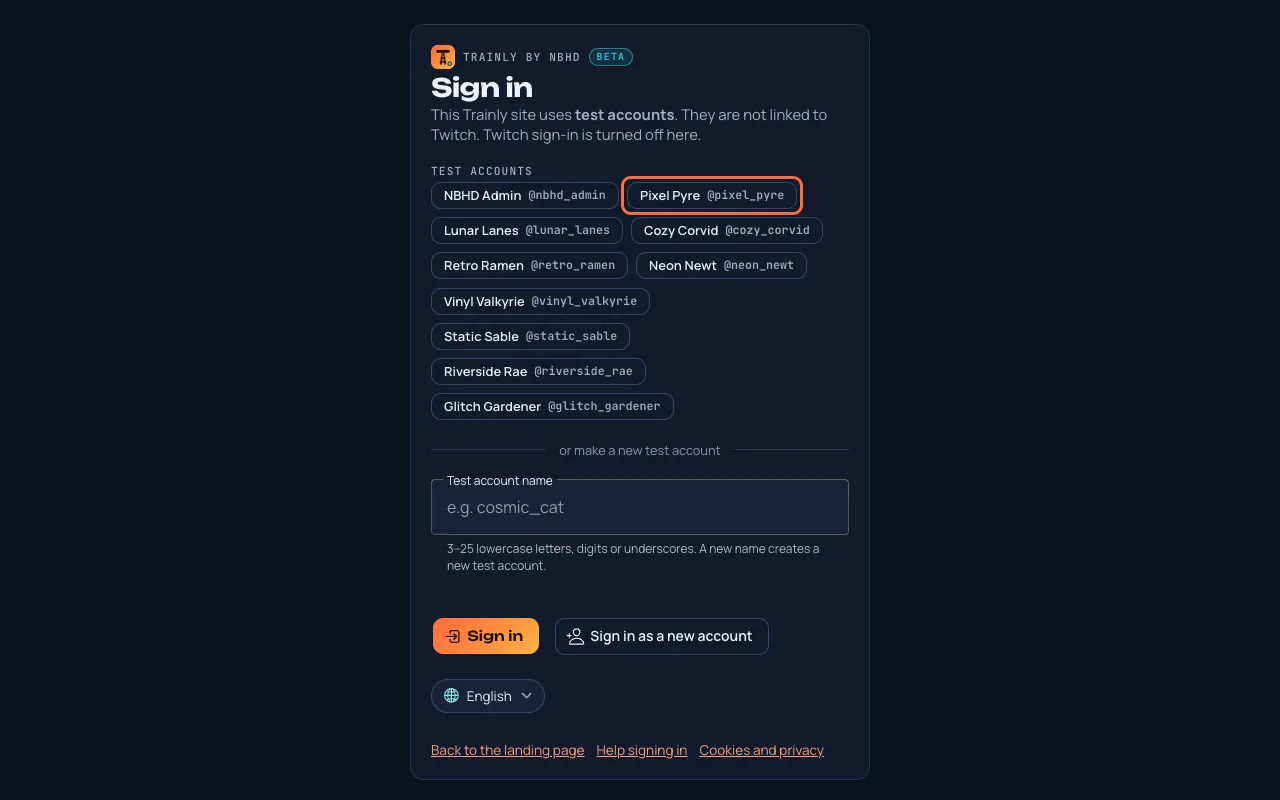
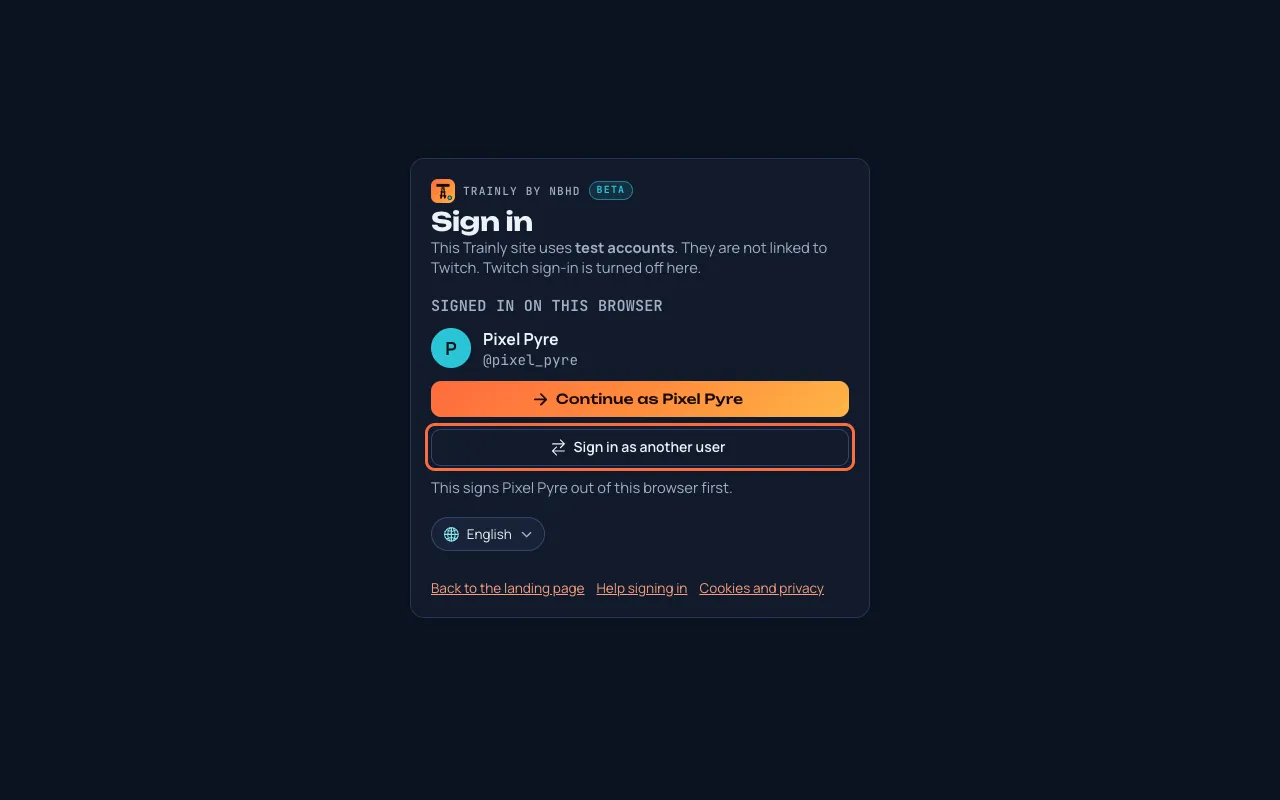
Test sites: some Trainly sites (like the demo) use test accounts instead and say "This Trainly site uses test accounts." There, press one of the names under Test accounts, or type a new name in Test account name and press Sign in. To try Trainly as someone who just arrived, press Sign in as a new account: it makes up a new name (like new_k3x9qa) and signs you in with an empty account. Test accounts are not linked to Twitch and don't carry over to a Twitch sign-in.
The Sign in page on a test site: press a name under Test accounts (one is outlined in coral), or make a new test account.
Didn't work? "Sign-in canceled" means the Twitch page was closed or not approved: press Back to sign in and try again. "This sign-in link has expired" means more than 10 minutes passed, or you finished in a different browser tab: start again from the same tab. "Twitch is not responding right now" means Twitch is having trouble: wait a few minutes. If the page says your session ended, just sign in again.
Your Home page
Who: EveryoneUnder a minute
Home shows your next trains, and shows you the way organizers see you: your picture and name, your Twitch details, your streamer profile, what's left to fill in, and your communities.
Open Home in the menu, or press the Trainly logo.
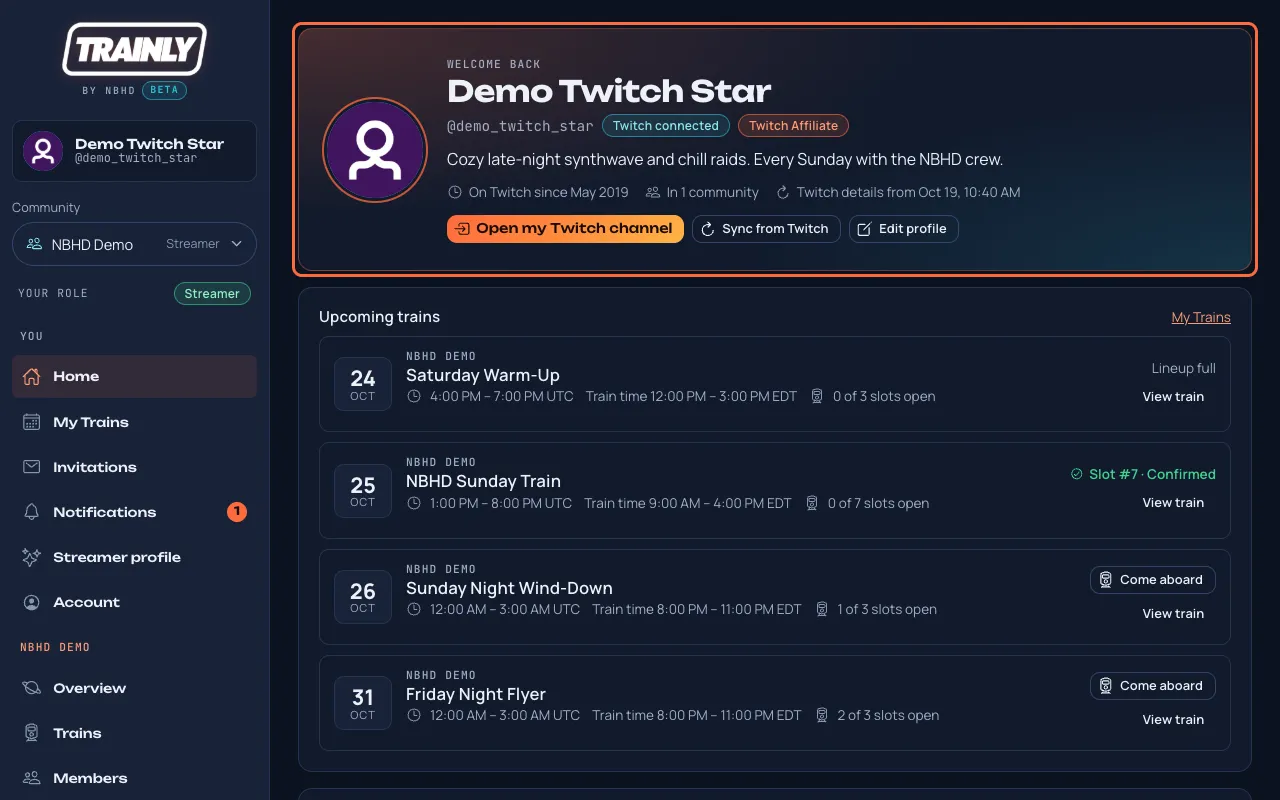
The top box (outlined in coral) comes from your Twitch account. Below it: your streamer profile, the checklist and your communities.
The top box shows your Twitch picture, name, Twitch name, Twitch Affiliate or Twitch Partner if you are one, your Twitch channel bio and since when you're on Twitch.
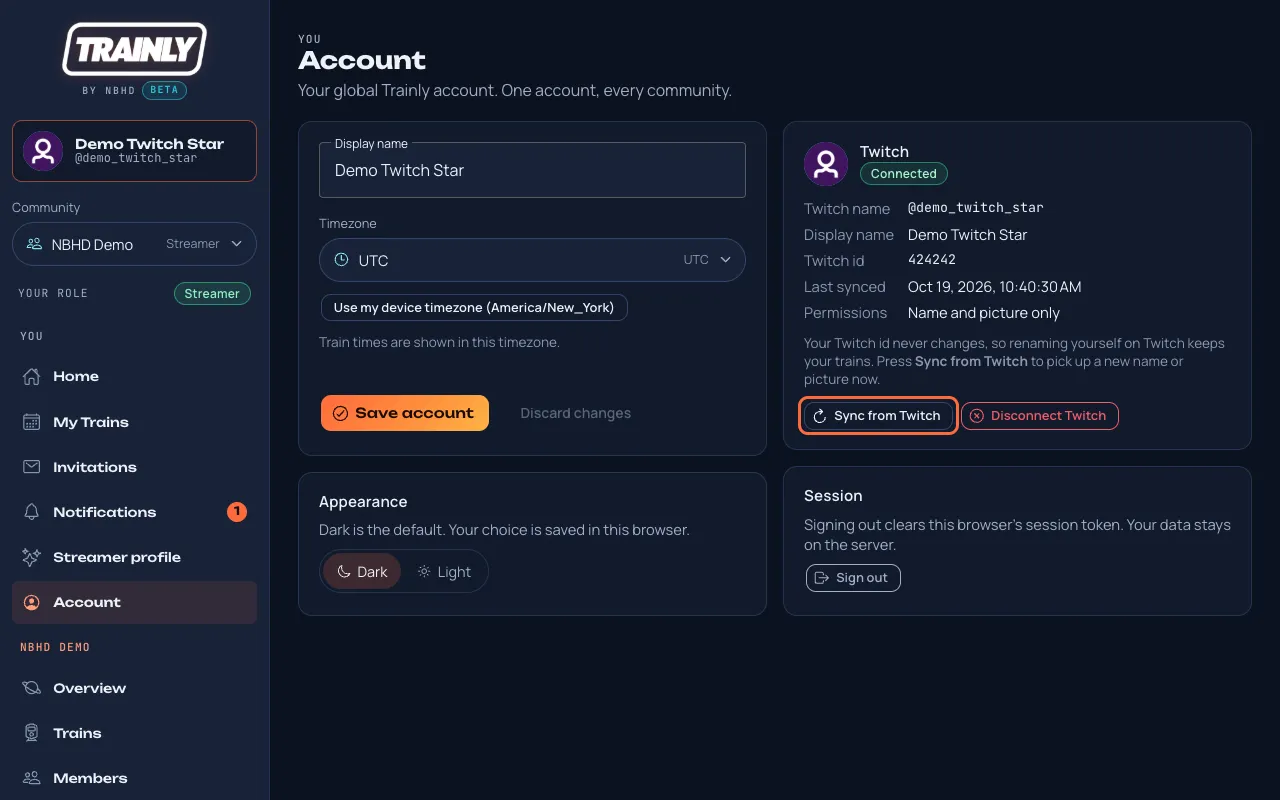
Press Open my Twitch channel to open your channel on twitch.tv, or Sync from Twitch after you change something on Twitch.
Your streamer profile shows your bio, category, language, typical stream length, who can see your profile, and your timezone. Press Edit (or Edit profile) to change them.
No Trainly bio yet? If your Twitch channel has one, Home shows it with a Use my Twitch bio button. Press it to copy that text into your streamer profile; you can edit it later on Streamer profile.
Profile checklist shows how many steps are done, with Set up next to the ones that aren't.
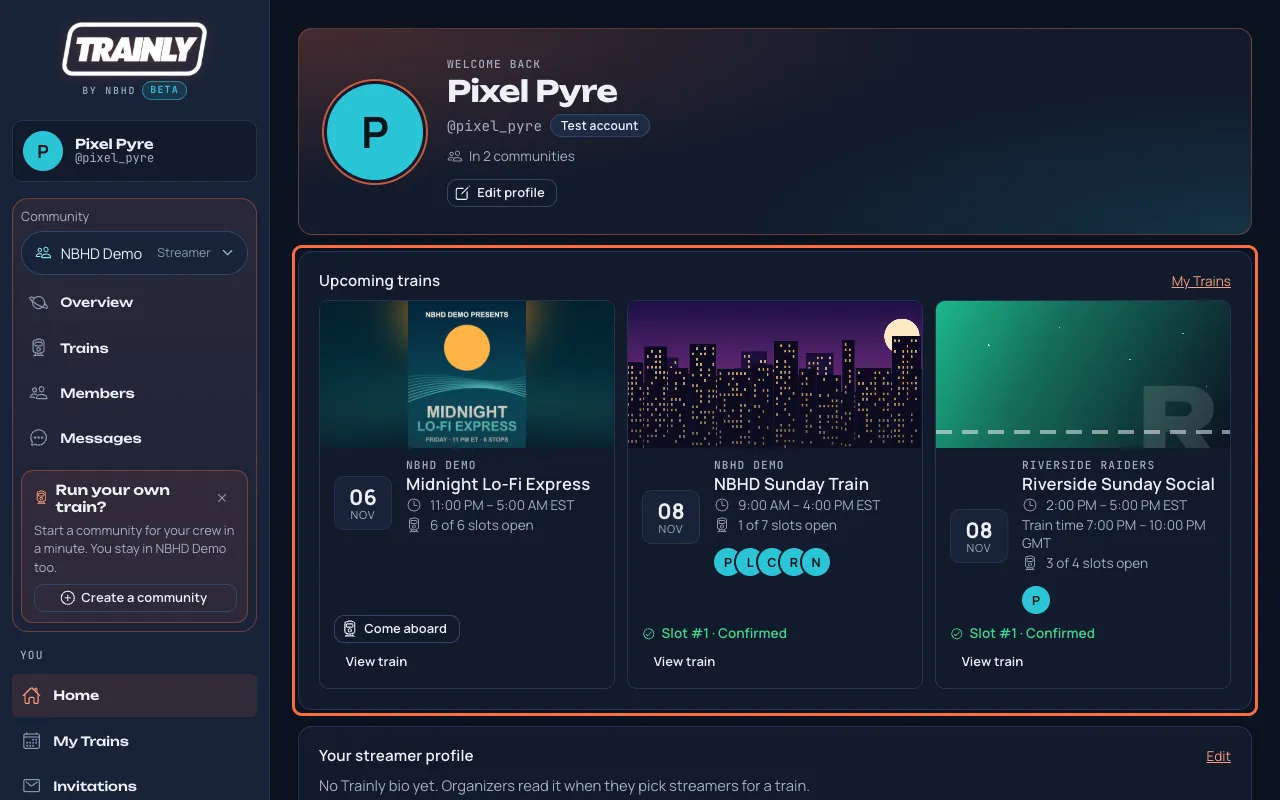
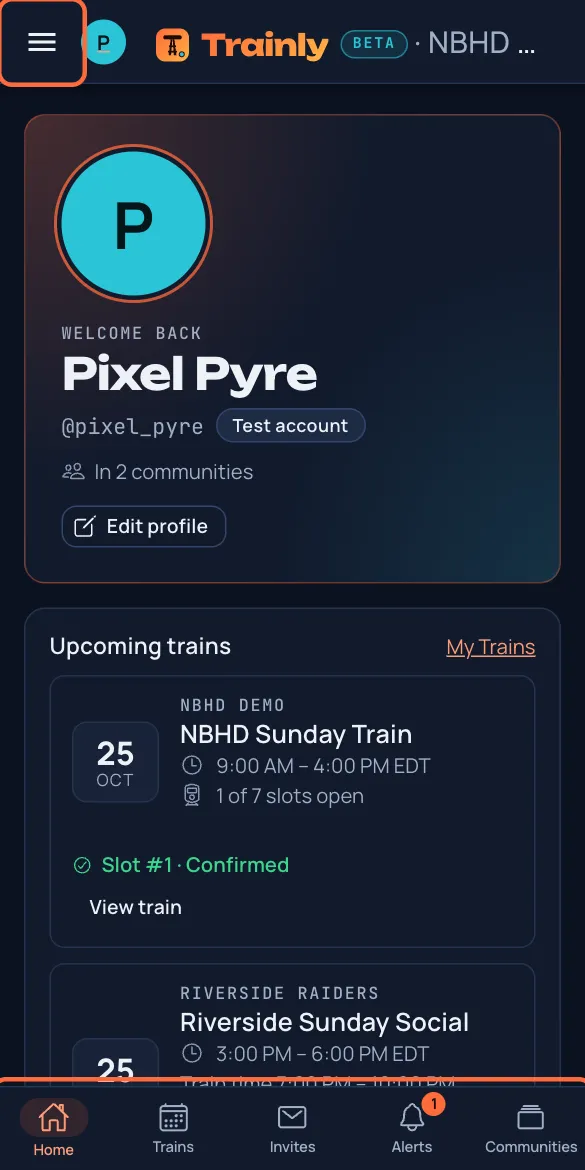
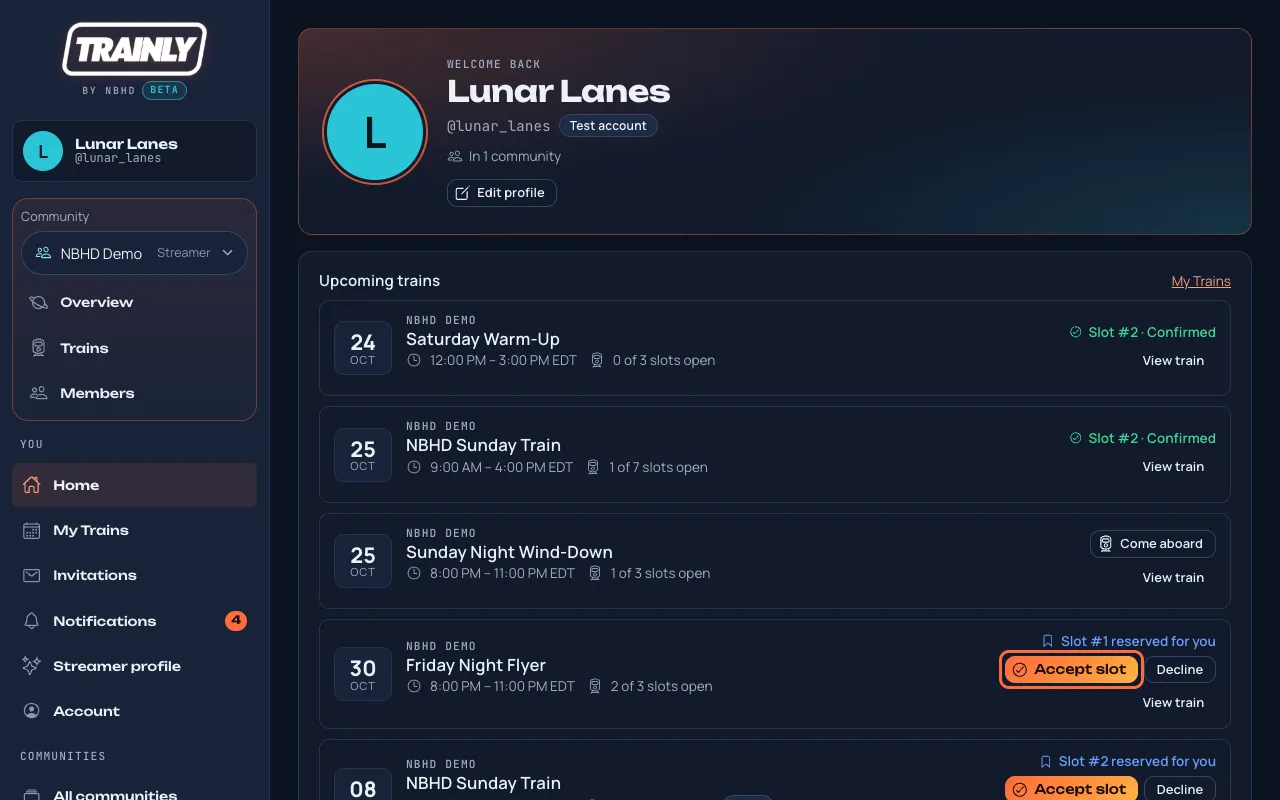
Upcoming trains lists the next published trains in every community you belong to, soonest first, in your time. Each one shows how many slots are still open and where you stand: Slot #… · Confirmed, Slot #… reserved for you with Accept slot and Decline, You asked for slot #…, or a Come aboard button that opens the train. Press View train or the title to open the train page. Under each train you see the pictures of its confirmed streamers (+ for the rest), and while it runs, On now: who is streaming.
Upcoming trains on Home (outlined in coral): the next trains across your communities, with your slot if you have one, or Come aboard to ask for an open slot.
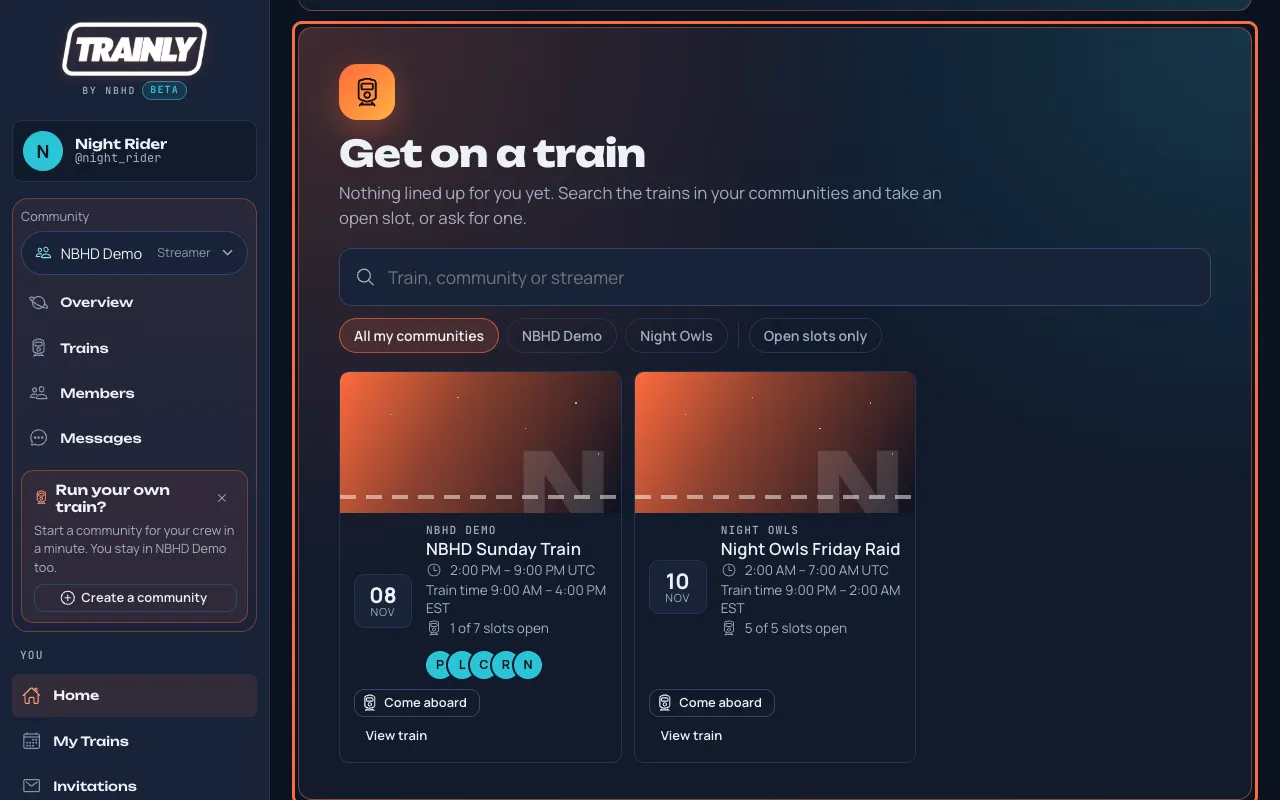
Nothing lined up yet? If you're in a community but have no slot, invitation or request in any upcoming train, Upcoming trains becomes Get on a train: type in the search box to find a train by its name, its community or a streamer in it, press a community to see only its trains (when you're in more than one), or press Open slots only. Then press Come aboard or Take a slot on a train.
Get on a train (outlined in coral) replaces Upcoming trains until you're in a train.
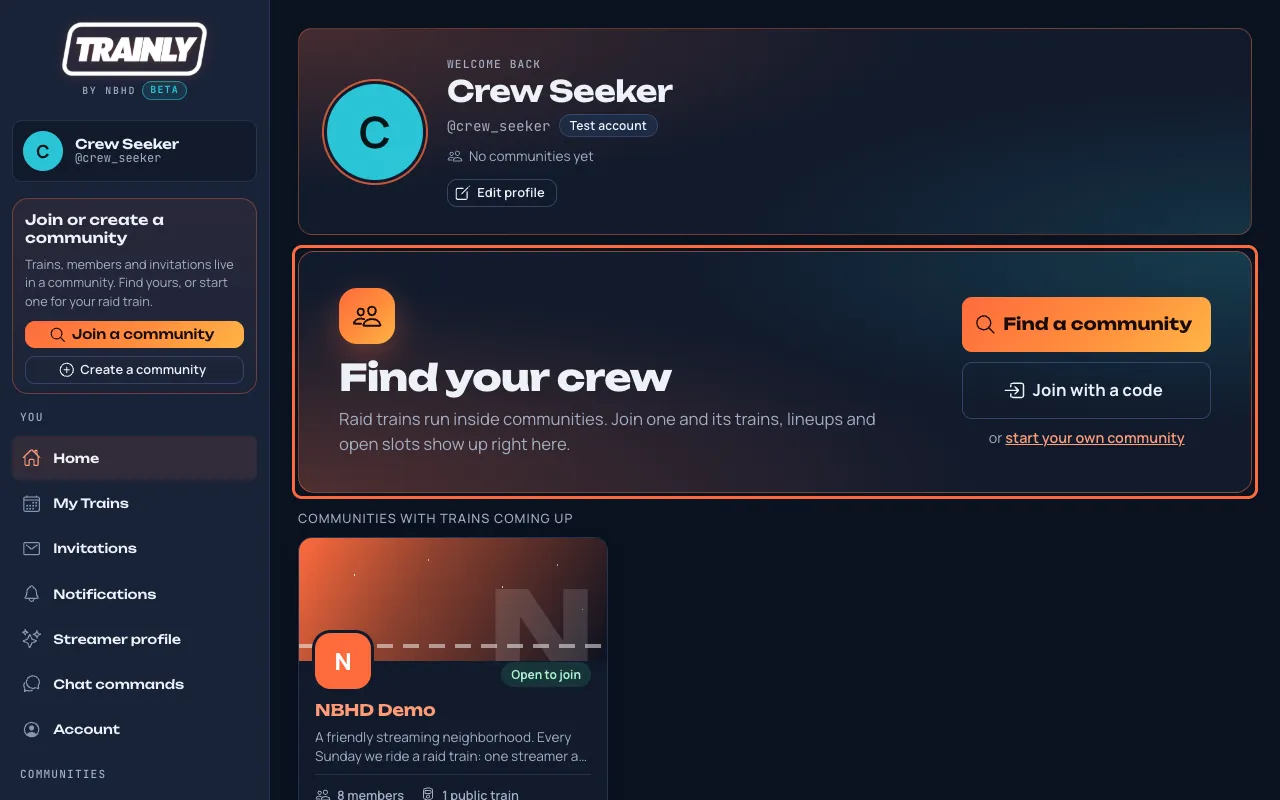
Not in any community yet? Home shows Find your crew instead: press Find a community to browse every listed community, Join with a code if someone gave you one, or start your own community. Underneath, a few active communities you can open right away.
Find your crew (outlined in coral) when you're in no community yet.
Always visible: your picture and name sit at the top of the menu on every page (on a phone, your picture is next to ☰). Press them to open Account. Test accounts show the first letter of the name instead of a picture.
Read only: Trainly only reads your public Twitch details. Nothing on Home changes anything on Twitch.
Fill in your streamer profile
Who: StreamersAbout 3 minutes
Organizers read your profile when they pick streamers for a train. A complete profile gets you picked faster.
In the menu, open Streamer profile. On a phone it is in the bar at the bottom of the screen.
Fill in what you can:
Bio: what you stream and what raiders should expect.
Category / genre: for example "Just Chatting" or "Rhythm games".
Preferred language: pick one of Trainly's languages. Trainly opens in it on any phone or computer where you haven't picked a language (more).
Typical stream duration: in minutes, for example 120 for two hours. Leave it empty if it changes a lot.
Profile visibility: who can see your profile (see the tip below).
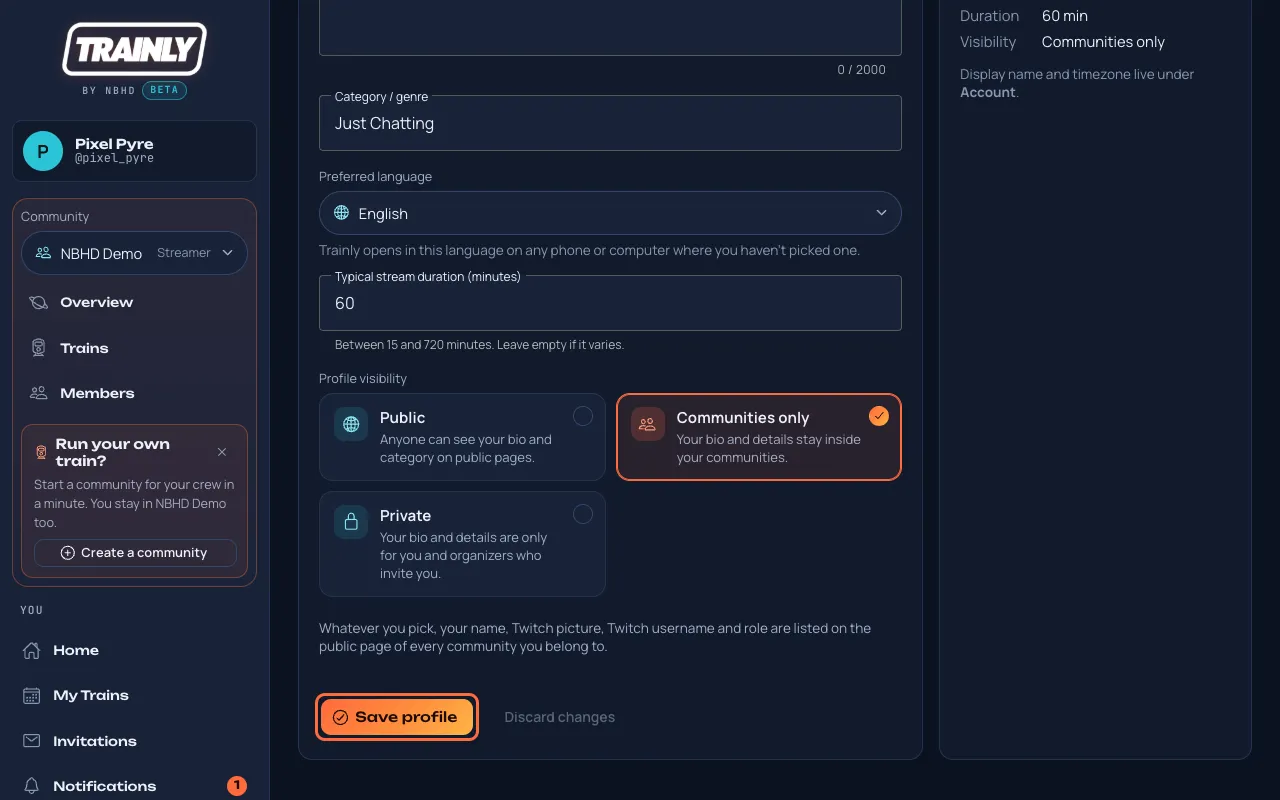
Press Save profile. You'll see "Profile saved", and the box on the right shows how organizers see you.
The Streamer profile page. Fill in the boxes, then press Save profile (outlined in coral). The box on the right, How organizers see you, updates after you save.
Which visibility should I pick?Communities only is the safe default: only communities you belong to see your profile. When you accept a slot in a train that has a public page, your name and Twitch username appear in its lineup. Public also shows your category there, and your bio on the public page of every community you belong to. Private hides your name in public train lineups: they just say "Confirmed streamer".
On your community's public page: every member is listed there with their name, Twitch picture, Twitch username and role, whatever visibility you pick. Only Public adds your bio. Leaving the community takes you off its page.
Changed your mind? Press Discard changes before saving to go back to what was saved.
Trainly is dark by default. If you prefer a light screen, for example in daylight, switch it with one press.
At the bottom of the menu, under Help center, press Light mode. Press Dark mode in the same place to go back. On a phone, press ☰ first.
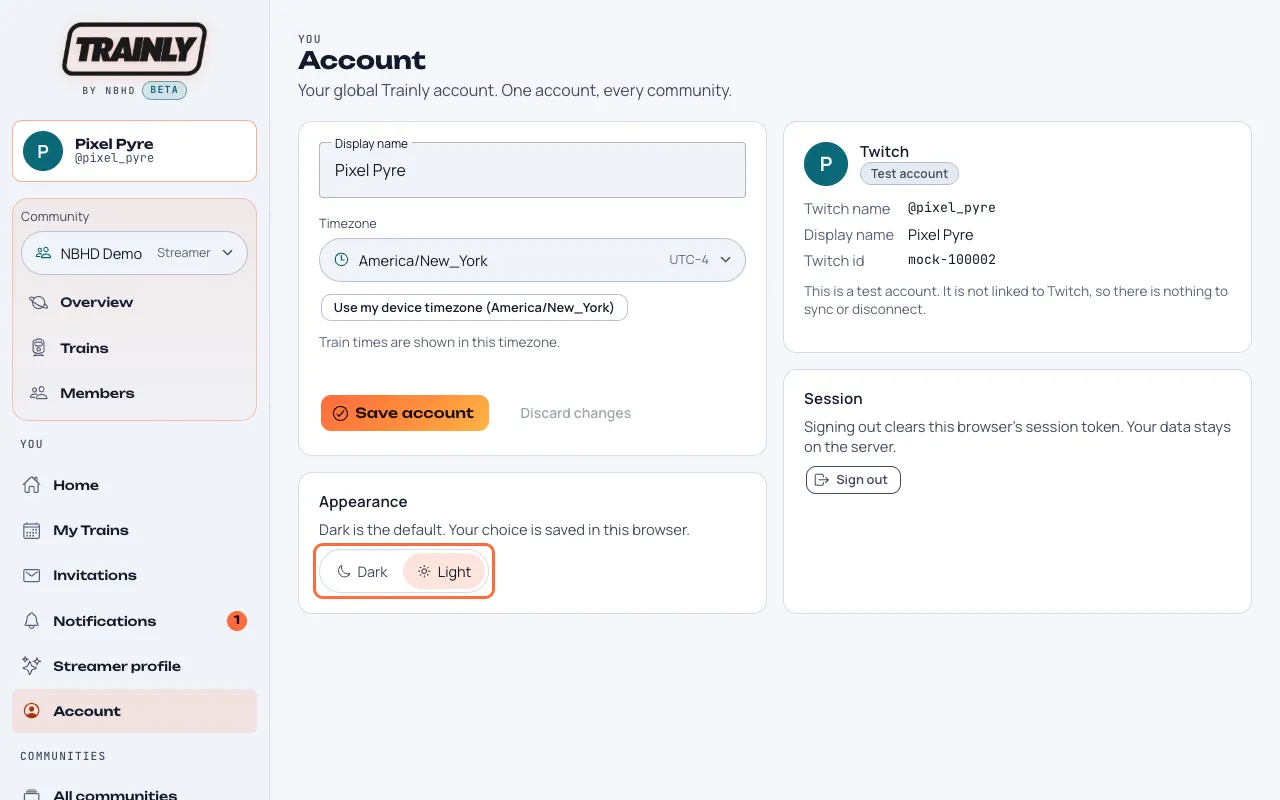
Or open Account and pick Dark or Light under Appearance.
The Appearance choice on the Account page (outlined in coral), here set to Light.
Good to know: your choice is saved in the browser you use, so each phone or computer remembers its own. Public train pages you open in that browser follow it too; this help center keeps its own look.
Change the language
Who: EveryoneA few seconds
Trainly works in English, Spanish, French, German, Japanese and Portuguese. Pick the one you read best and every screen, button and message switches to it.
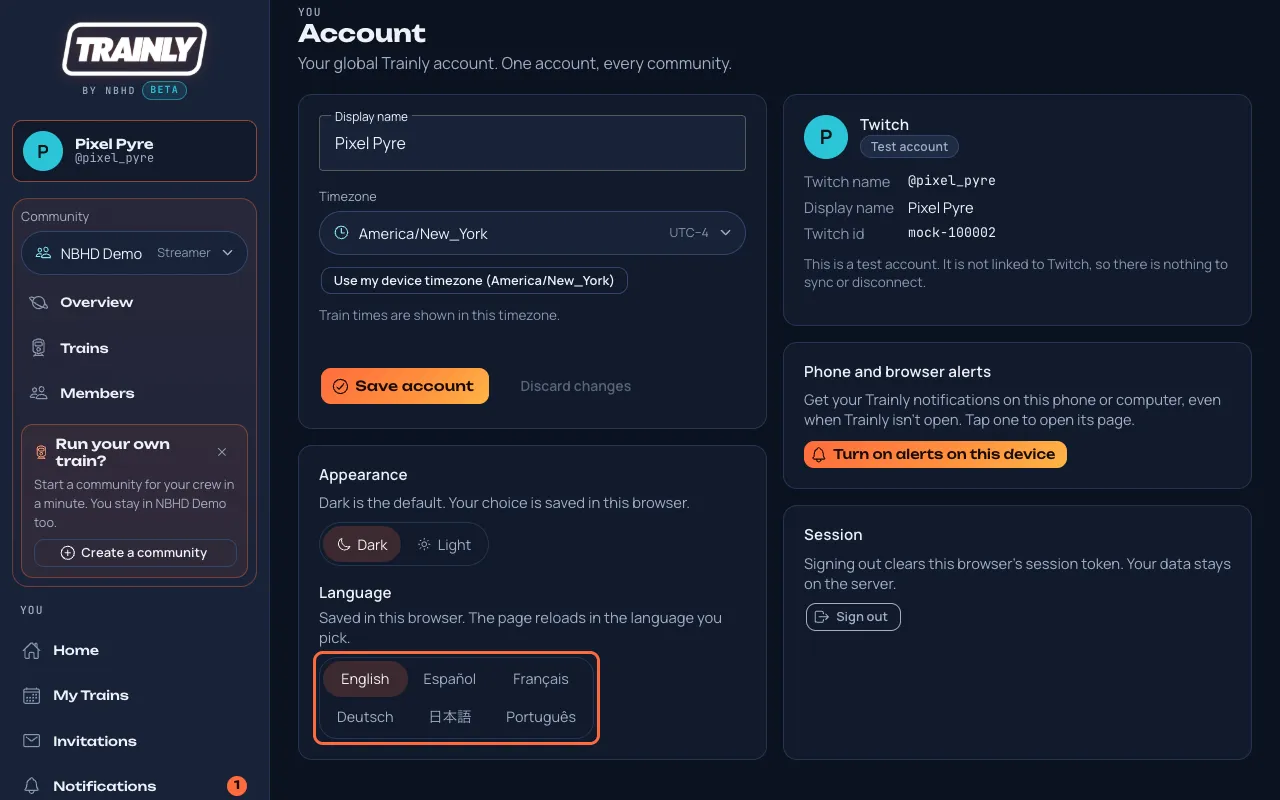
At the bottom of the menu, under Help center, open the language list (🌐) and pick yours: English, Español, Français, Deutsch, 日本語 or Português. The page reloads in that language. On a phone, press ☰ first.
Or open Account and, in the Appearance box under Language, press the language you want.
The Language choice on the Account page (outlined in coral). Each language is written in its own language, so you can find yours whichever one is showing.
Not signed in yet? The sign-in page (under the sign-in buttons) and the bottom of the front page have the same language list.
Good to know: your choice is saved in the browser you use. If your browser is set to one of these languages, Trainly starts in it until you pick one. Help center opens this help center in the same language, and the top of every help page lists all the languages. If your browser also lists another of these languages, Trainly offers it once in a small note at the top, written in that language.
Your profile's language: the Preferred language in your streamer profile is the one Trainly uses on any phone or computer where you haven't picked a language. Changing it there also switches the browser you're using; the list at the bottom of the menu and the Account buttons change this browser only. If you filled in the old Primary language box, that language is shown here but doesn't change Trainly's language until you choose a language in Preferred language and press Save profile (choosing the one already shown counts).
What stays the same: names people typed (communities, trains, bios) are never translated. The posts Trainly makes in Discord are still in English for now.
Cookies and privacy
Who: EveryoneA minute
Trainly doesn't use cookies, ads or tracking. It only remembers your sign-in and a few settings in the browser you use.
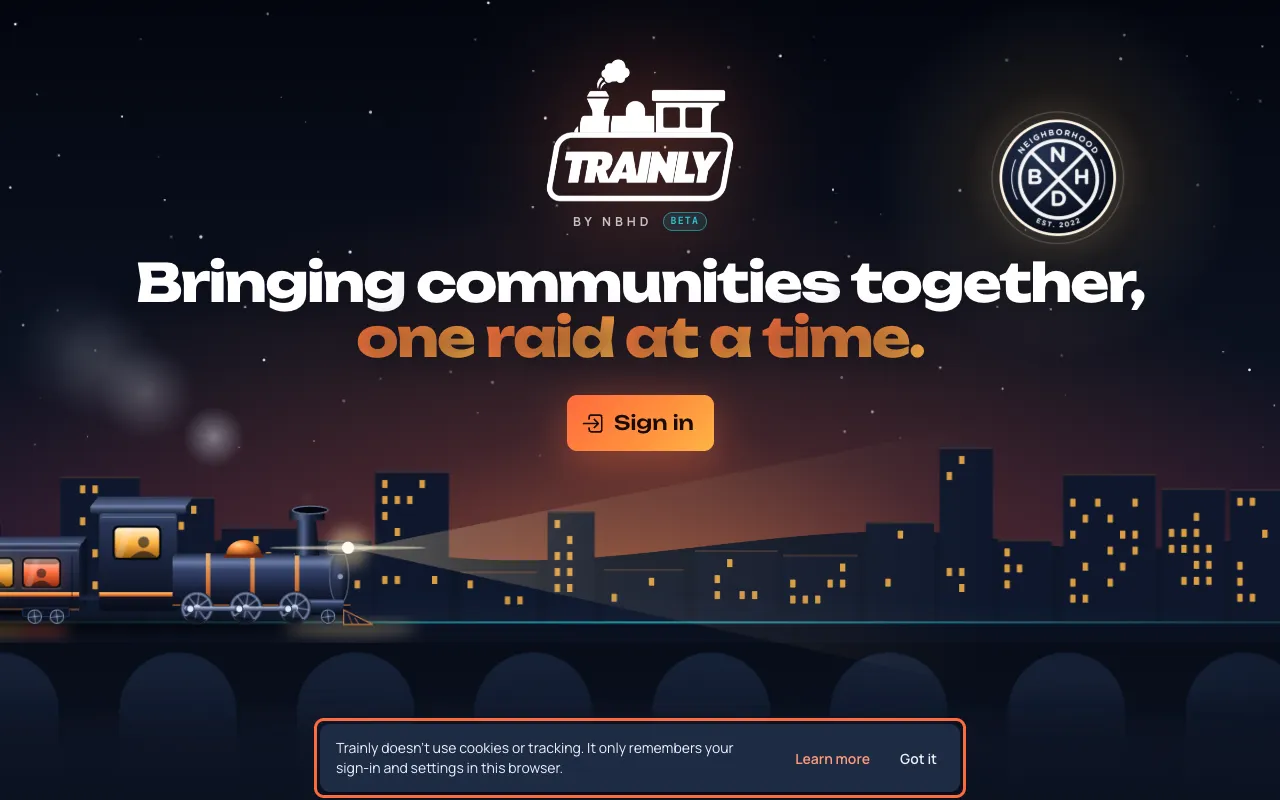
The first time you open Trainly in a browser, a small note at the bottom says so. Press Got it to close it, or Learn more to read the details. It doesn't come back in that browser.
The one-time note at the bottom of the screen (outlined in coral).
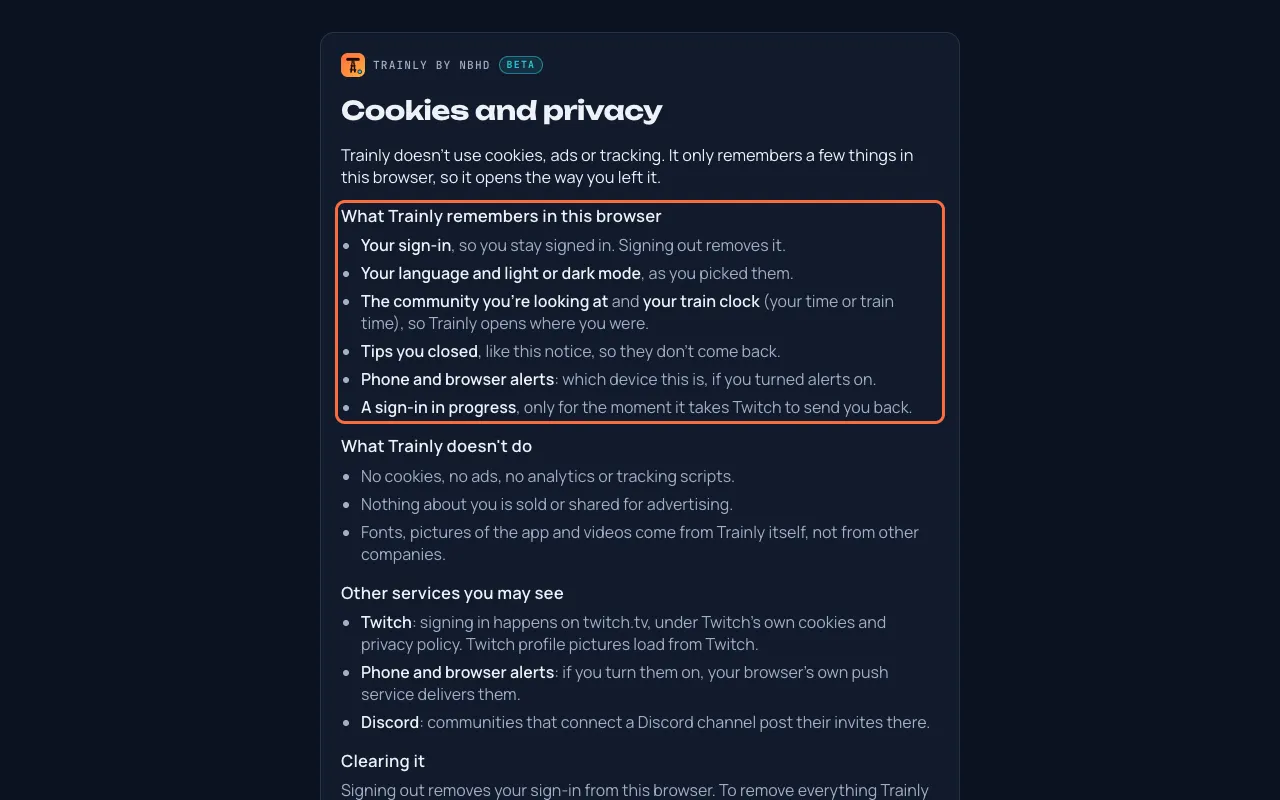
To read it again later, press Cookies and privacy at the bottom of the front page or on the sign-in page.
The Cookies and privacy page: what Trainly remembers in this browser (outlined in coral), what it doesn't do, and how to clear it.
What Trainly remembers: your sign-in, your language and light or dark mode, the community you were looking at, your train clock, tips you closed, and which device gets alerts if you turned them on. Signing out removes your sign-in; to remove everything, clear this site's data in your browser's settings.
Other services: signing in with Twitch happens on twitch.tv, under Twitch's own cookies and privacy policy, and Twitch profile pictures load from Twitch. Phone and browser alerts are delivered by your browser's own push service. Nothing about you is sold or shared for advertising.
Set your timezone and display name
Who: EveryoneAbout 1 minute
Trainly shows train times in your timezone, so you never have to do time math. New accounts start on UTC, which is probably not where you live.
In the menu, open Account.
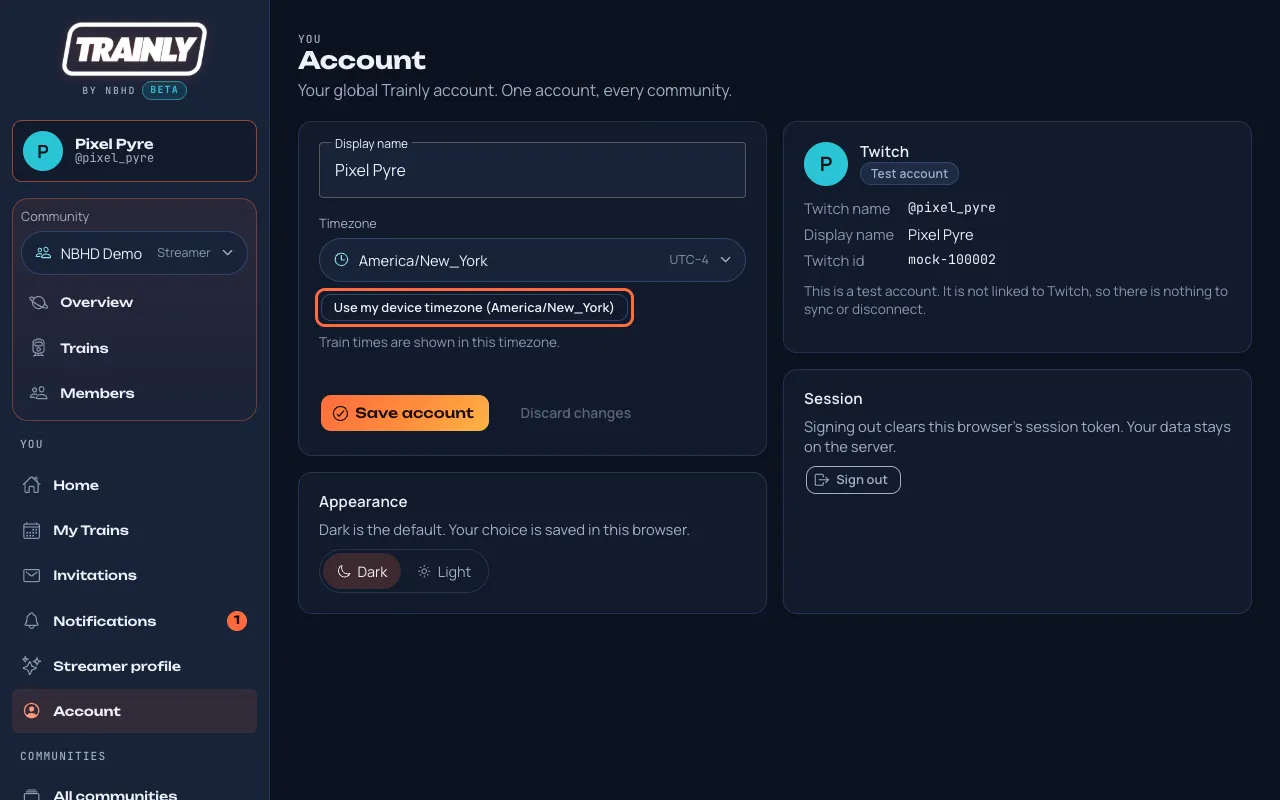
Press Use my device timezone. This picks the timezone your computer or phone is set to. You can also press the Timezone button and pick one: type a city or region (for example new york) to find it, and each one shows its time difference from UTC, for example America/New_York UTC−4. On a phone the list slides up from the bottom of the screen: press Close at its top right (or tap the page above it) to go back without changing anything.
The Account page. The button outlined in coral also shows which timezone your device uses, here America/New_York. Press Save account below it when you're done.
Change your Display name if you like. This is the name organizers see.
Press Save account.
Tip: timezones are listed as Region/City. Pick the big city that shares your clock, for example America/Chicago for Central time in the US.
Join a community with its code
Who: StreamersAbout 1 minute
Every community has a short code, like nbhd-demo. Your organizer will share it with you.
Got a join link (it looks like …/join/nbhd-raid-train)? Just open it. If you're not signed in yet, sign in with Twitch and Trainly brings you straight back with the code filled in; skip to step 4.
Got a code instead? In the menu, open Join by invite code. You can also press Join with a code on your Home page while you're in no community.
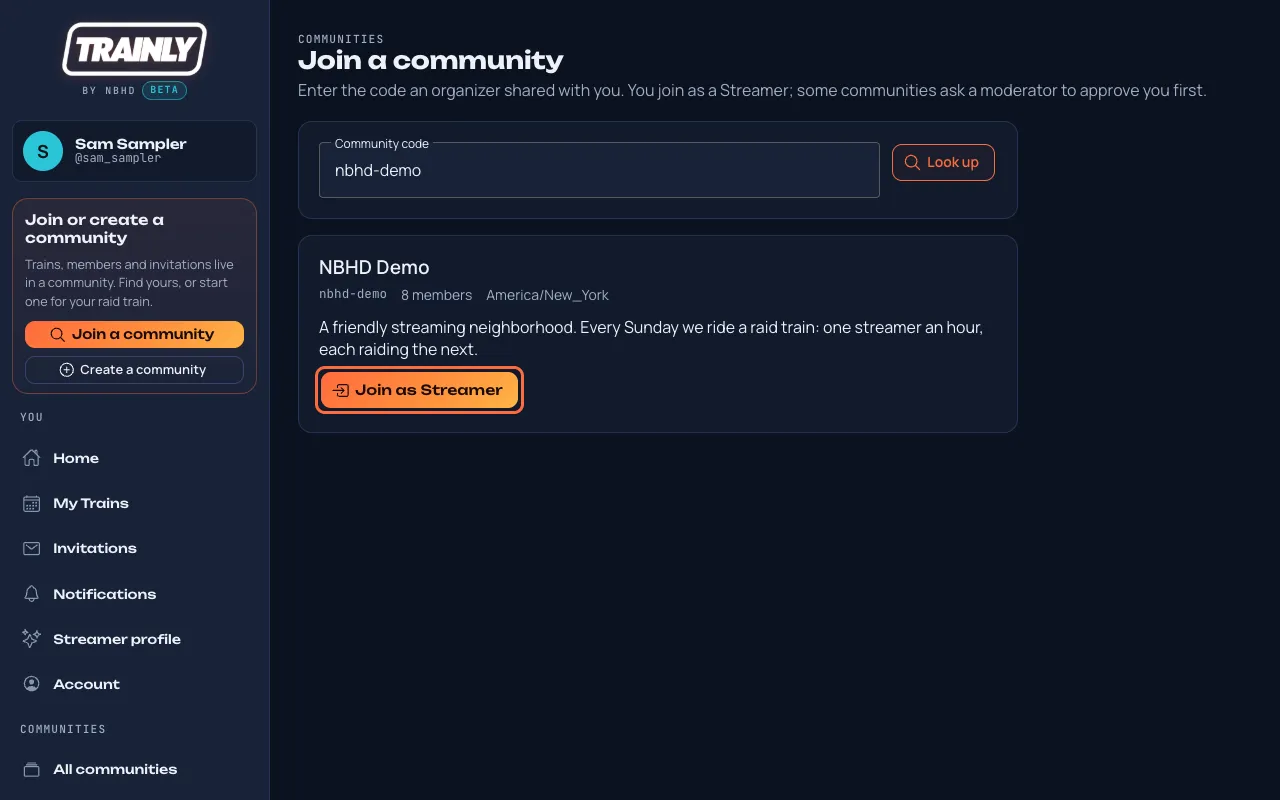
Type the code into Community code and press Look up.
Check the name and description so you know it's the right community.
Press Join as Streamer. Not a streamer, but here to help run the trains? Press Join as Crew instead (what Crew is). You'll see a welcome message and the community's page.
After Look up, the community's card appears so you can check it's the right one. Then press Join as Streamer (outlined in coral).
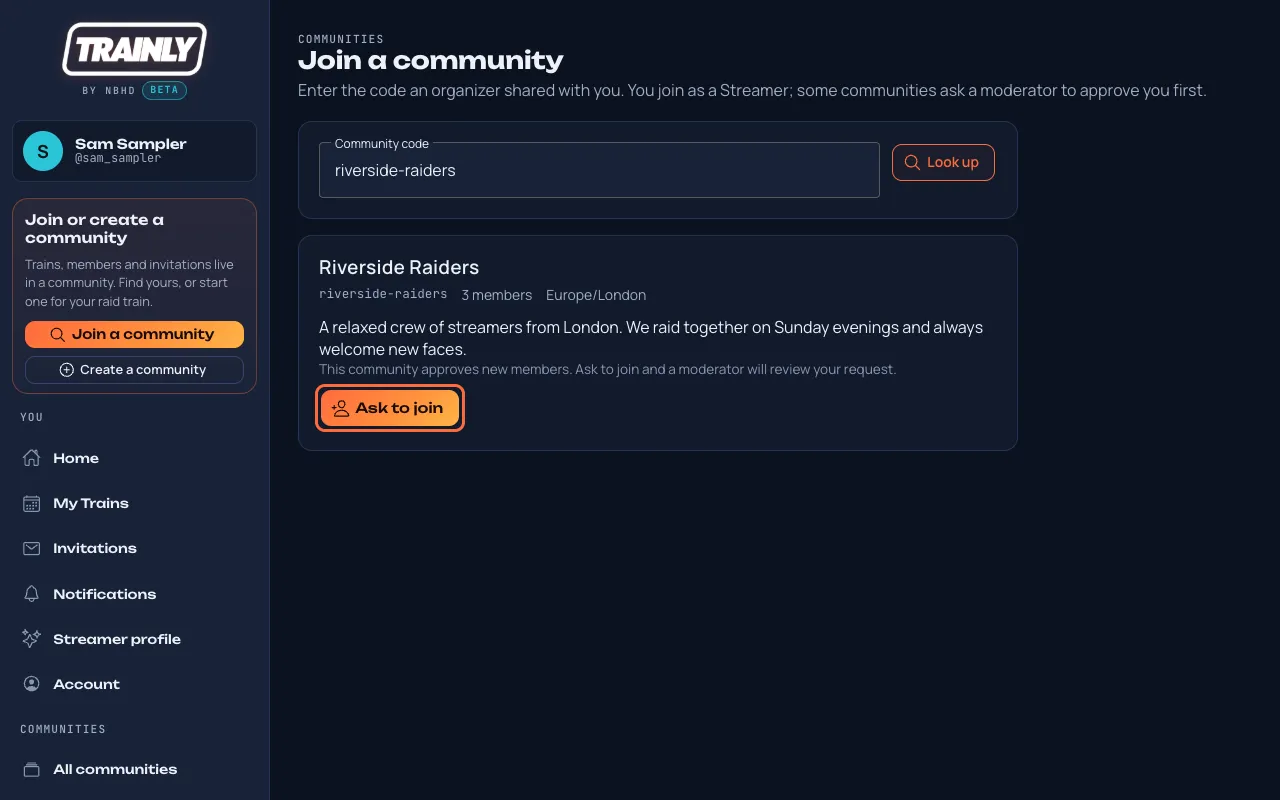
Some communities check new members first. Then the buttons say Ask to join and Ask to join as Crew instead. Press one and you'll see "Request sent". A moderator of that community decides, and you get a notification either way.
A community that approves new members: press Ask to join (outlined in coral) and wait for a moderator.
Tip: capitals don't matter. NBHD-Demo and nbhd-demo are the same code. Don't have a code? Find the community by its name instead.
"No community with that code"? Check the spelling with your organizer. Codes use letters, numbers and dashes only, with no spaces. If it says you are already a member, you're all set; press Open community. If it says "This community isn't accepting new members right now", its owner has closed joining; ask one of its organizers.
Help as Crew (you don't stream)
Who: EveryoneUnder a minute
Crew is for people who help run the trains but don't stream: helpers, chat regulars, friends of the community.
When you join (with the code, a join link, the community's window or an invite), press Join as Crew instead of Join as Streamer. Already a member? An Owner can change your role to Crew on Members.
As Crew you see everything a Streamer sees, and also the community's draft trains, read only, so you can help get them ready.
You're never put in a lineup: nobody can reserve or invite you for a slot, and Come aboard isn't offered to you.
Need to edit one train's lineup? An organizer can pick you as an event moderator of that train.
You can send a message to anyone on a train's lineup: press ⋯ on their stop, then Send message.
Good to know: Crew is listed in the community's Team on its public page. To start streaming later, ask an Owner to make you a Streamer. An Owner can only make someone Crew when they have no slots, invitations or requests on upcoming trains.
Find a raid train to watch or join
Who: Everyone, no account neededUnder a minute
See the public trains of every community on Trainly in one place, in your own time.
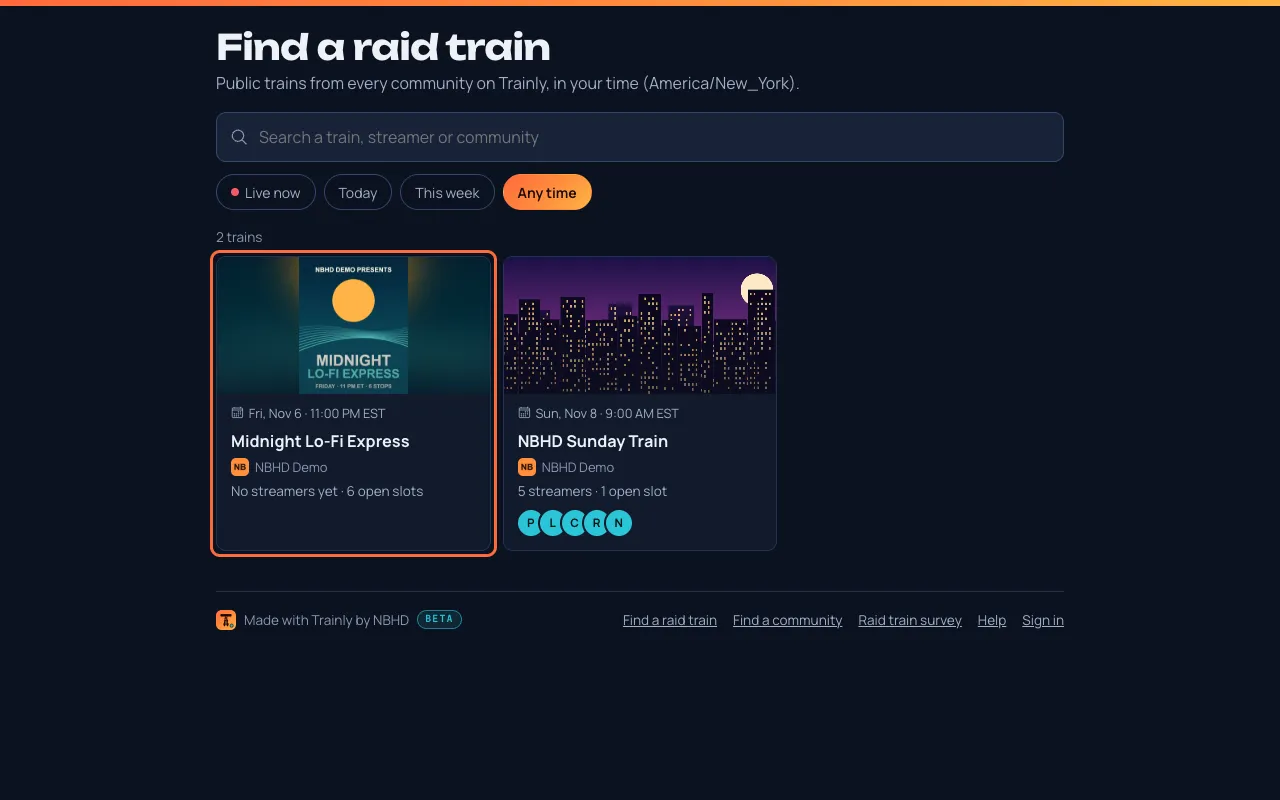
Open Find a raid train: from the front page press Find a train to watch, in the app use Find a raid train under Communities in the menu, or follow the link at the bottom of any public page.
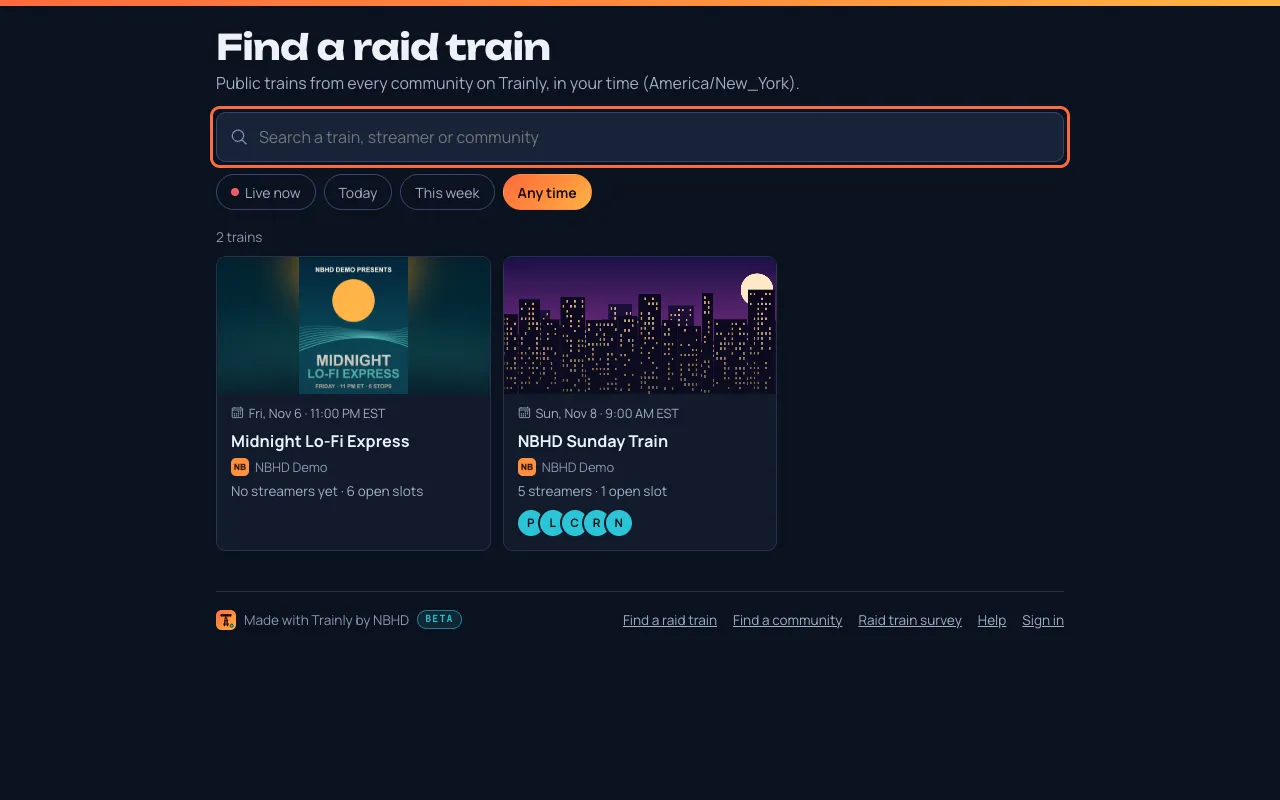
Type a train's name, a streamer's name or a community in the search box. Leave it empty to see everything.
Narrow it down with Live now, Today, This week or Any time. Live now shows how many trains are running.
Search a train, streamer or community (outlined in coral) and pick when.
Press a train to open its public page with the lineup and both times. Running trains come first and say who is on now; press Show more trains at the bottom for more.
What's listed: only trains a community made Public and published, from now on. Trains shared only by link (Unlisted), Private trains and drafts never appear, and streamers whose profile is Private are counted but never named or found by name. The link of a search, like /trains?q=nbhd, can be shared.
Find a community and ask to join
Who: StreamersAbout 1 minute
No code? Browse every community on Trainly as cards, read what each one is about, and ask to join from its card.
Open All communities in the menu (Communities in the bar at the bottom on a phone). If you already belong to a community, the page opens on Your communities: press Discover to see every community.
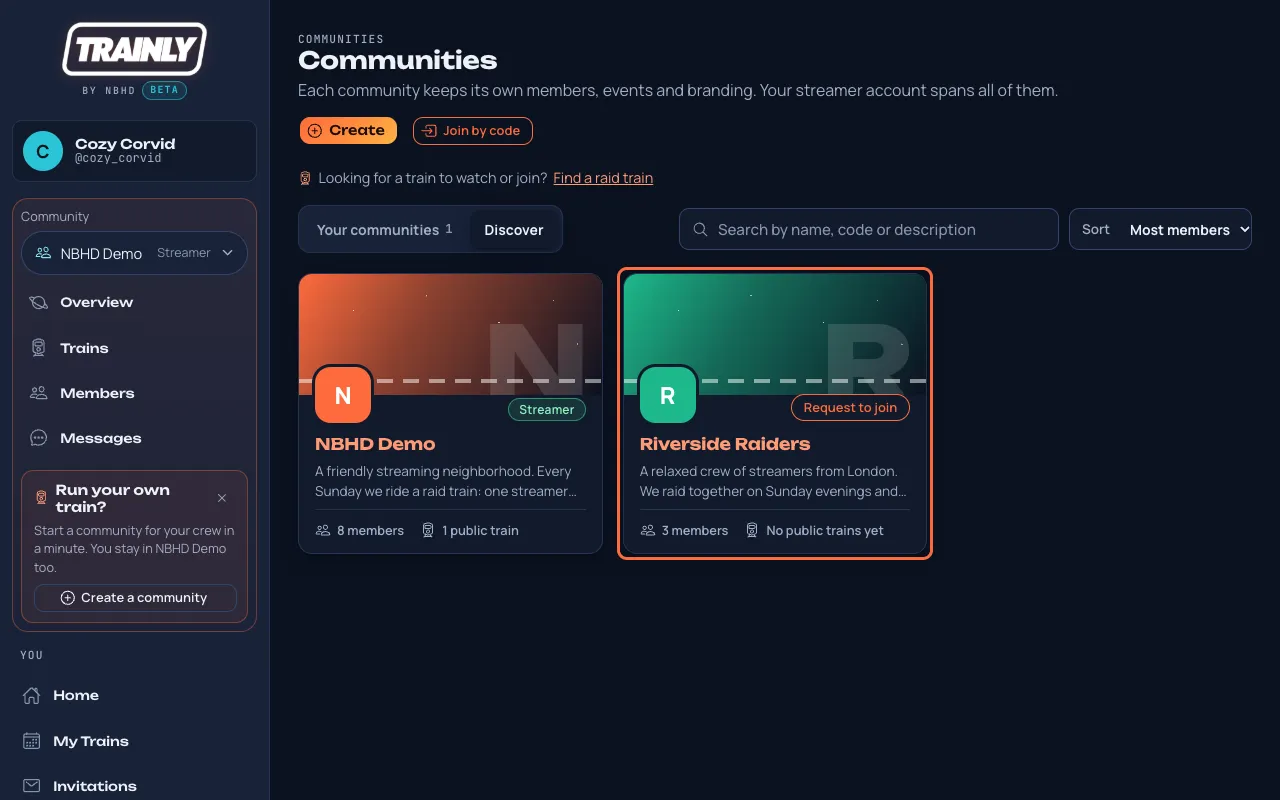
Each card shows the community's banner, logo and name, the start of its description, how many members it has and how many public trains are coming up. To narrow the list, type part of a name, code or description in the search box, or change Sort to Most members, Most trains, Newest or A to Z. Show more under the cards loads the next ones.
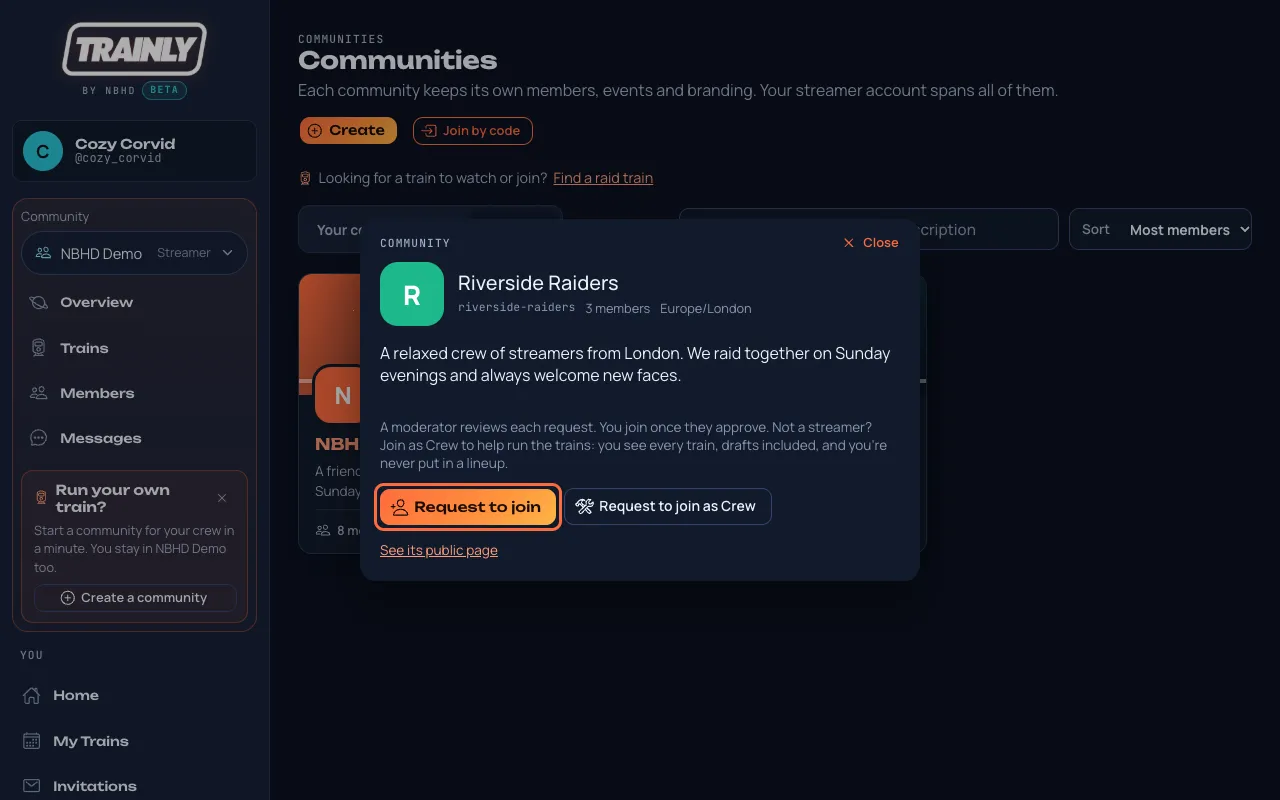
Discover shows every community as a card. Riverside Raiders (outlined in coral) checks new members, so its button says Request to join.
Next to the logo, each card shows where you stand: your role if you're a member, Join if anyone can join, Request to join if a moderator checks new members, Request sent while your request waits, or Invite only. Press that button, or the community's name, to open its window with its logo, code, member count, timezone and full description.
Press Request to join. A moderator of that community reviews your request; you see "Request sent" and get a notification when they decide. Communities that are open to everyone show Join community instead: press it and you're in as a Streamer right away. Next to it, Request to join as Crew or Join as Crew does the same as Crew.
The community's window. This one checks new members, so the button (outlined in coral) says Request to join; communities that are open to everyone say Join community.
Good to know: pressing a community you're already in opens it straight away. A community that hasn't uploaded a banner shows its logo repeated over its color, or just its color and first letter when it has no logo. "Public trains" are the upcoming trains anyone can see on the community's public page; drafts and unlisted trains aren't counted. If you're a member, the banner also says how many people in that community are live on Twitch right now. See its public page in the window shows the community's upcoming public trains.
"No community matches …"? Check the spelling, or ask the organizer for the community's code and use Join a community with its code. "This community isn't taking requests right now"? It only lets people in with a personal invite; ask one of its organizers to invite you by your Twitch name.
Browse communities without an account
Who: Everyone, no account neededAbout 2 minutes
Anyone can look around the communities on Trainly before signing in, then join one with their Twitch account.
On the Trainly front page, scroll to Find your crew and press See all communities. You can also press Find a community at the bottom of the front page or of any public page.
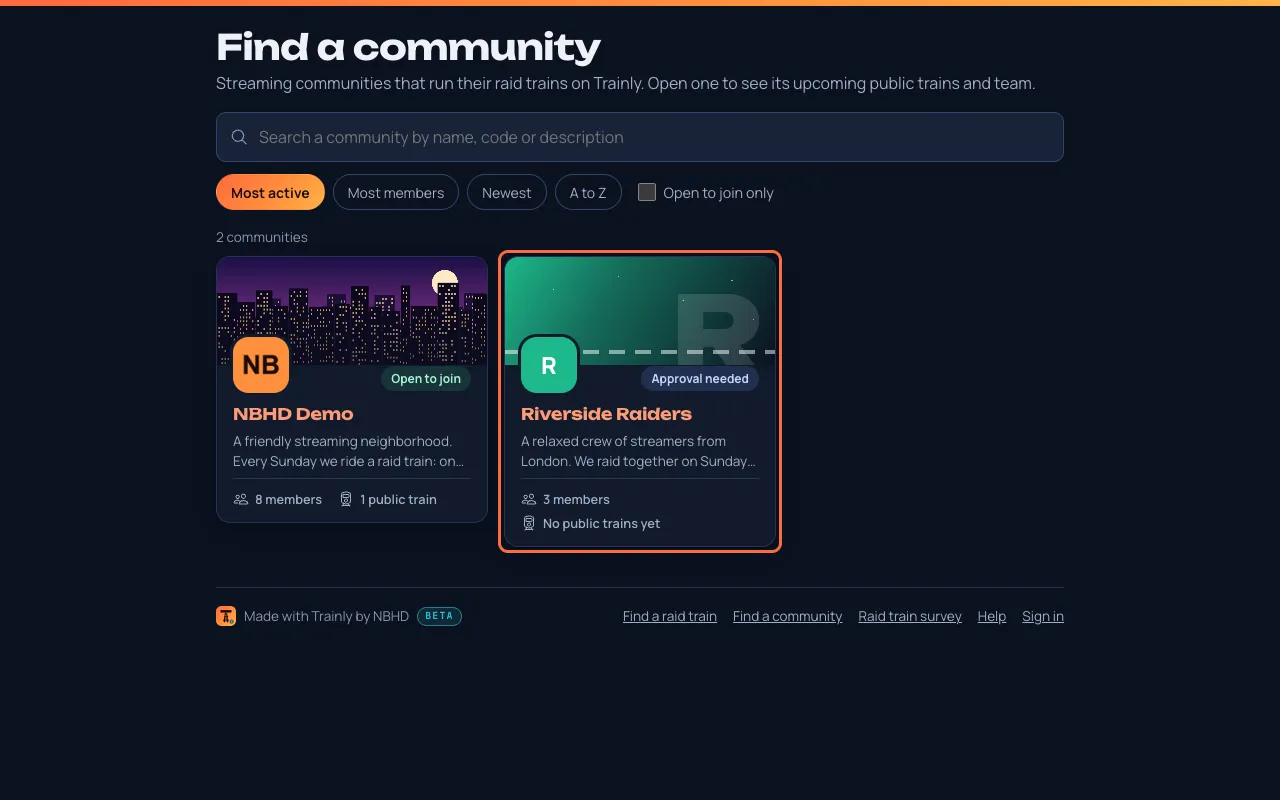
Search by name, code or description, pick Most active, Most members, Newest or A to Z, or tick Open to join only. Each card shows the community's banner, logo, description, members and upcoming public trains, how it takes new members (Open to join, Approval needed or Invite only) and Train live now while one of its public trains is running.
Find a community lists the communities on Trainly. Riverside Raiders (outlined in coral) asks a moderator to approve new members.
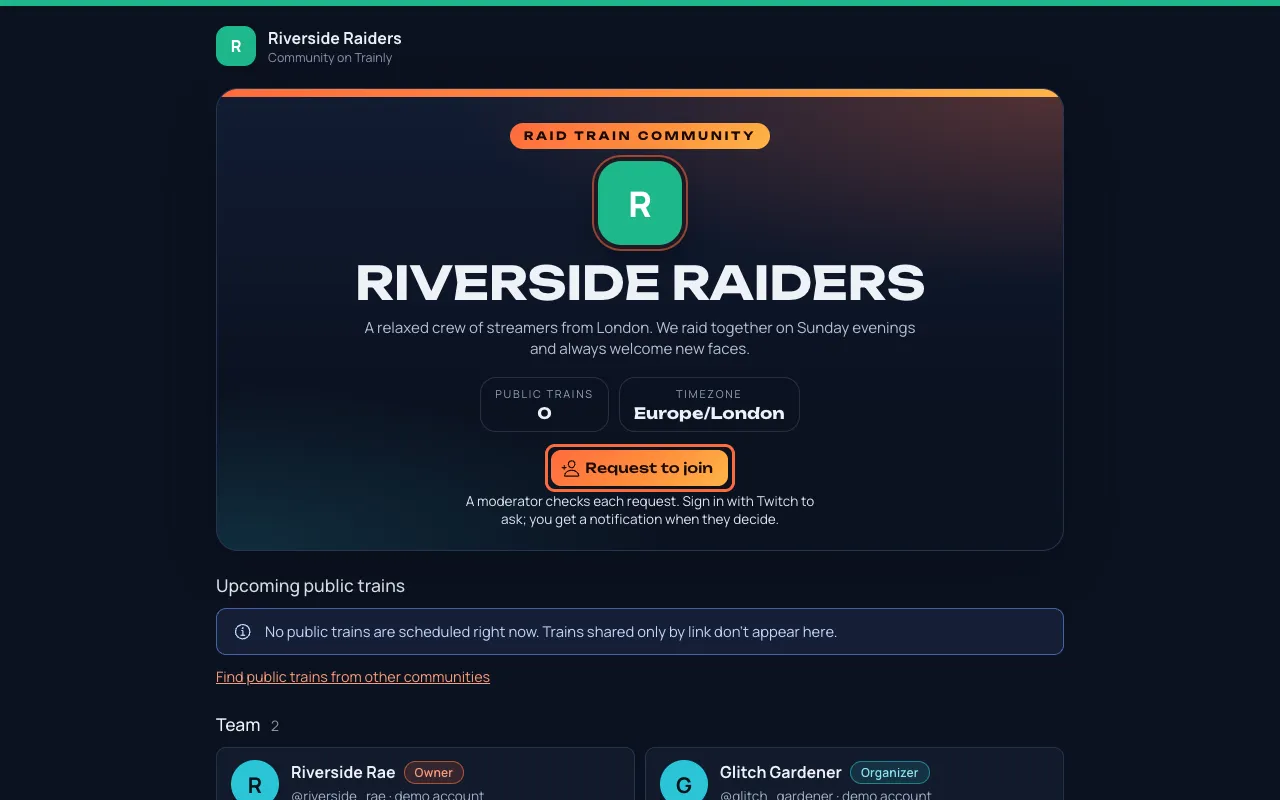
Press a community to open its public page with its upcoming public trains and team. Press Join … (with the community's name) when anyone can join, or Request to join when a moderator checks new members.
The community's page. This one checks new members, so the button (outlined in coral) says Request to join.
Sign in with Twitch. Trainly opens the join page with the community's code already filled in: press Join as Streamer, or Join as Crew if you help without streaming (what Crew is).
No join button? The community is Invite only: ask one of its organizers to invite you by your Twitch name. Can't find a community? Its Owner may have hidden it from Trainly's lists; ask an organizer for its link or code and use Join a community with its code.
Accept an invite link
Who: StreamersAbout 1 minute
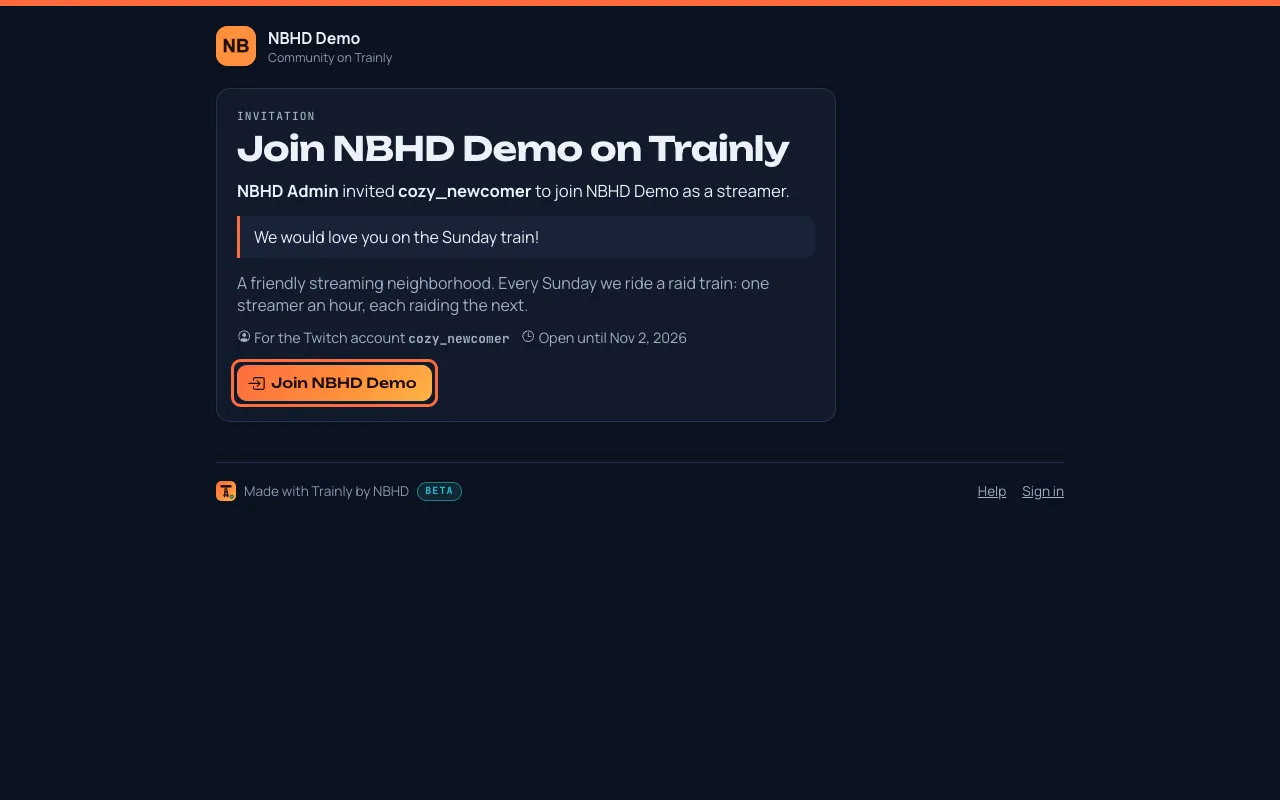
An organizer can invite you by your Twitch name. They send you a personal link, for example in Discord or a Twitch whisper. The link only works for your Twitch account.
Open the link. It looks like …/invite/ followed by letters and numbers. You see who invited you, their message, and which Twitch account the invite is for.
If you're not signed in, press Sign in to accept and sign in with that Twitch account. Trainly brings you straight back to the invite.
Press Join as Streamer, or Join as Crew if you help run the trains without streaming (what Crew is). You'll see a welcome message and the community's page.
Signed in with the invited Twitch account. (An older picture: the button now reads Join as Streamer, with Join as Crew next to it.)
No link handy? Your invites also wait under Community invites at the top of Invitations, even ones sent before you first signed in to Trainly. Press Join as Streamer, Join as Crew or Decline. The person who invited you is told when you decline, and you can still join from the link until it expires.
Tip: an invite link lets you in even when the community normally asks new members to wait for approval.
It says the invite is for a different Twitch account? You're signed in with another account. Press Sign out, then sign in with the account the invite names. It says the invite was withdrawn, has expired or was already used? Invite links work for 14 days and only once. Ask the person who invited you for a new one.
If you stream with more than one community, the menu shows one community at a time.
Find the Community button at the top of the menu. On a phone, press the ☰ button at the top left first.
On a phone: press ☰ at the top left to open the full menu. Your picture next to it opens Account. The bar at the bottom has shortcuts to Home, Trains (My Trains), Invites, Alerts (notifications) and Communities. A number means something new is waiting.
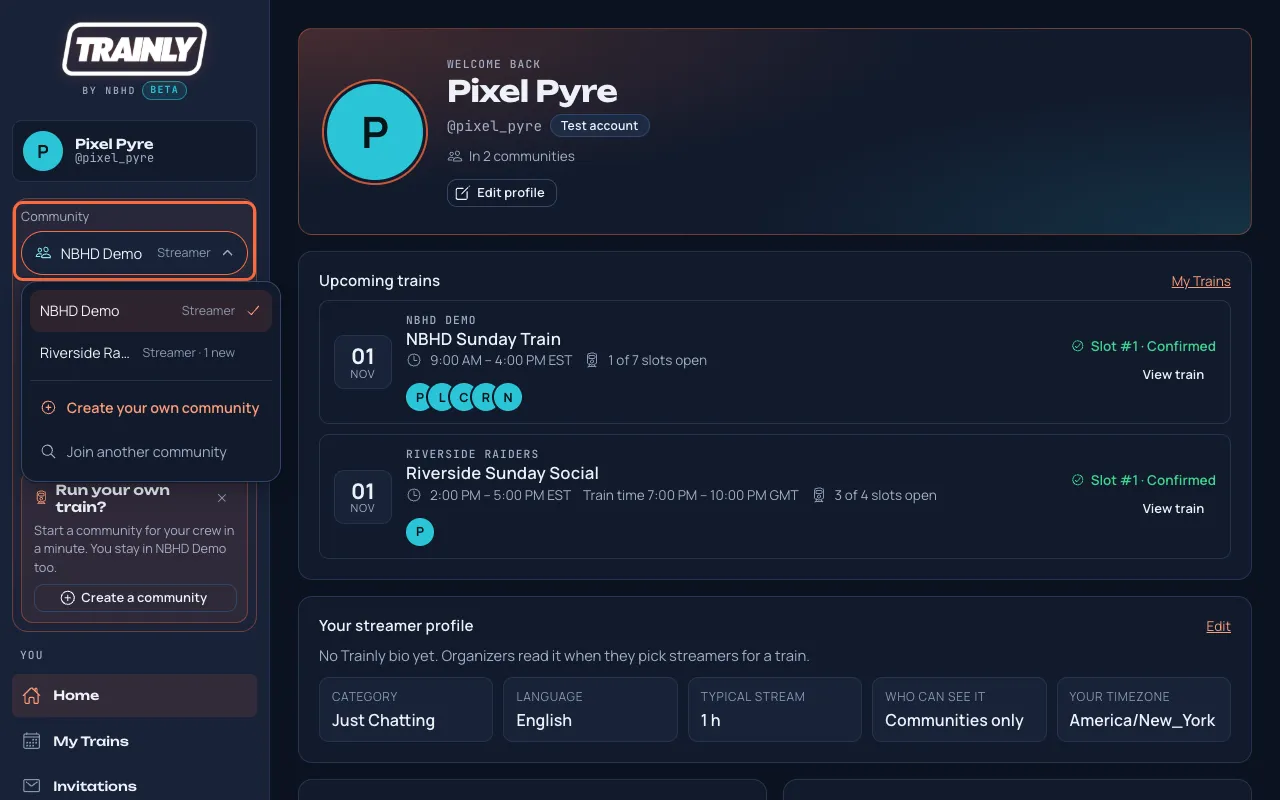
Press it and pick the community you want. Each one shows your role on the right, for example NBHD Demo Streamer. When one of your other communities has messages you haven't read, it says how many, for example Streamer · 1 new. With many communities, type part of the name to find it.
The Community list opened on a computer. This streamer belongs to two communities and can pick either one. 1 new next to Riverside Raiders means a message there is waiting.
The links right under the button switch to that community: Overview, Trains, Members, Messages, and Invite streamers if you're a moderator or above. They sit together in one panel at the top of the menu, above You. If you're reading Messages when you switch, you land on the other community's messages.
Not in a community yet? The top of the menu says Join or create a community, with Join a community (find one and ask to join) and Create a community for your own raid train.
You can also see every community you belong to under All communities.
Find a train and read its page
Who: StreamersAbout 2 minutes
See when a train runs, who is in the lineup, and the community's guidelines. Long guidelines fold behind Show more; links in them open in a new tab.
Pick your community with the Community button, then open Trains in the menu.
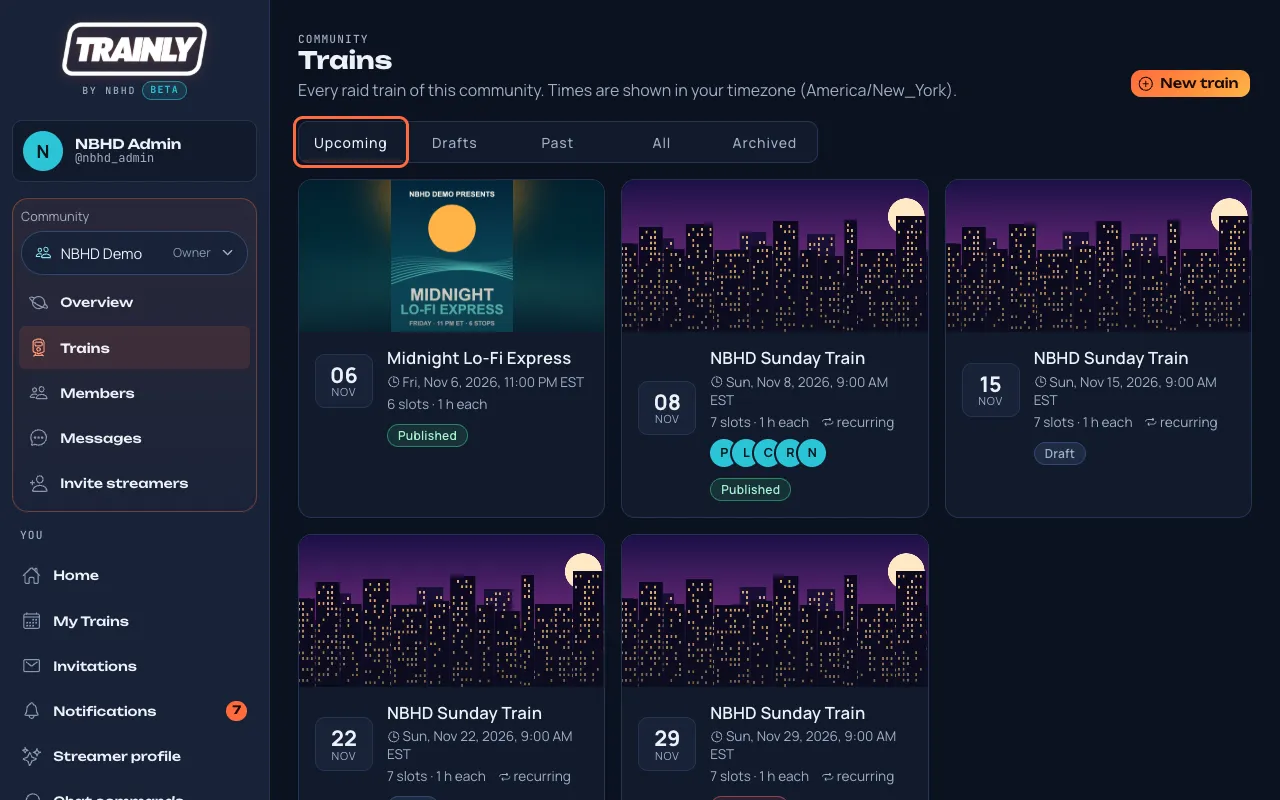
Press Upcoming to see what's next. Each train shows its date and start time in your timezone, and how many slots it has. A train that is running right now stands out in orange with Live now and Running now, until …. Under each train you see the pictures of its confirmed streamers in running order (+ for the rest), and while it runs, On now: who is streaming.
The Trains page with Upcoming selected (outlined in coral). Each card shows the train's flyer (or the community's banner), the date, start time, number of slots and status.
Press a train to open it. At the top you'll see the start and end time in your timezone, the one set on your Account. If the train was planned in another timezone, Trainly also shows the Train time, the organizer's clock, and a Your time / Train time switch. The switch changes the times at the top and in the whole Lineup, and Trainly remembers your choice.
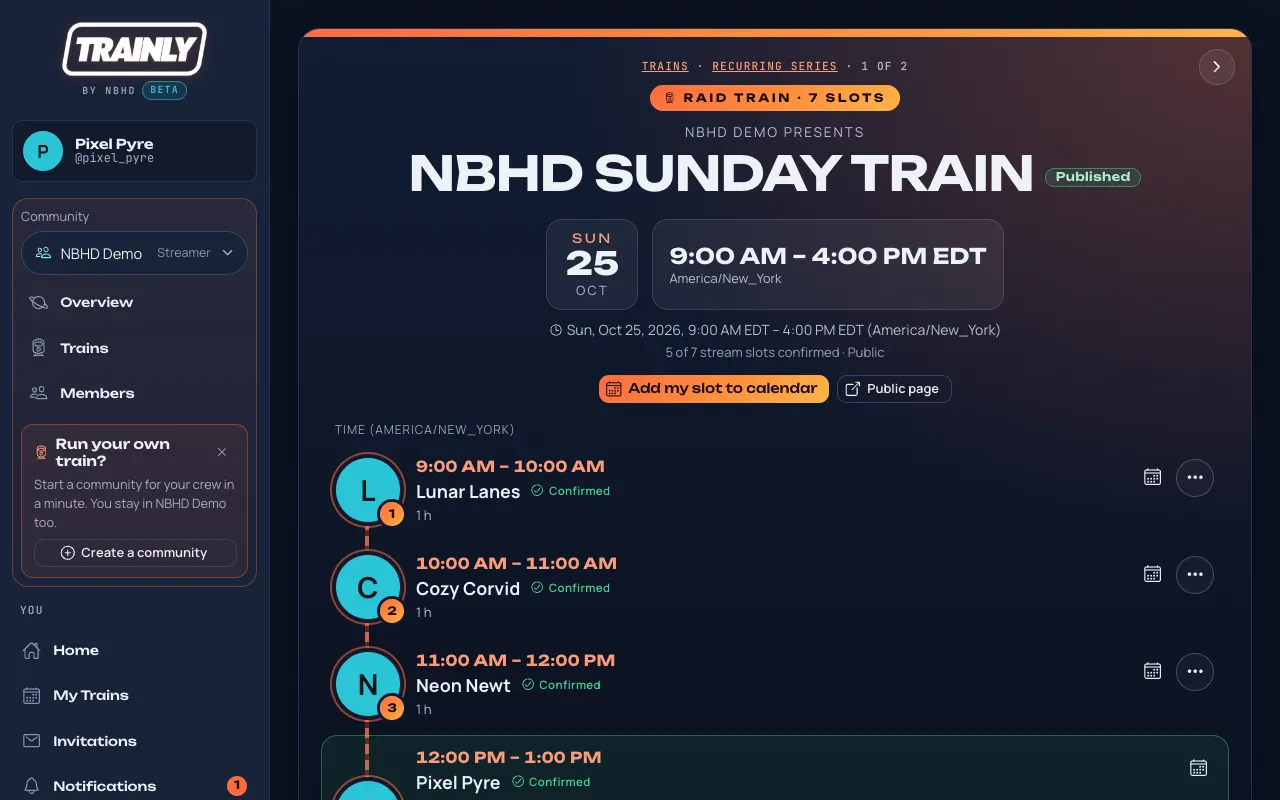
Look at Lineup to see each slot in order, with its time in your timezone and who is streaming. Each streamer's Twitch picture sits next to their name; test accounts show their first letter instead. While the train runs, the stop on air is highlighted with On now and the next stream stop says Up next, by the schedule.
A train page as a streamer sees it: the date and time at the top, then the Lineup as stops on a track, each led by the streamer's picture. Streamers can't change the lineup, but they can Come aboard an open slot, and press Can't make it? on their own to swap, send a heads-up or give it up. The ⋯ on other stops is for sending a message.
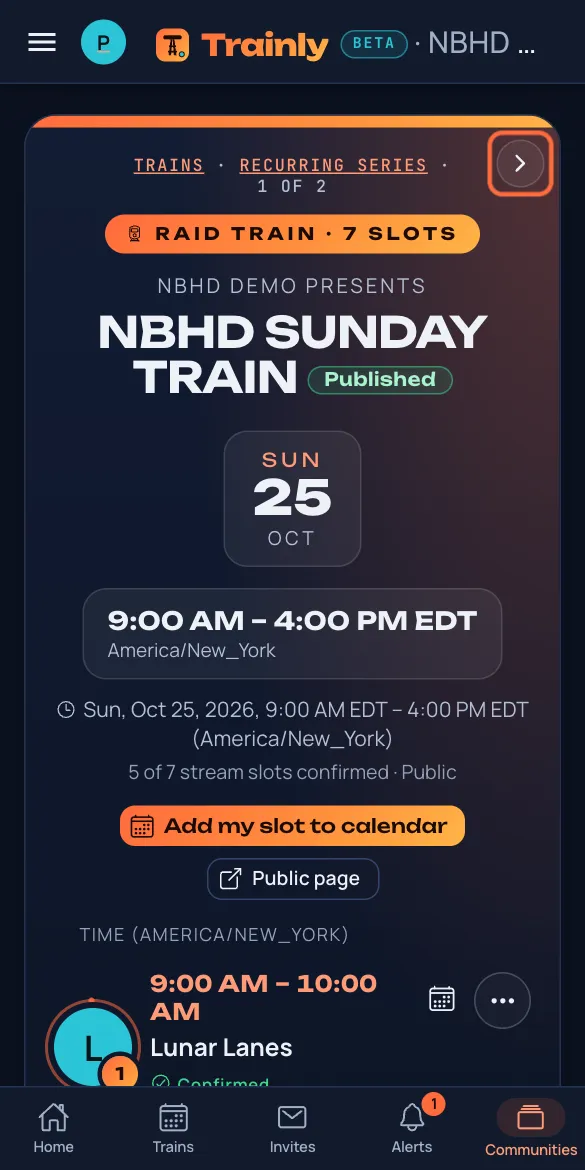
To move to the train before or after this one, swipe left or right on a phone, or press the ‹ or › arrow in the flyer's top corners (hover over one to see which train it opens). They go in date order through the community's trains you can see; the top line says where you are, for example 1 of 2. Back still returns to the list.
Swipe left for the next train and right for the previous one, or press the arrow in the flyer's corner (outlined in coral).
While a train is running, its page plays the stop on air: Twitch's player takes the place of the date and time, with Live, who is on until when, and who is next under it, and Watch on Twitch to open the channel. It switches to the next streamer by itself when their stop starts. It starts muted: press the sound button in the player. The date and time are still in the line below.
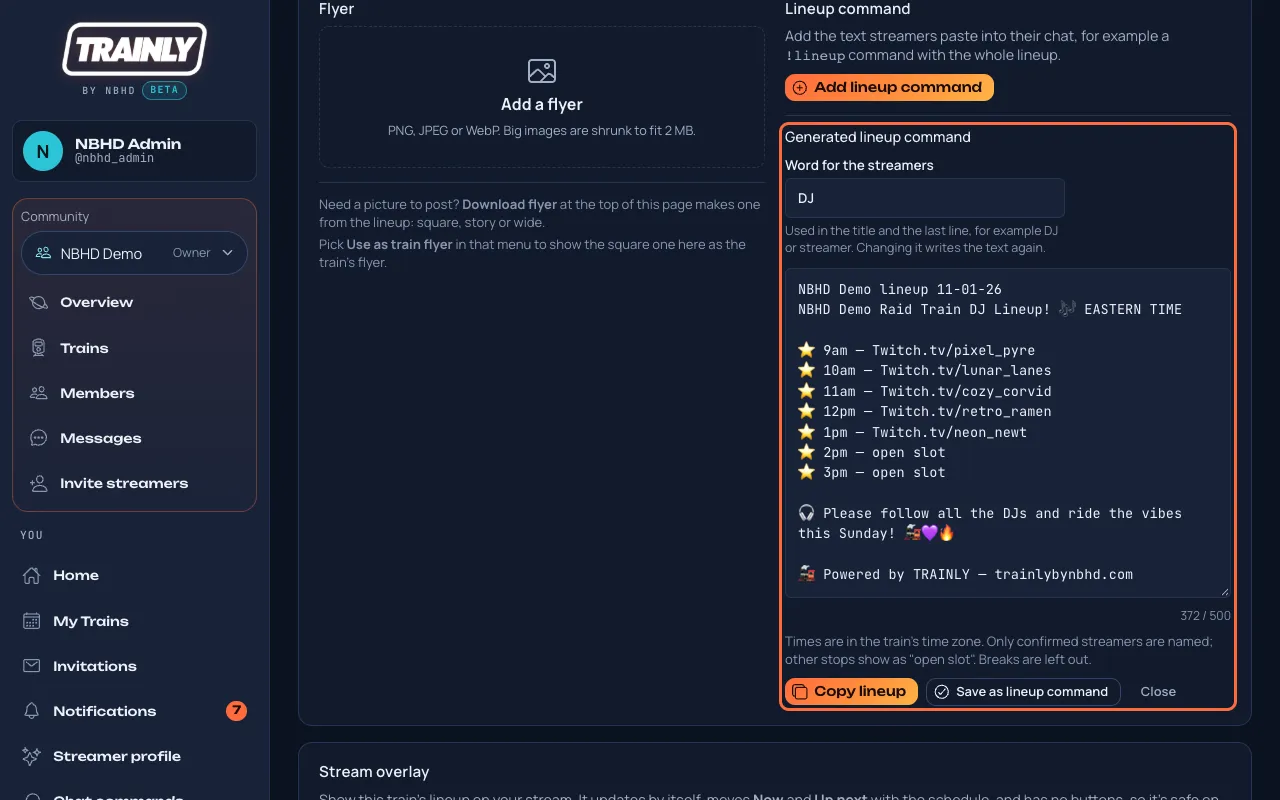
If the organizers added them, Flyer and lineup command shows the train's flyer and a line of text to paste in your chat. Press Copy command to copy it.
Scroll down to About this train and read Guidelines for the community's rules, for example when to raid.
Looks like a flyer? That's the streamer view: each slot leads with the streamer's Twitch picture, with your own slot highlighted. Press Public page at the top to open the page you can share with viewers. Organizers and lineup editors see the lineup editor instead.
Why can't I see some trains? Trains still being planned are drafts. Only organizers, moderators and the streamers they invited see a draft until it is published.
Invited to a draft, or a slot reserved for you? You see that train like any other: the flyer, the lineup and your slot, with a note saying it's a draft. Accept or decline from Invitations, or with Accept slot on the train for a reserved slot. The rest of the community can't see it yet, and nobody can come aboard until the organizers publish it.
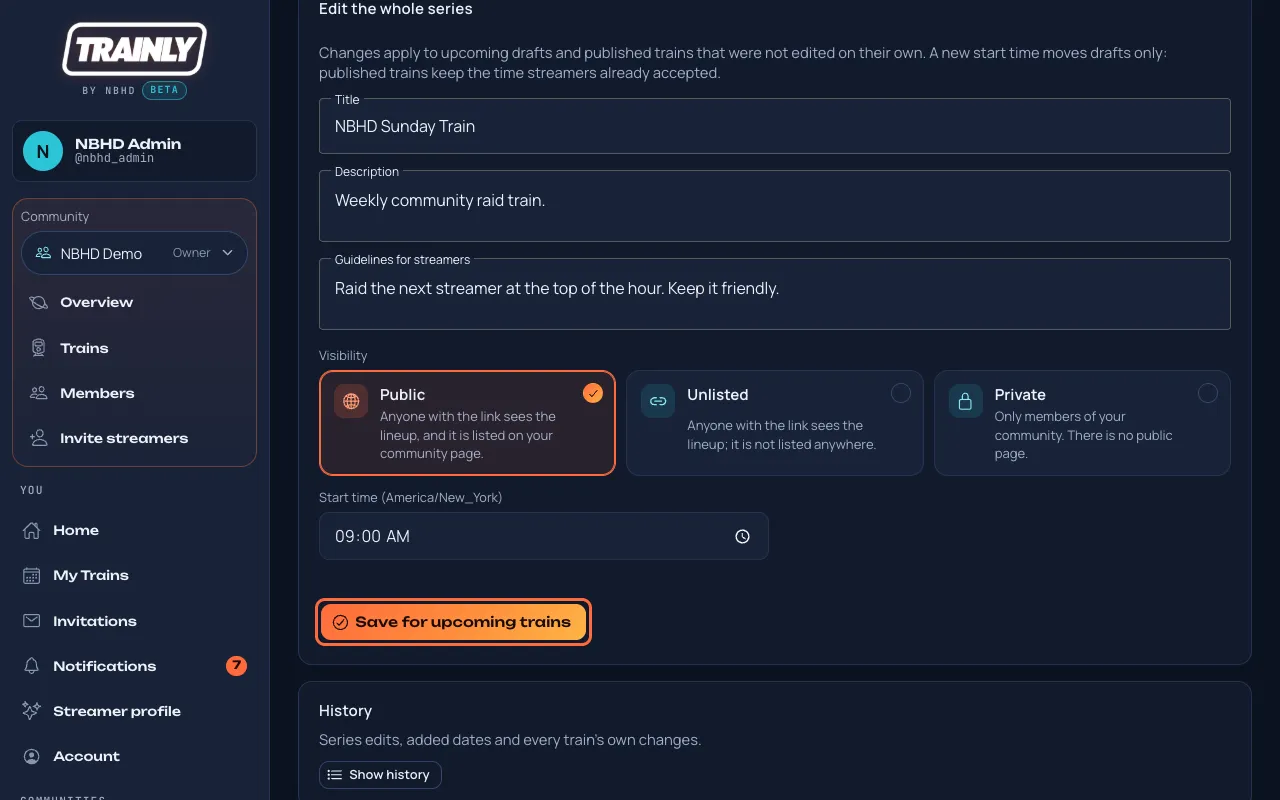
Organizers and moderators see trains in their own timezone too. Press Train time to see the clock the train was planned in. When you edit a train's date and start time, you still type them in the train's timezone.
No player? It only shows for streamers who signed in with Twitch, and not during breaks or open slots. If Twitch doesn't show the streamer as live yet, the player waits for them. On the public page it shows only for streamers the page names with a Twitch link, never for Private profiles.
See an open slot in a published train you'd like? Ask for it. An organizer says yes or no, and you get a notification either way.
Open the train: from Upcoming trains on Home, or from Trains in your community's menu.
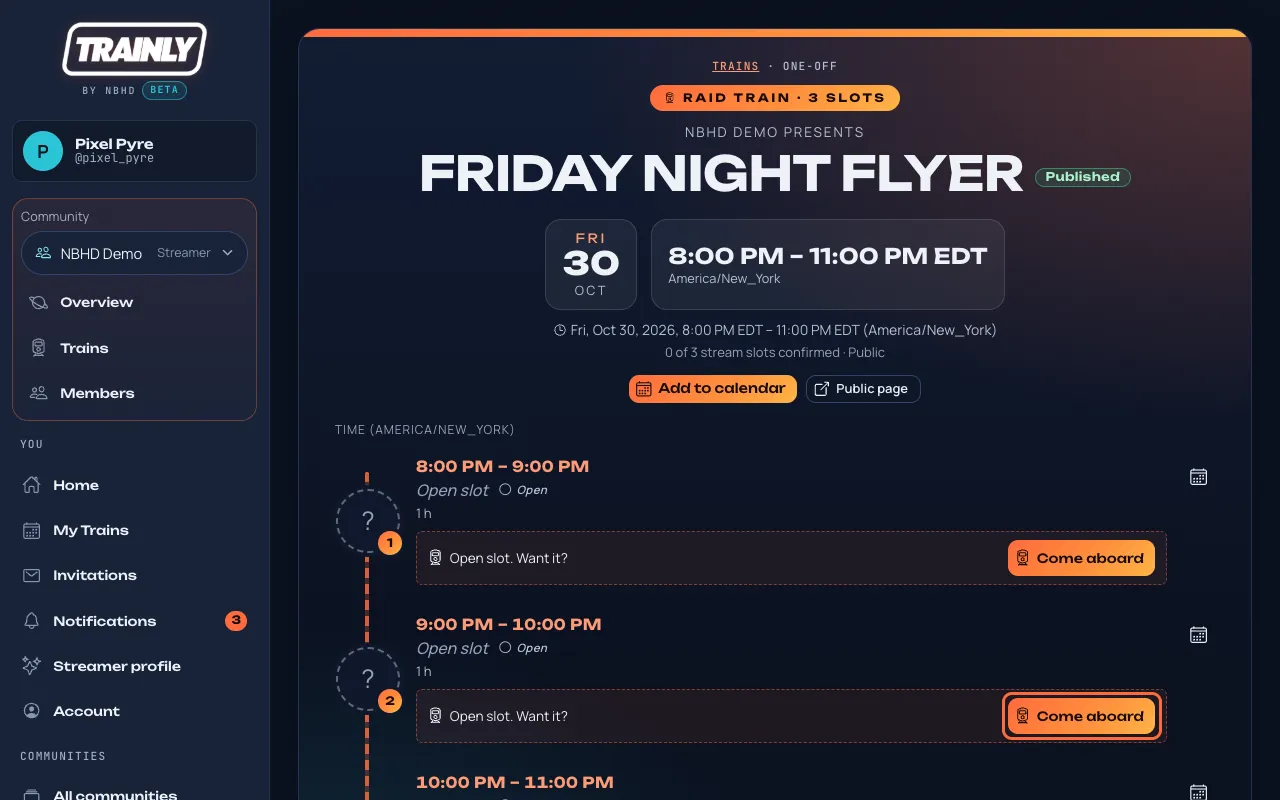
In the Lineup, every open slot you can ask for shows Open slot. Want it? with a Come aboard button. Press it on the slot you want.
Press Come aboard (outlined in coral) on the open slot you want.
Add a message for the organizers if you like, then press Come aboard in the box. You'll see "Request sent".
The row now says You asked to come aboard this slot. Waiting for an organizer. Changed your mind? Press Withdraw request.
When an organizer decides, you get a notification. If they accepted, the slot is yours: it shows as Confirmed in the lineup, in My Trains and on Home. Can't make it after all? Press Can't make it? on it to swap, send a heads-up or give it up (how), or Withdraw in My Trains.
Tip: asking does not hold the slot. Someone else can ask for the same one, and the organizer picks. You can have one open request per train; after a no, you can ask for another slot.
No Come aboard button? You see it only on open slots of a published train (never on a draft, even one you were invited to), when you don't already have a slot or an open request in that train. Locked slots, breaks and slots that already started can't be asked for. If the button is there but pressing it says "You already have a confirmed train at that time", you're booked in another community then. On a train that says Open to members you don't ask: press Take this slot instead (how).
Take an open slot on a train open to members
Who: Every memberUnder a minute
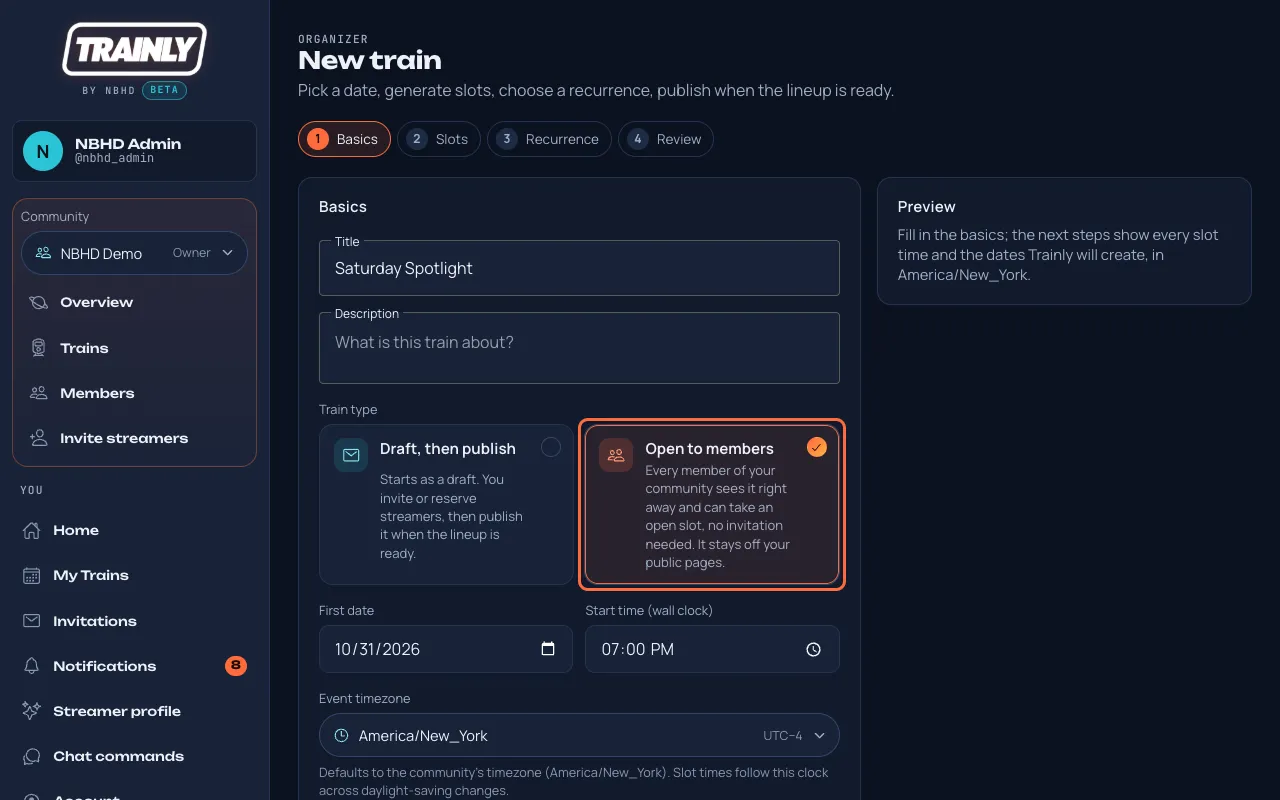
Some trains are open to members: you don't need an invitation and nobody has to approve you. The first member to take an open slot gets it.
Open the train from Trains in your community's menu, or press Take a slot next to it under Upcoming trains on Home. These trains say Open to members next to their title.
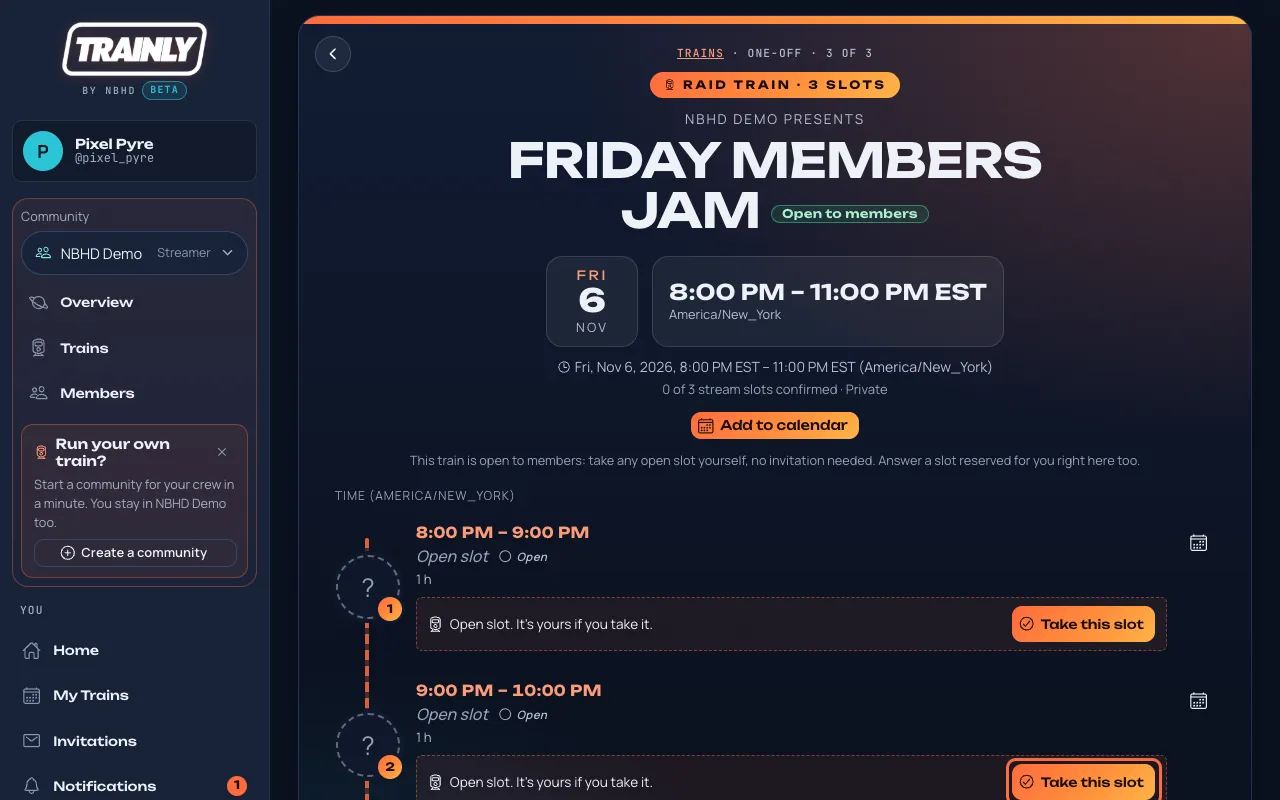
Every open slot you can take says Open slot. It's yours if you take it. Press Take this slot on the one you want.
Press Take this slot (outlined in coral) on the open slot you want.
Check the time in the box and press Take this slot. The slot is yours right away: it shows your name and Confirmed, and it's listed in My Trains. The organizers get a notification.
Can't make it after all? Press Can't make it? on your slot to swap, send a heads-up or give it up (how). A slot you give up is open again for any member to take.
Tip: you can take one slot per train. Want a different one? Give yours up first, then take the other.
No Take this slot button? You already have a slot in this train, or the slot is locked, a break or has already started. Crew members don't stream, so they don't get the button. "Someone just took slot #…" means another member was faster: pick another open slot. "You already have a confirmed train at that time" means you're booked in another train then.
Answer a slot reserved for you
Who: The streamer the slot is reserved forUnder a minute
An organizer can put you in a slot directly. You decide whether to take it, so the lineup only shows people who really plan to be there.
You get a notification "A slot is reserved for you" (or "Reminder: …" if the organizers asked again). Open it, or open the train from Upcoming trains on Home. This works on drafts too: if the train is still a draft, you can see it because a slot is reserved for you, and it shows a Draft badge.
Your slot shows Reserved for you. Will you take it? Press Accept slot to confirm it, or Decline if you can't make it. You can add a note when you decline.
On Home or on the train page: Accept slot (outlined in coral) confirms it; Decline opens the slot again.
Accepted slots turn Confirmed and appear in My Trains. Declined slots open up again and the organizers are told. Accepted, then plans changed? Press Can't make it? on it to swap, send a heads-up or give it up (how), or Withdraw in My Trains.
Accept doesn't work? Trainly won't let you be in two trains at the same time; if you already confirmed an overlapping slot elsewhere, it says so. Decline this one or withdraw from the other.
Said yes in chat? An organizer can confirm the slot for you. You get a notification, and you can still withdraw if plans change.
Add a train or your slot to your calendar
Who: EveryoneUnder a minute
Put the train in the calendar on your phone or computer, so it reminds you 15 minutes before you go live.
On the train page, press Add my slot to calendar. It says Add to calendar when you don't have a slot on that train: then the whole train is added. Right after you press Accept on an invitation or Accept slot, Trainly also asks You're aboard!: press Add to calendar there.
Choose where it goes. Calendar on this device is the calendar on your iPhone, iPad, Mac or Windows computer (Apple Calendar, Outlook and most others). Google Calendar is for Google Calendar, which most Android phones use; on Android it is listed first.
On an iPhone or iPad, the train opens in a calendar preview: add it from there. On a computer, open the file that downloads and your calendar app adds it. With Google Calendar, check the details and save.
Want one streamer's set? Every slot in the Lineup has its own calendar button: the small calendar icon at the right of the slot. It adds just that slot, with the streamer's name, date and time, on the train page and on the public page. There, Add to calendar next to Copy link adds the whole train instead.
The time changed? A calendar entry does not update by itself. If the organizers move your slot, delete the old entry and add it again. "This calendar link has expired"? The link from the app works for 30 minutes. Go back to the train and press the button again.
Share a train's public page
Who: EveryoneAbout 1 minute
A public page shows the lineup to anyone, even people without a Trainly account. Send it to your viewers so they know who is on and when.
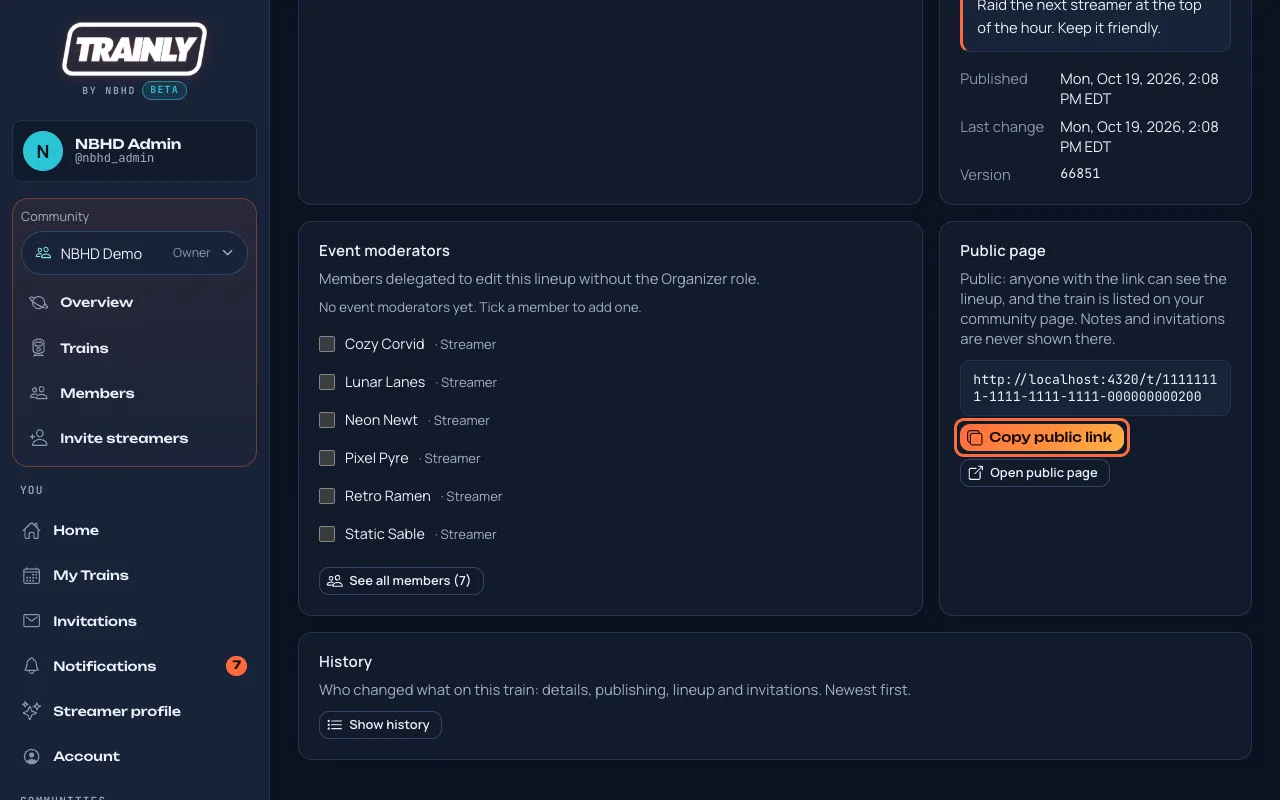
Open the train in Trainly and scroll down to Public page.
Press Copy public link and paste it in Discord, on social media or in your stream chat. Open public page shows it to you first.
The Public page box on a train. Press Copy public link (outlined in coral) to copy the address.
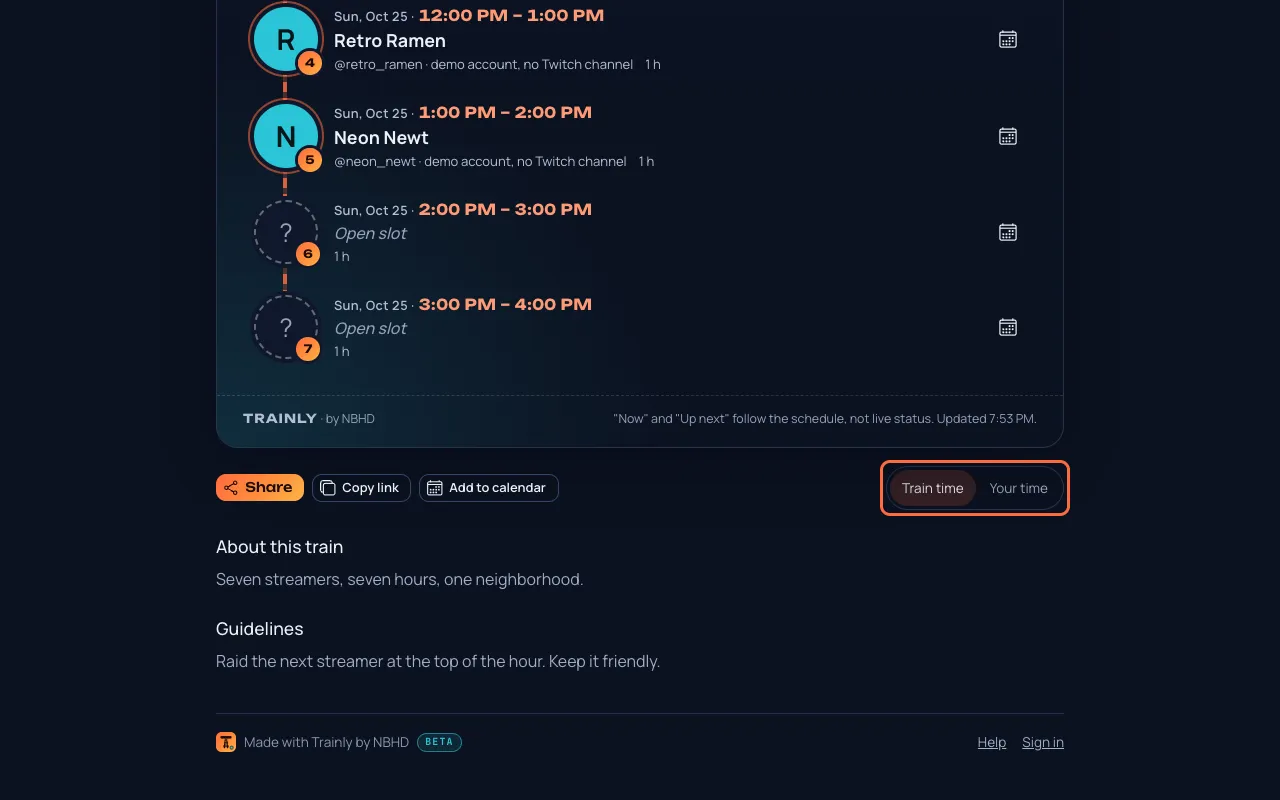
Anyone who opens the link sees the community's name, the train time, the lineup and the guidelines. If they live in another timezone, they also see your time; the Train time / Your time switch changes the times in the lineup.
The public page a viewer sees. The switch under the flyer (outlined in coral) shows the lineup in the train's time or the viewer's own time.
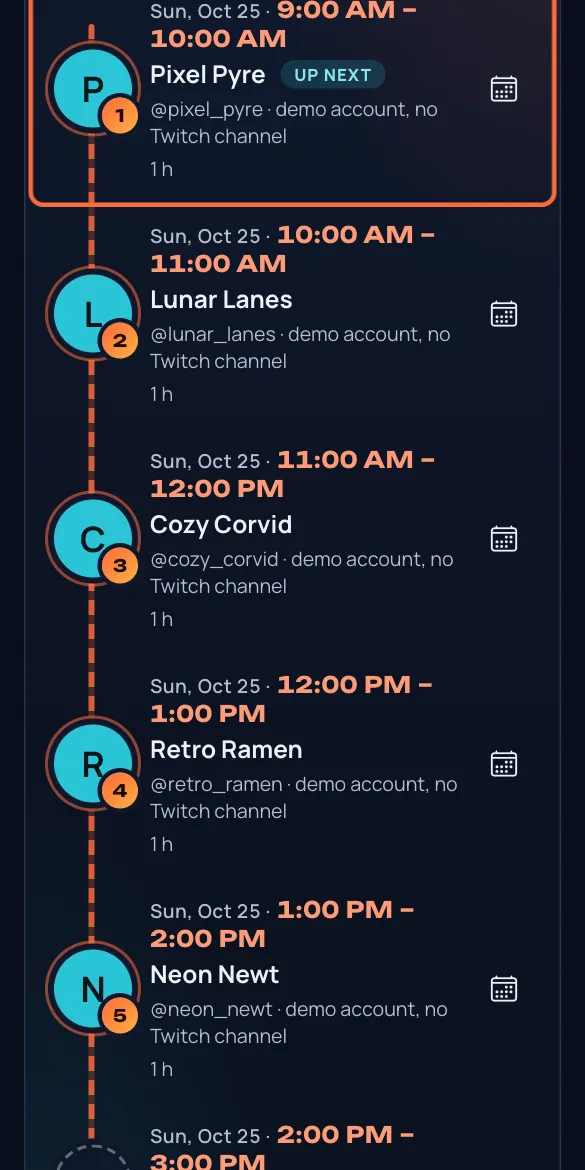
On a phone, the page fits the screen. Up next marks who is on next, and Now (scheduled) marks the slot the schedule says is running.
The public page on a phone. The next streamer is marked Up next.
While the train runs: the public page plays the stop on air from Twitch where the date and time are, for streamers it names with a Twitch link (not Private profiles). It starts muted and switches streamer by itself (more).
What viewers see: only streamers who accepted their slot, by name, Twitch picture and Twitch username. Slots still being arranged say Open slot; who was invited, notes and messages are never shown. Watch on Twitch and the Twitch picture appear for streamers who signed in with Twitch. Test accounts in this preview show their first letter in a circle and "demo account, no Twitch channel" instead. A streamer whose profile is Private shows as "Confirmed streamer", with no name or picture.
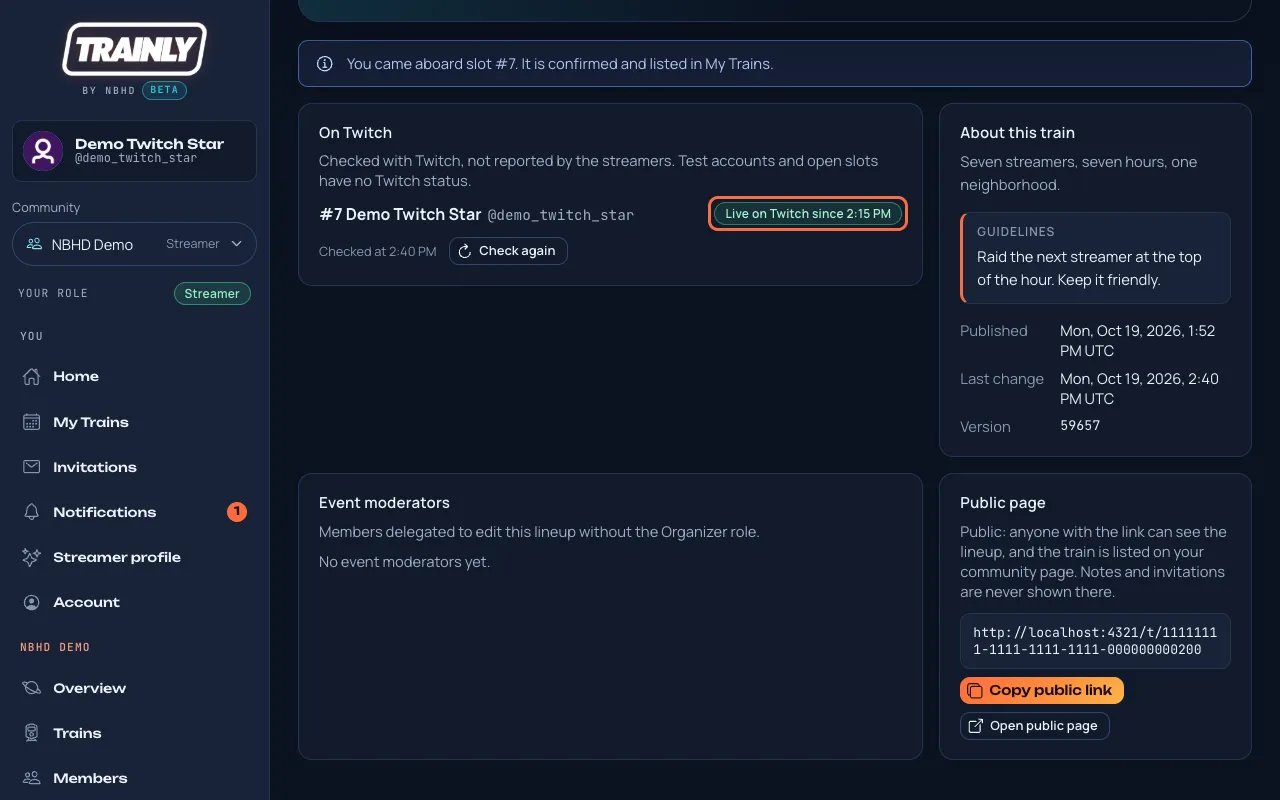
Now and Up next follow the schedule. Trainly does not check whether a channel is actually live yet.
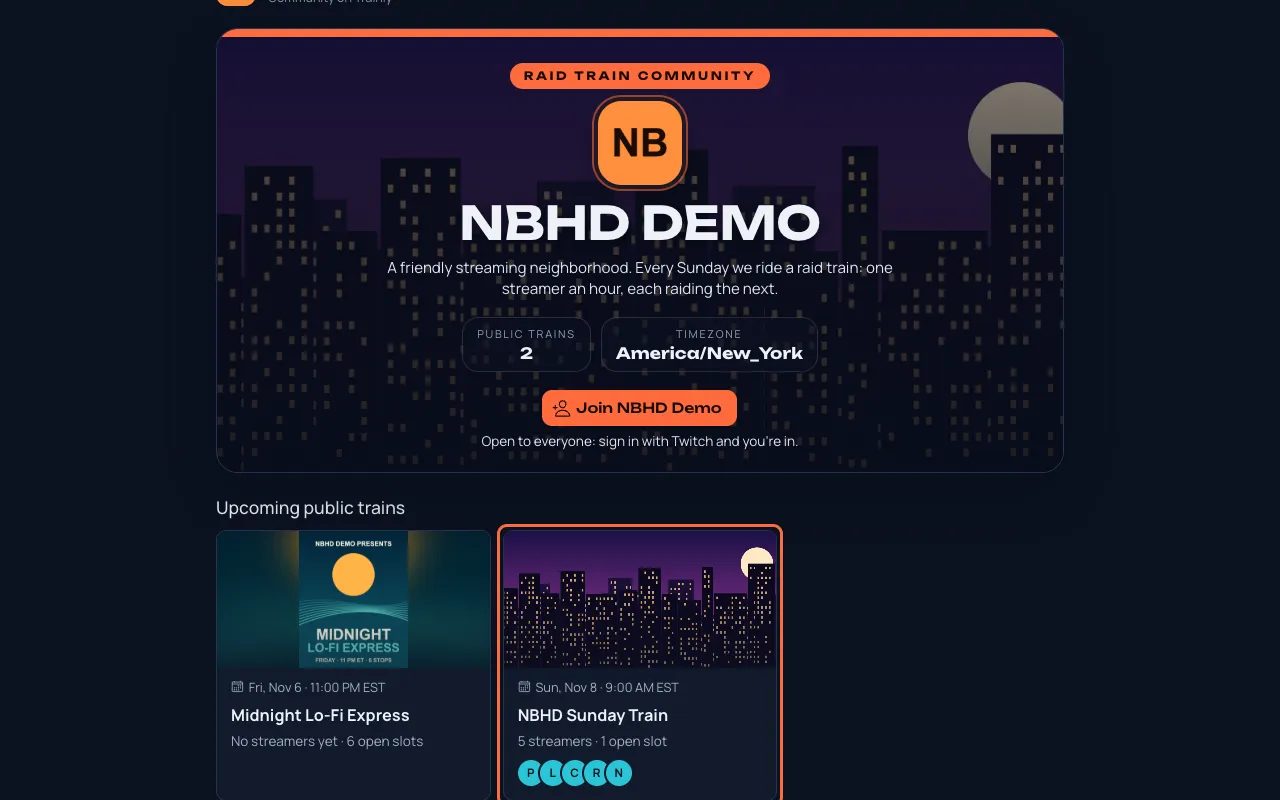
Tip: every community also has a page that lists its upcoming public trains and its members: /c/ followed by its code, for example /c/nbhd-demo. Organizers find it under Overview as Public page.
A community page. Press a train (outlined in coral) to open its public page.
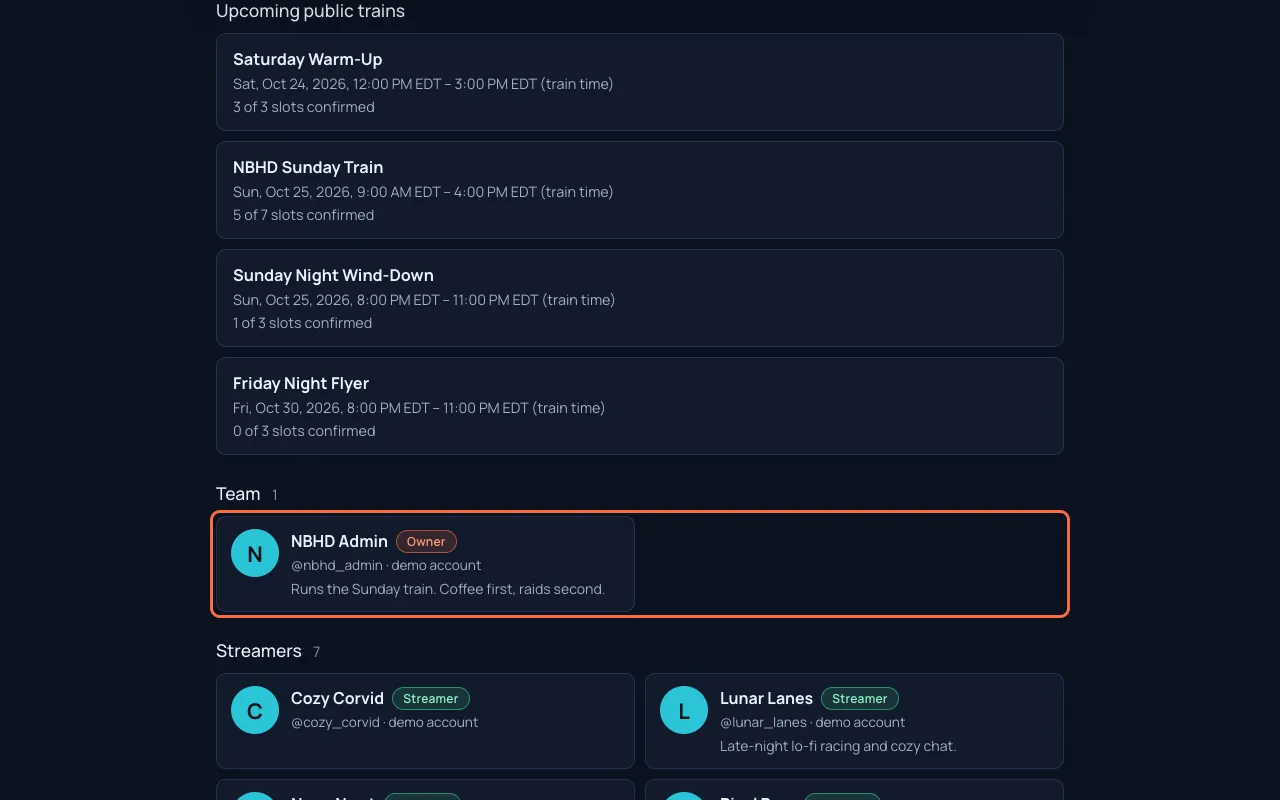
Who is on the community page: under the trains, Team lists the community's Owners, Organizers and Moderators and Streamers everyone else. Each card has the member's picture, name, role and a twitch.tv/ link to their channel (it opens in a new tab). Members with a Publicprofile also show the start of their bio. Test accounts show "demo account" instead of a link. People who asked to join and are still waiting, and people who left, are never listed. More than 12 in a list? Press Show all.
Team (outlined in coral) and Streamers on a community page. Every member is listed; bios show for Public profiles.
"This train page isn't available"? The train is still a draft, its organizers made it Private, or the link is incomplete. Ask an organizer for a fresh link. See Choose who can see a train.
Download a flyer of your train
Who: Everyone, even without an accountUnder a minute
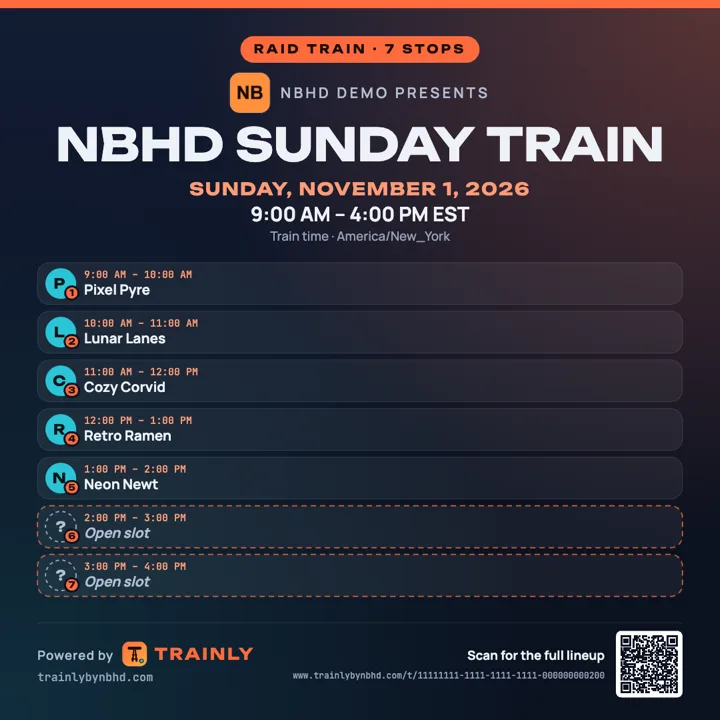
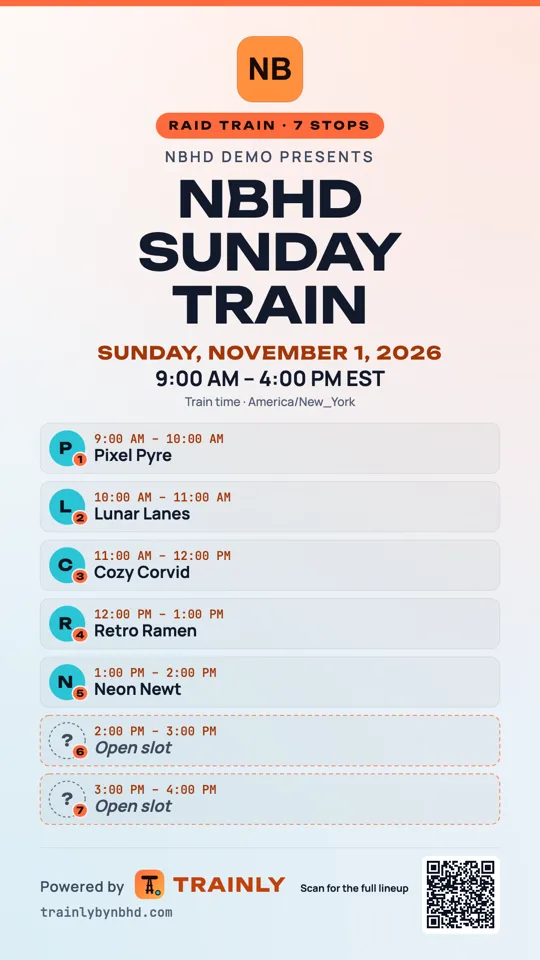
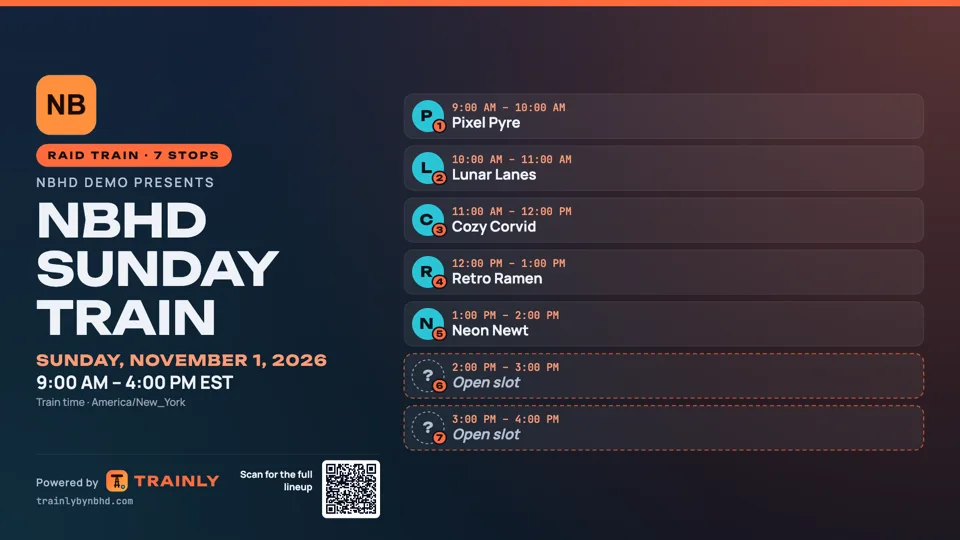
Get a ready-made poster of the train to post on Instagram, TikTok, X or Discord: your community's logo and color, the train's name, the date and time, and every stop with its streamer.
Open the train. On its public page, Download flyer is right under the poster, next to Share and Copy link. Signed in to Trainly? Open the train in Trainly: Download flyer is in Flyer and lineup command, right under the Flyer (under Add a flyer when there is none yet).
Want the times in your own timezone? Press Your time first. The flyer uses the clock the page shows and says which one under the time.
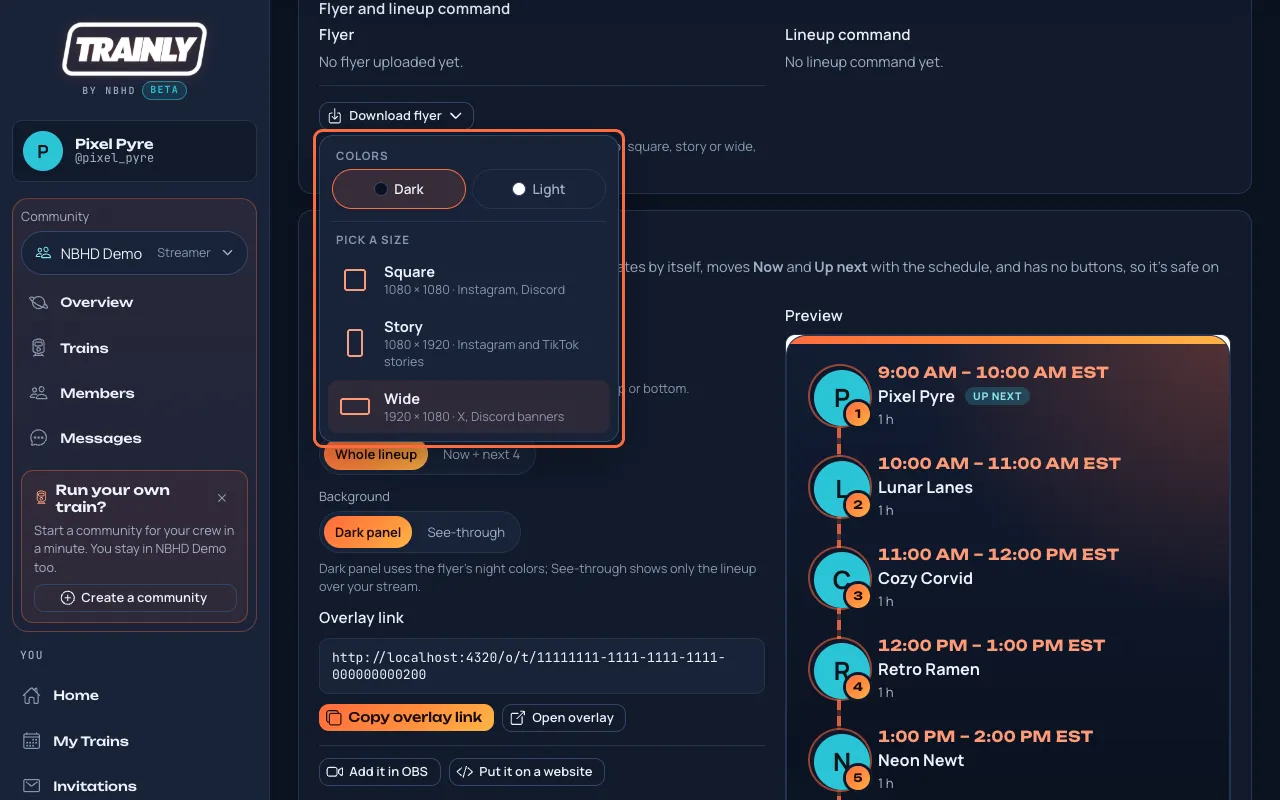
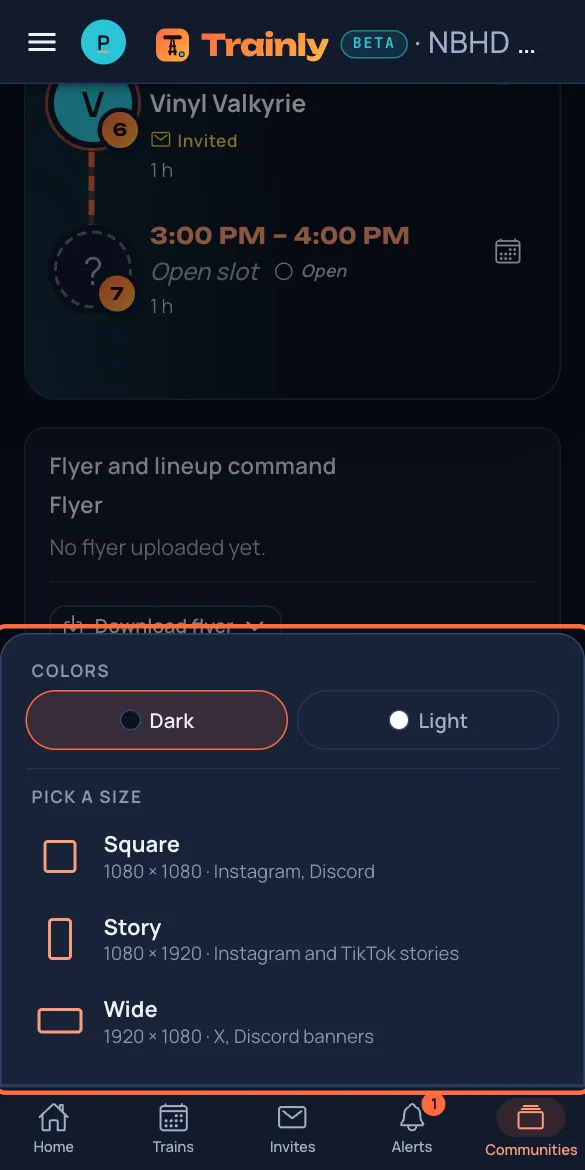
Press Download flyer. Under Colors, pick Dark or Light. Then pick a size:
Square (1080 × 1080): Instagram posts and Discord.
Story (1080 × 1920): Instagram and TikTok stories.
Wide (1920 × 1080): X posts and Discord banners.
The Download flyer menu: pick the colors, then a size. On a phone it opens at the bottom of the screen.On a phone the menu opens at the bottom of the screen.
On a computer the picture is saved to your downloads. On a phone the share menu opens: pick Save Image to keep it in your photos, or an app to post it straight away.
Square, Dark. The QR code opens the train's public page.Story, Light.Wide, Dark: the lineup sits on the right.
Organizers and owners: at the bottom of the same menu, Use as train flyer saves the square flyer, in the colors you picked, as the train's flyer. Everyone in the community then sees it under Flyer and lineup command. If the train already has a flyer, Trainly asks first: Replace flyer or Keep the old flyer.
Good to know: the flyer is made in your browser from the lineup on the page, so it shows the lineup as it is right now. Make a new one after the lineup changes. The logo and color are your community's (Owners set the logo in Add your community logo); without them the flyer shows the first letter and Trainly's orange. Streamers who signed in with Twitch show their Twitch picture; others show their first letter. Open slots are drawn dashed with a question mark. From the train page, only confirmed streamers are named: reserved and invited slots show as open, so a shared flyer never shows who was only asked. The QR code and the page address are printed only for Public and Unlisted trains that are published. Long lineups get smaller rows, then two columns (three on Wide); if they still don't fit, the last box says how many more stops there are, so pick Story or Wide for a long train.
Didn't work? If you see "The flyer couldn't be made in this browser", try another browser (Chrome, Safari, Edge or Firefox), or take a screenshot of the lineup instead.
Show the lineup on your stream
Who: Everyone who can see the trainAbout 3 minutes
Put the train's lineup on screen while you stream, so your viewers see who is on now and who is next. It updates by itself, and it works in OBS, Streamlabs and on a website.
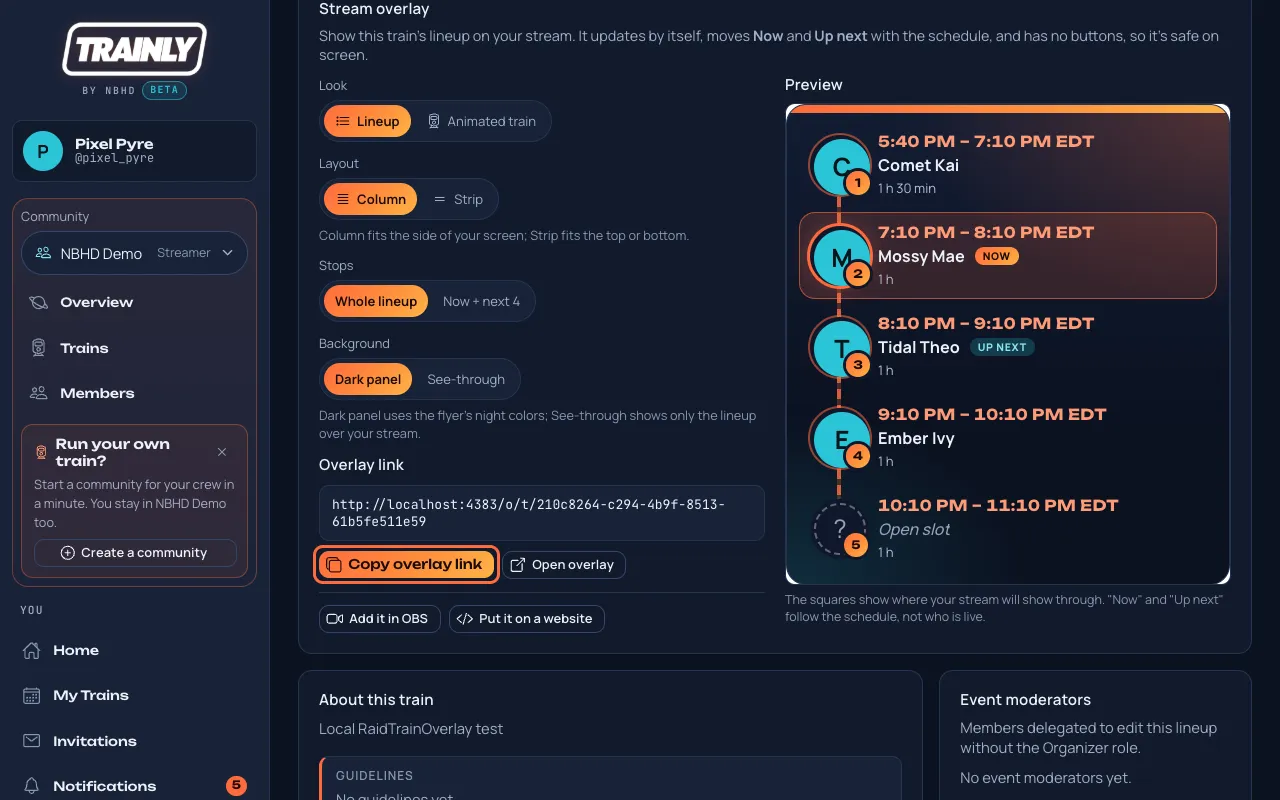
Open the train in Trainly and scroll down to Stream overlay, just under Flyer and lineup command. It's there once the train is published as Public or Unlisted.
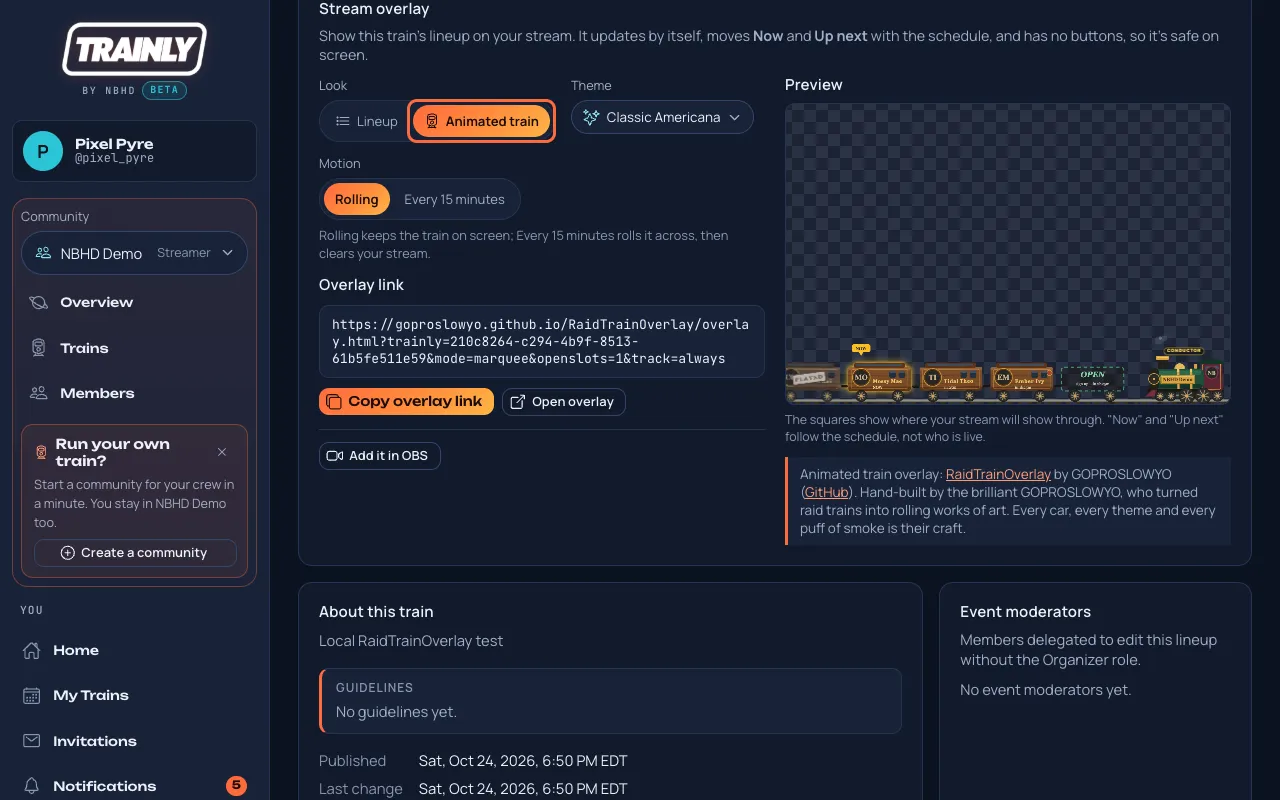
Under Look, pick Lineup for Trainly's list of stops (the next step), or Animated train for a train that rolls across your stream (see Animated train below).
Pick how it looks. Column fits the side of your screen; Strip fits the top or bottom. Whole lineup shows every stop; Now + next 4 shows five stops and moves along as the train goes. Dark panel puts the flyer's night colors behind the lineup; See-through shows only the lineup over your stream. If you live in another timezone than the train, Train time / My time picks the clock. Preview shows the result; the squares are where your stream shows through.
Press Copy overlay link. Open overlay shows it on its own in a new tab.
The Stream overlay box. Choose the look, then press Copy overlay link (outlined in coral). The preview on the right shows what your viewers will see.
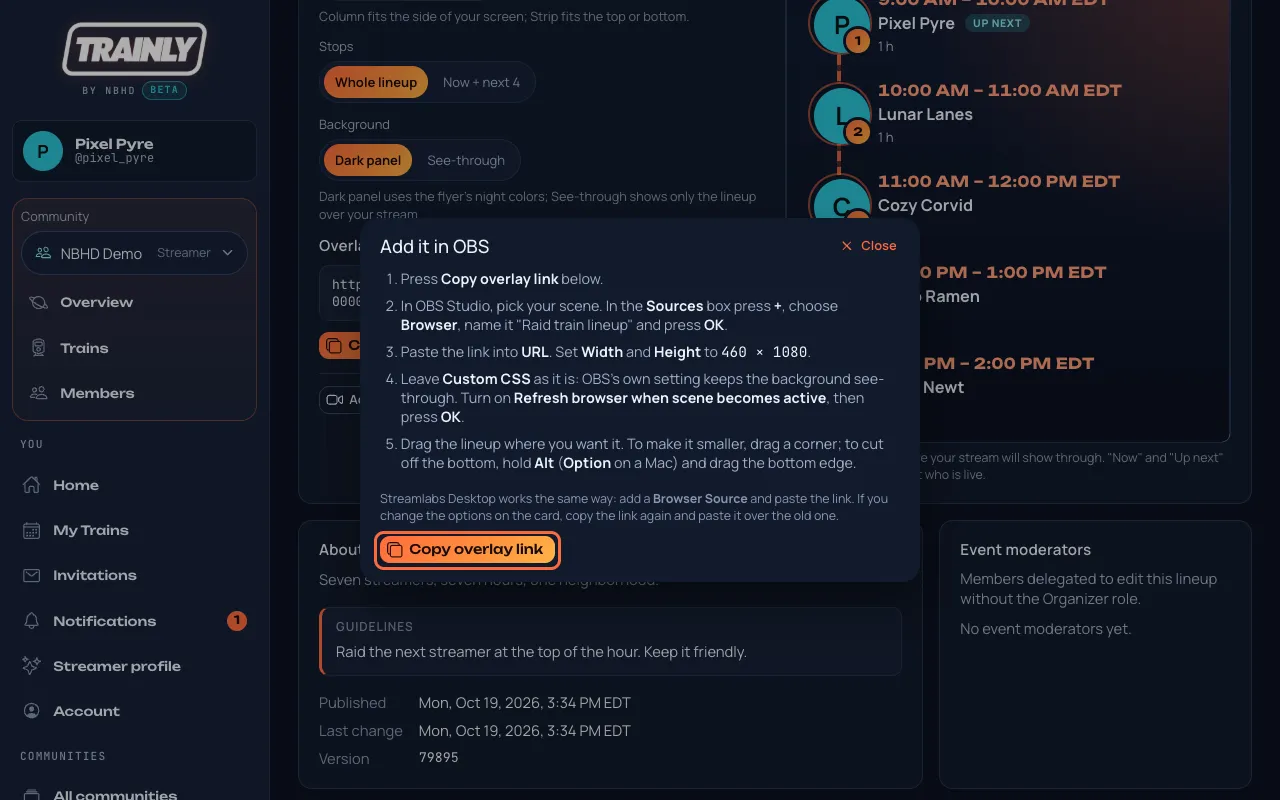
Not sure how to add it? Press Add it in OBS. A window opens with these same steps, the size to use and its own Copy overlay link button; press Close when you're done.
The Add it in OBS window. Everything you need is in it, including Copy overlay link (outlined in coral).
In OBS Studio, pick your scene. In the Sources box press +, choose Browser, name it "Raid train lineup" and press OK.
Paste the link into URL. Set Width and Height to the size the Add it in OBS window shows: 460 × 1080 for Column, 1920 × 220 for Strip, 1920 × 1080 for Animated train.
Leave Custom CSS as it is (OBS's own setting keeps the background see-through). Turn on Refresh browser when scene becomes active and press OK.
Drag the lineup where you want it. Drag a corner to make it smaller. To cut off the bottom, hold Alt (Option on a Mac) and drag the bottom edge.
Streamlabs Desktop: add a Browser Source the same way and paste the link. On a website: press Put it on a website in the same box; in the window that opens, press Copy website code, and paste it into a "Custom HTML" or "Embed" block on your page.
What it shows: the same lineup as the public page: confirmed streamers with their picture and name, open slots and breaks, with Now on the slot the schedule says is running and Up next on the next one. It checks for changes every 30 seconds. Now and Up next follow the schedule; Trainly does not check who is actually live.
Tip: changed an option? Copy the link again and paste it over the old one in OBS. For a long train, Now + next 4 keeps the overlay short.
Animated train
The animated train is RaidTrainOverlay by GOPROSLOWYO (GitHub), hand-built by the brilliant GOPROSLOWYO. Each streamer rides in their own car, the community drives the engine, and a NOW sign follows the schedule. Trainly sends it the train's lineup; the train itself is GOPROSLOWYO's work.
Under Look, pick Animated train.
Pick a Theme, such as Classic Americana, Synthwave, 16-bit pixel or Pride, or Shuffle (every theme in turn). Under Motion, Rolling keeps the train on screen; Every 15 minutes rolls it across, then clears your stream. Preview shows the train with your choices.
The Stream overlay box with Animated train chosen (outlined in coral). Pick a theme and how it moves; the preview shows the train.
Press Copy overlay link and add it in OBS with the steps above, at Width 1920 and Height 1080. The train runs along the bottom of your screen. Changed the theme or motion? Copy the link again and paste it over the old one.
Good to know: a long slot is still one car, and open slots show as OPEN cars. Put it on a website is only for Lineup. If the animated train is empty, check the same things as below: it only shows trains that have a public page.
The overlay is empty? It only shows trains that have a public page. If the organizers moved the train back to draft, made it Private or canceled it, the overlay goes blank on purpose, so your viewers never see an error. It comes back by itself within 30 seconds once the train is public again. Still empty? Right-click the source in OBS, choose Properties, and press Refresh cache of current page.
Answer !train and !nextup in your chat
Who: Every streamer, for their own channelAbout 3 minutes, once
Viewers ask "who's next?" all the time. Let your StreamElements bot answer from your Trainly schedule, so the answer is always up to date. It's optional: your trains work the same without it.
Open Chat commands in the menu (under Tools). You can also get there from Account › Integrations › Chat commands.
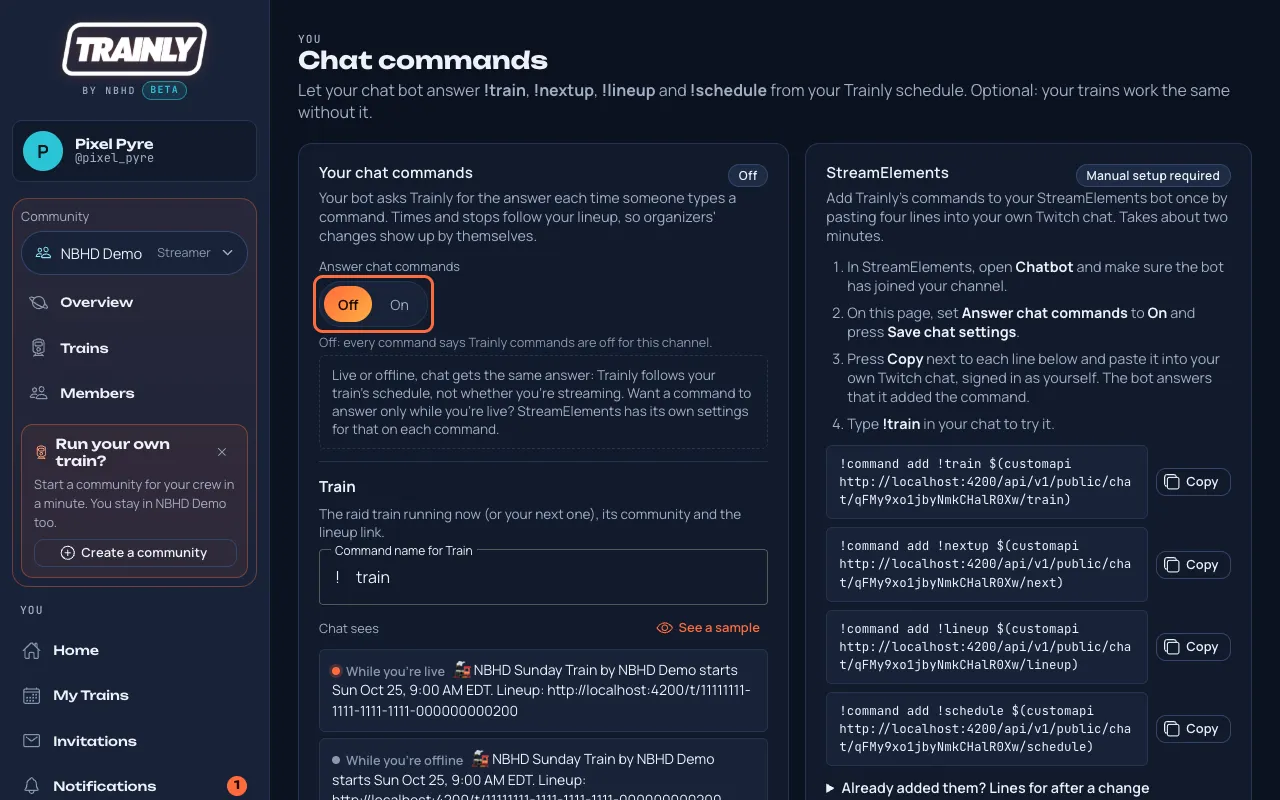
Under Your chat commands, set Answer chat commands to On. Each command shows Chat sees: exactly what it would answer right now, While you're live and While you're offline. The two are the same, because Trainly follows your train's schedule, not whether you're streaming.
Answer chat commands (outlined in coral). Set it to On, then press Save chat settings at the bottom of the box.
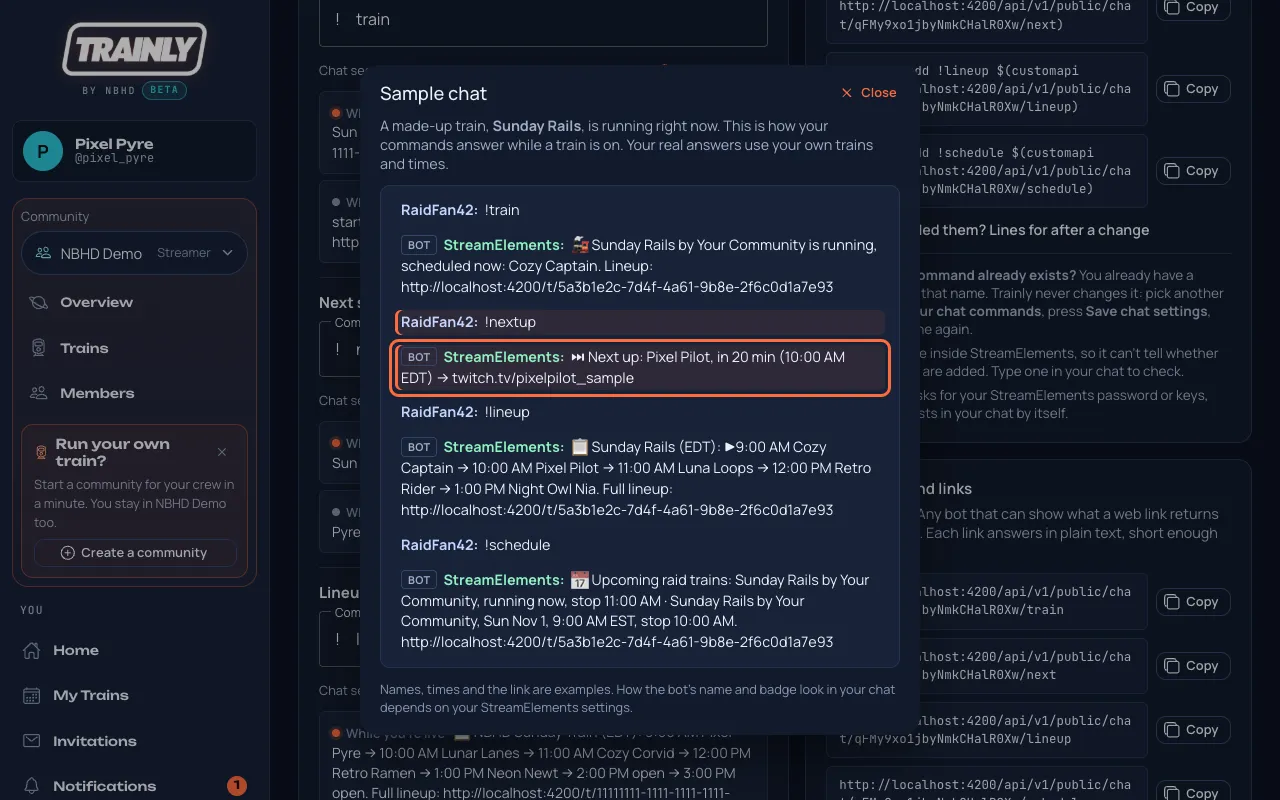
Not on a train yet, or want to see it in action? Press See a sample next to Chat sees. A window shows a made-up train, Sunday Rails, running right now: a viewer types each command and the bot answers, so you can see exactly how it looks in chat. Press Close when you're done.
The Sample chat window. The command you picked is highlighted (outlined in coral). Everything in it is made up.
Want other names? Change them in the boxes (for example raidtrain instead of train). Use letters, numbers or underscores, no spaces. Then press Save chat settings.
In StreamElements, open Chatbot and make sure the bot has joined your channel.
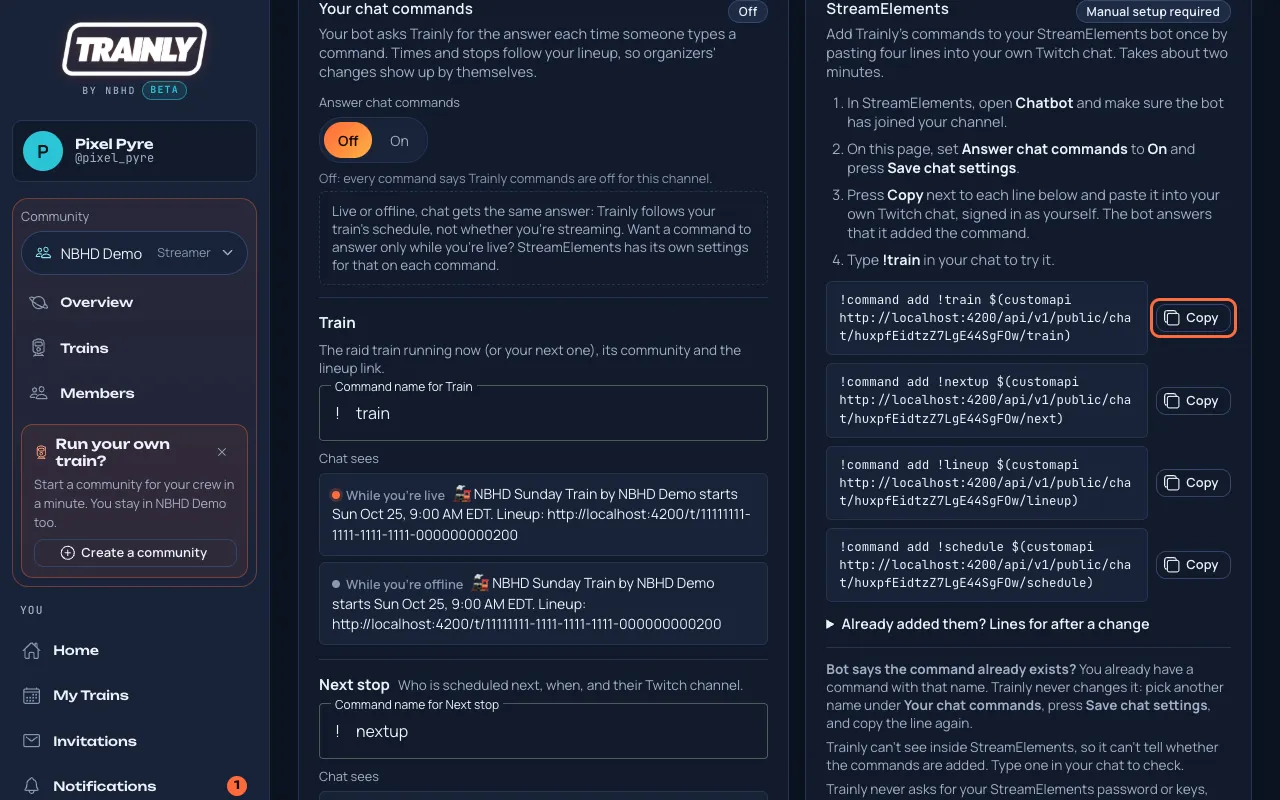
Back in Trainly, in the StreamElements box, press Copy next to the first line, paste it into your own Twitch chat (signed in as yourself) and send it. The bot says it added the command. Do the same for the other three lines.
The four lines to paste into your chat. Press Copy (outlined in coral) next to each one.
Type !train in your chat. The bot answers with your train, its community and the lineup link.
What each command says:!train: the train running now (or your next one), its community and the lineup link. !nextup: who is scheduled next, when, and their Twitch channel. !lineup: the stops in order with their times. !schedule: your next trains and your stop in each. The answers follow the schedule, not Twitch: Trainly never says someone is live, and it never starts a raid.
Only while you're live? Trainly gives the same answer whether you're live or offline. If you want a command to answer only while you're streaming, change that command's settings in StreamElements; Trainly doesn't change it for you.
Why !nextup and not !next? StreamElements already has its own !next for song requests, so Trainly's starts as !nextup. You can rename it.
Two trains at the same time? If you're on two trains that run at once, the page asks When more than one train runs at once: pick the train your commands should use, or Pick for me, then press Save chat settings.
What it shares: only what your trains' public pages already show. Private trains and drafts are never included. Trainly never asks for your StreamElements password or keys, and it never posts in your chat by itself: the bot only answers when someone types a command.
Tip: a link got somewhere it shouldn't? Press Make new links under Your command links. The old links stop working at once. Then open Already added them? Lines for after a change and paste those lines (they start with !command edit) into your chat.
Another bot?Your command links lists the four links on their own. Any bot that can show what a web link returns can use them.
The organizers' lineup command (Flyer and lineup command) is text you copy once, so it doesn't change when the lineup does. Trainly's chat commands answer from the live schedule. If you already added the organizers' !lineup, give Trainly's another name or remove the old one in StreamElements.
The bot says the command already exists? You already have a command with that name. Trainly never changes your own commands: pick another name under Your chat commands, press Save chat settings, and copy the line again.
The bot answers "Trainly commands are off for this channel"? Set Answer chat commands to On and press Save chat settings. If you pressed Make new links, paste the new lines from Lines for after a change.
The bot doesn't answer at all? Check in StreamElements that the bot has joined your channel and isn't muted, and that the command is on. Trainly can't see inside StreamElements, so it can't tell whether the commands are added.
Add TrainlyBot to your chat
Who: Every streamer, for their own channelAbout 1 minute, once
TrainlyBot is Trainly's own chat bot for raid trains. Add it to your Twitch chat once from Trainly. You can turn it off at any time. Look for the Conductor: TrainlyBot's mascot, the little robot in a conductor's cap, waves on the TrainlyBot page.
Open TrainlyBot in the menu (under Tools).
Press Add TrainlyBot to my chat. Twitch opens and asks for one permission: letting TrainlyBot join your chat as a bot. Check that Twitch shows your own channel, then press Authorize. You come back to the TrainlyBot page.
Under Your chat, check the list: Added to your chat, Twitch lets it post and Moderator (recommended).
Recommended: type /mod trainlybot in your own Twitch chat, then press Check again. As a moderator, TrainlyBot can post more often, even in a busy chat.
Press Send a test post. A short message from TrainlyBot appears in your chat, and Recent posts in your chat shows it as Posted. You can send one test post a minute. The list shows 10 posts at a time, newest first: use Previous, Next or a page number under it for older ones.
Or in one click: on www.trainlybot.com, press Add TrainlyBot to my chat and approve on Twitch. You don't need to sign in to Trainly first; if you're new, your Trainly account is made from your Twitch login. Settings and Turn off are still here on the TrainlyBot page.
Already a moderator? If TrainlyBot is already a moderator in your chat, you don't need the Twitch step: press Check again and Trainly adds it.
What TrainlyBot does in your chat: three switches, Answer chat commands, Automatic train posts and Streamer commands. Set them and press Save.
Commands your chat can type:!train, !nextup, !lineup, !schedule and !trainly. While Answer chat commands is on, TrainlyBot answers each one once every 30 seconds. If your StreamElements bot answers them too, chat gets two answers: remove them in StreamElements, or set Answer chat commands to Off here.
What it can't do: TrainlyBot can't ban anyone or change your channel. It only starts a raid when you type !raidnow yourself, after you turned on Let TrainlyBot start my raids. Trainly never sees your Twitch password.
Turn it off: press Turn off TrainlyBot and confirm. It stops posting in your chat at once, and you can add it again later. To remove Trainly from Twitch completely: Twitch › Settings › Connections › Trainly › Disconnect. TrainlyBot then turns off in Trainly too.
Automatic train posts: when you're on a train whose organizers turned on TrainlyBot posts, TrainlyBot posts the train's moments in your chat while you're live: the train start, who's next, the raid reminder (you still start the raid yourself) and the end of the line. Set Automatic train posts to Off and press Save to stop them in your chat.
Commands only you can type: in your own Twitch chat, !ready checks you in for your stop (from 30 minutes before it starts), !late 10 tells the organizers you're running late (the number is minutes), !cantmake tells them you might not make your stop, and !trainlybot pause stops TrainlyBot's train posts in your chat until your stream ends (!trainlybot resume turns them back on; your moderators can type these two as well). TrainlyBot answers so you know it worked. Viewers who type them get nothing. To turn them off, set Streamer commands to Off and press Save. While the site is in test mode, try them under Try a command.
Shoutouts: if your chat is on a train with Shoutout on, TrainlyBot gives the next streamer a Twitch shoutout at handoff. For that, TrainlyBot must be a moderator in your chat (/mod trainlybot) and added with Add TrainlyBot to my chat.
Let TrainlyBot start my raids: an extra Twitch permission, separate from adding TrainlyBot. Press Let TrainlyBot start my raids and approve on Twitch. Then, during your stop, type !raidnow in your chat to raid the next stop on the lineup, or !raidcancel to stop a raid that is still counting down. Twitch still shows you its pop-up and 90-second countdown. Only you can type these, and TrainlyBot never raids anyone else or on its own. To take the permission back, press Stop letting TrainlyBot start my raids.
A post says Not posted? The reason is shown under it. Most often Twitch no longer lets TrainlyBot in: press Add TrainlyBot to my chat again, or type /mod trainlybot in your chat and press Check again.
The page says TrainlyBot isn't available yet? Trainly hasn't switched its bot on yet. Come back later.
Turn on TrainlyBot posts for a train
Who: Organizers and Owners, and moderators picked for the trainAbout 1 minute
TrainlyBot can post the train's moments in each stop's Twitch chat: when the train starts, who's next, the raid reminder and the end of the line. It's off for every train until you turn it on.
Open the train and scroll down to the TrainlyBot card.
Set TrainlyBot posts to On.
Press Which posts to open it (closed, it shows how many are on, like "9 of 9 on") and tick the posts you want: Train start, All aboard, Next stop is live, Handoff heads-up, Raid reminder, Change of plans, Welcome raiders and End of the line. Each one says when it's posted. All are ticked at first.
Optional: set Lineup timer to Every 30 min or Every 60 min to post who's next in the chat of the stop on air.
Press Save TrainlyBot settings.
Check Stops. Only stops marked Ready get posts. For the others, press Copy invite to TrainlyBot and paste the invite to those streamers: each streamer adds TrainlyBot to their own chat (how).
When TrainlyBot posts: only in the chat of a stop that is live on Twitch, each post once, in the language that streamer picked in Trainly. The raid reminder shows the /raid command to type: TrainlyBot never starts the raid. A streamer whose profile is private is called "the next streamer" instead of by name.
This train's posts (press it to open) lists what TrainlyBot posted for this train, marked Posted or Not posted with the reason.
Moderators who weren't picked for this train see the card but can't change it.
Checked in and heads-ups from chat: when a streamer types !ready in their chat, the lineup shows Checked in with the time. !late 10 and !cantmake arrive as the usual heads-up (Running late, "10 min", or Might not make it) with a notification, just like from the train page.
Organizer messages: press Organizer messages to open it. Closed, it shows how many you have and how often one goes out, like "2 of 5 · every 30 min". Press Add a message: a window opens with a big box for up to 300 characters, for example your Discord link or "follow everyone on the lineup". Press Save message. To change a message, press Edit next to it; Remove message in the same window takes it out. You can have up to 5. Set Post one to Every 30 min or Every 60 min: that is saved right away. TrainlyBot posts them one at a time, in order, in the chat of the stop on air, only while TrainlyBot posts is On. It takes out @ pings and leading command characters. Only Organizers and Owners can change them; Moderators see them.
Shoutout: with Shoutout ticked under Which posts, TrainlyBot gives the next streamer a Twitch shoutout at each handoff (Twitch shows its own card with a Follow button). Twitch only allows it in chats where TrainlyBot is a moderator and was added with Add TrainlyBot to my chat, and never for a streamer with a private profile.
What do the stop labels mean?Not added: that streamer hasn't added TrainlyBot yet, so send the invite. Posts off: the streamer set Automatic train posts to Off. Turned off: the streamer turned TrainlyBot off. Twitch says no: Twitch no longer lets TrainlyBot into that chat, so the streamer adds it again. No streamer yet: the slot is still open.
Answer an invitation
Who: Everyone who is invitedAbout 1 minute
Organizers invite you to a slot in their train. Say yes or no so they know who is coming.
Open Invitations in the menu. A number next to it means invitations are waiting for you. On a phone, press Invites in the bottom bar.
Each card shows the community, the train, your slot and its time in your timezone. If the train runs in another timezone, its own time is shown too ("Train time").
Check Answer within…: after that deadline the invitation expires and the slot goes to someone else. Open Train guidelines to read the community's rules.
Press Accept to take the slot, or Decline if you can't make it. When you decline you can leave a short note for the organizer (optional).
An invitation waiting for an answer. Press Accept or Decline (both outlined in coral).
Some invitations say Pick a slot or Roster call · pick a slot. Press the slot button under the invitation (it says Choose a slot or shows a slot such as #3), pick a time, then press Accept. The first person to accept a slot gets it.
After you accept, the slot appears in My Trains and the organizer gets a notification.
Tip: the Answered tab keeps everything you've already replied to. Ten invitations fit on a page: press Next or a page number under the list for older ones.
"You already have a confirmed train at this time"? You accepted another train (in any of your communities) that overlaps this slot. Trainly won't let you be in two places at once. Withdraw from the other one first, or decline this one.
"That slot was just taken"? Someone else accepted it a moment before you. For a "pick a slot" invitation, choose another time and press Accept again.
"This invitation expired"? The deadline passed before you answered. Ask the organizer to send it again.
"Train draft" on the invitation? The organizers are still planning the train and invited you before opening it to everyone. You can open it with View train and answer right away; only invited streamers can see it until it's published.
See all your trains in My Trains
Who: EveryoneAbout 1 minute
One list of every slot you've accepted, in every community you stream for, shown in your own time.
Open My Trains in the menu (on a phone, Trains in the bottom bar).
Upcoming lists your next slots, grouped by day in your timezone. Each card shows the community, the train, your slot number and your start and end time.
Each card also shows the pictures of the train's confirmed streamers (+ for the rest), and while it runs, On now: who is streaming.
If the train runs in another timezone, the card also shows the Train time in that zone, so you can compare with the community's announcements.
Two trains from two different communities in one list. The outlined card runs in London, so its own time is shown under yours.
Press View train to open the whole lineup and its guidelines.
Past shows trains you've done; Canceled shows trains the organizer canceled.
Good to know: daylight saving changes are handled for you. If your country changes its clocks on a different weekend than the train's, the time you see is still right.
Times look a few hours off? Your account timezone is probably still UTC. See Set your timezone.
Can't make it? Swap your slot or send a heads-up
Who: Everyone with a confirmed slotAbout 1 minute
Something came up? You don't have to drop out. Ask another streamer on the train to trade times, or warn the organizers that you're late and keep your slot.
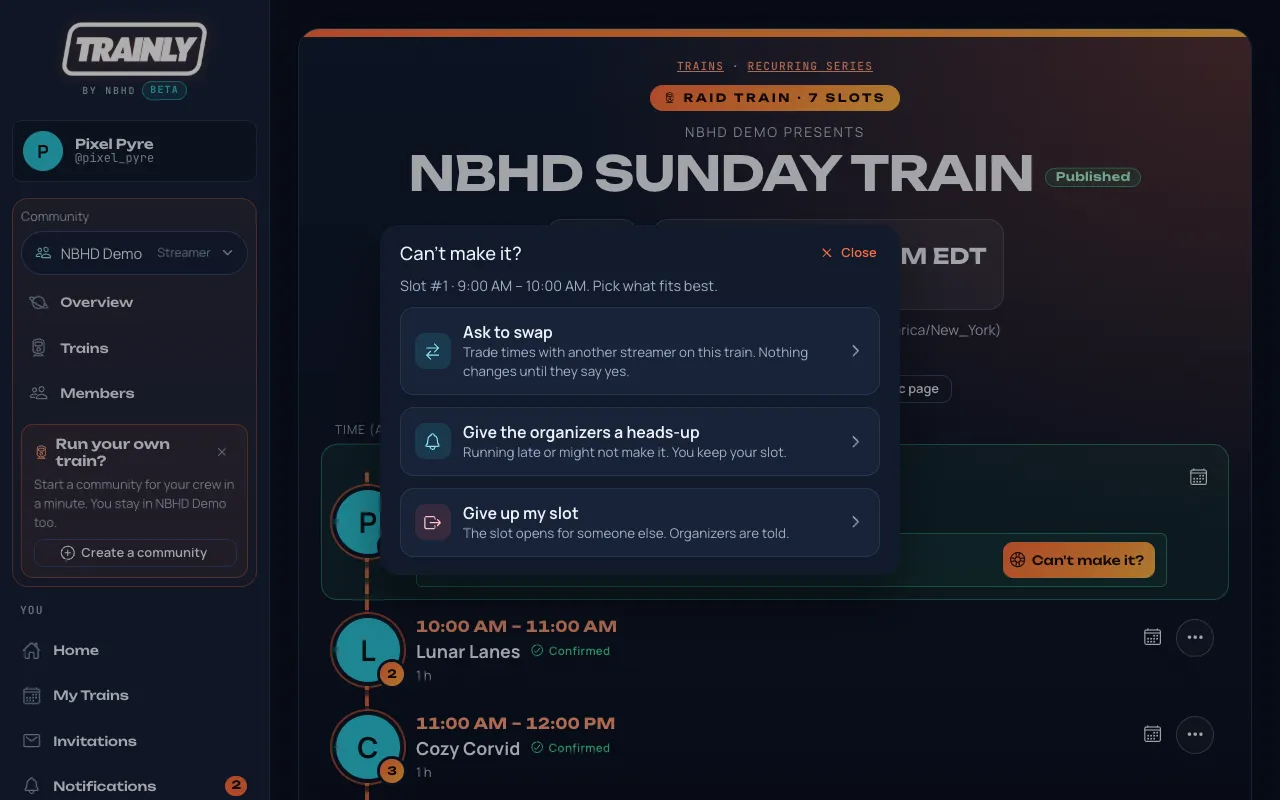
Open the train. Your stop in the Lineup says Your slot. Press Can't make it? on it.
Three ways out. Nothing happens until you pick one and confirm it. Close (top right) goes back to the train.
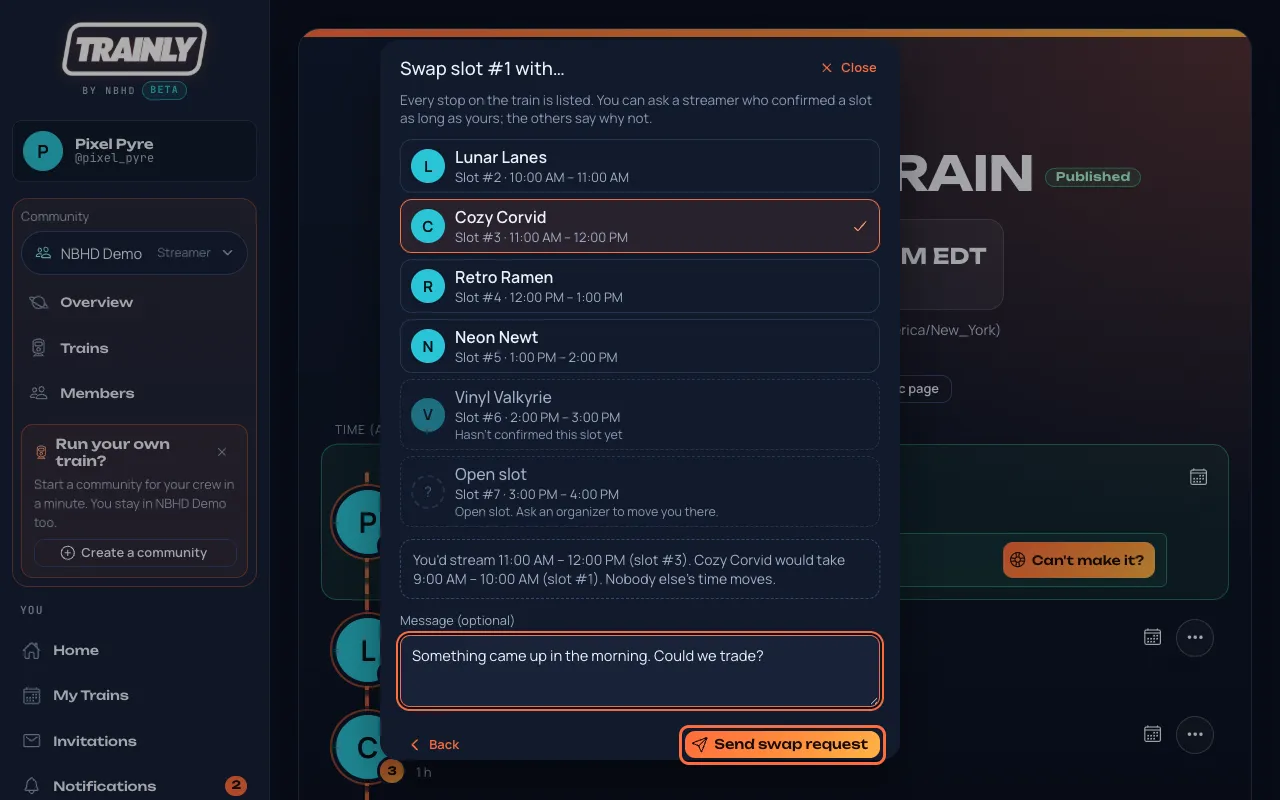
To trade times: press Ask to swap and pick a streamer. Trainly says what would change, for example "You'd stream 11:00 AM to 12:00 PM (slot #3). Cozy Corvid would take 9:00 to 10:00 AM (slot #1)." Add a message if you like, then press Send swap request.
Every stop on the train is listed. You can pick a streamer who confirmed a slot as long as yours; the others are greyed out and say why (for example "Hasn't confirmed this slot yet" or an open slot).
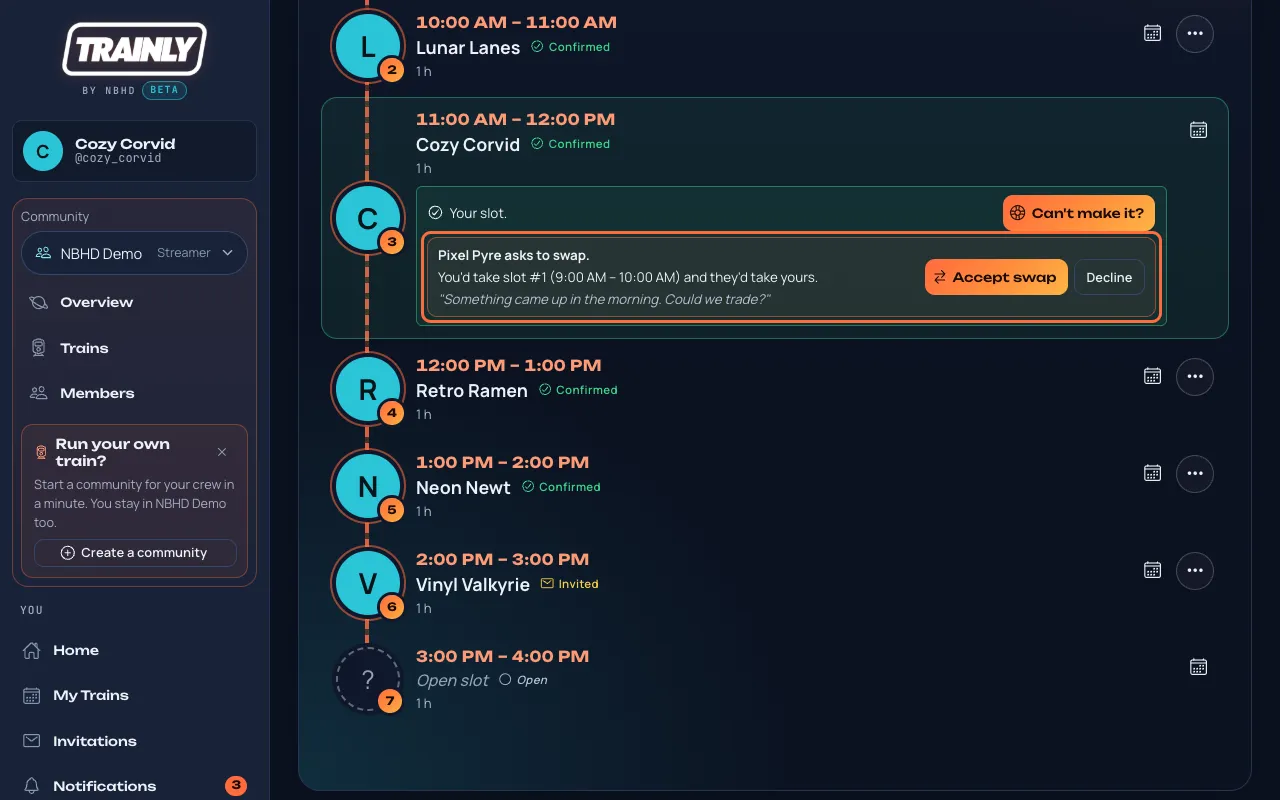
The other streamer gets a notification and sees your request on their stop, with Accept swap and Decline. Nothing moves until they accept. Then you trade times at once, and the organizers are told. Until then your stop says Swap asked · waiting for …; press Take back to cancel it.
What the other streamer sees on their stop.
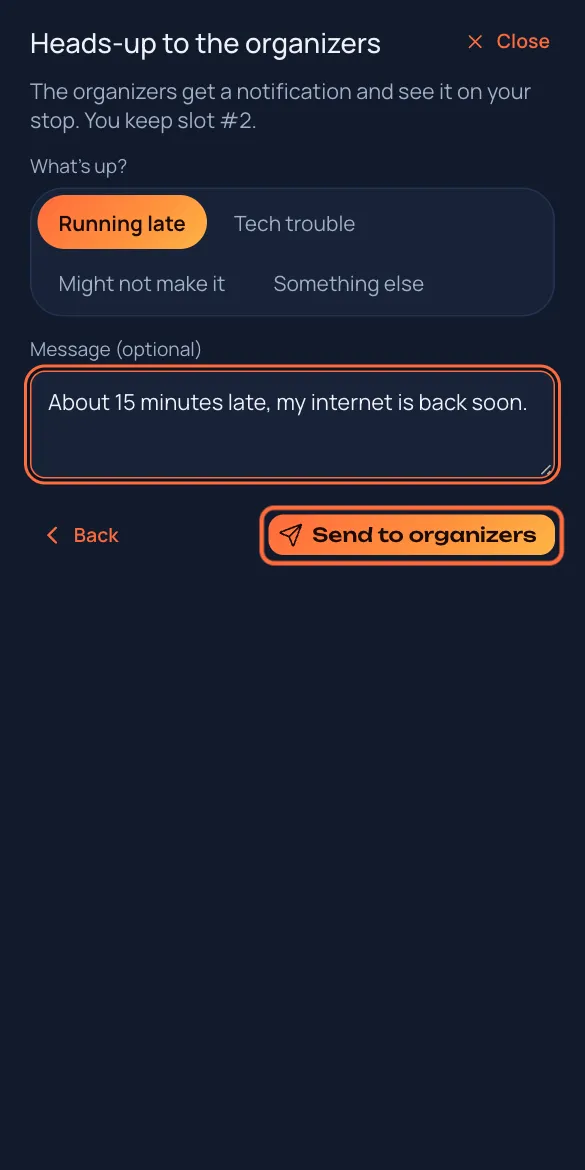
To warn the organizers: press Give the organizers a heads-up, pick Running late, Tech trouble, Might not make it or Something else, add a message if you like, and press Send to organizers. You keep your slot.
On a phone it fills the screen. Close at the top right takes you back.
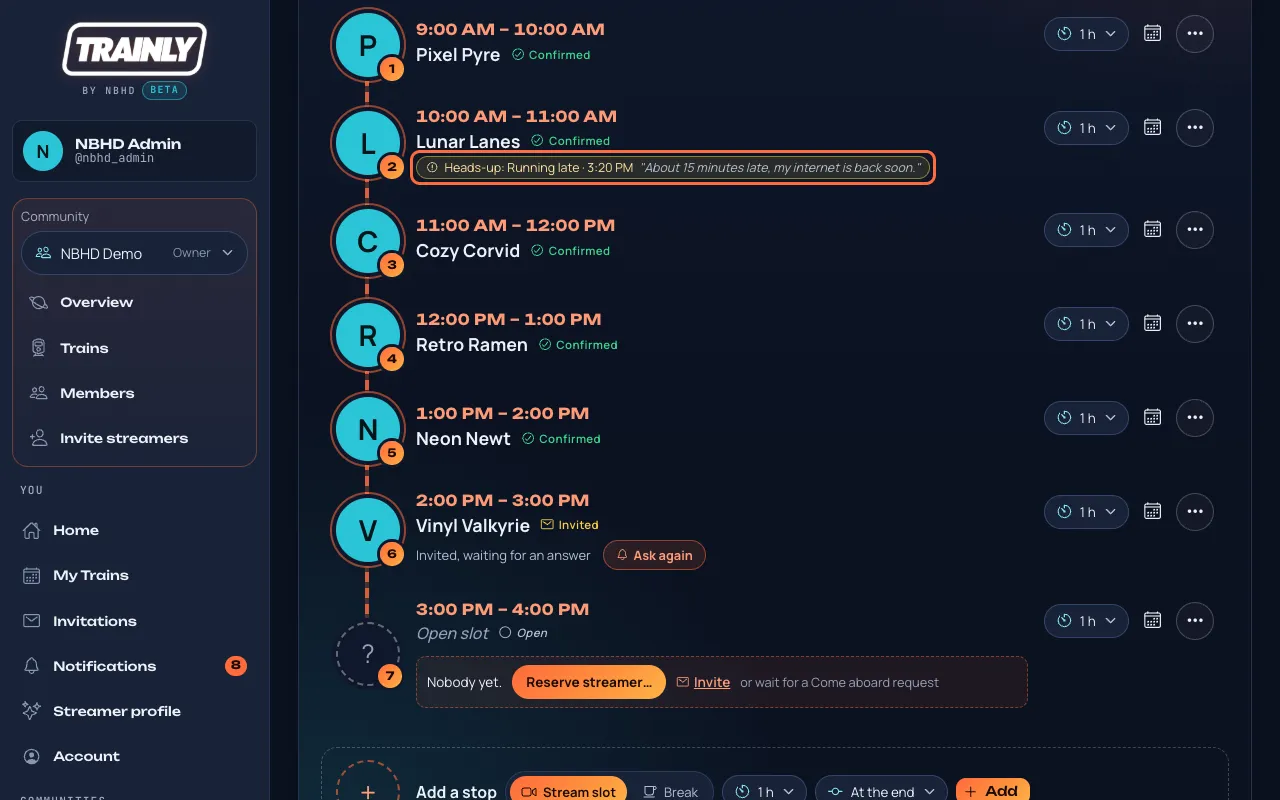
The organizers get a notification and see an amber Heads-up on your stop. Other streamers don't see it. When things are fine again, press All set again on your stop.
What organizers see on the lineup.
Tip: really can't come? Choose Give up my slot in the same window. The slot opens for someone else and the organizers are told (more).
Someone can't be picked for a swap? They may not have confirmed their slot yet, or it's an open slot (ask an organizer to move you there). Swaps keep everyone else's time the same, so only slots of the same length work. Locked slots and slots that already started can't be swapped. Swaps work on drafts too, until the train starts. Ask an organizer: they can still move stops with Swap with in the lineup. "They already have a confirmed train at your time" means accepting would double-book them.
Withdraw from a train you accepted
Who: EveryoneUnder a minute
Plans change. Withdrawing frees your slot and tells the organizers right away so they can find someone else. It works for every slot you hold: one you accepted from an invitation, one you came aboard, or one that was reserved for you and you accepted.
Open My Trains and find the train. Every upcoming slot has a Withdraw button.
Press Withdraw on its card.
Add a short note for the organizers if you like (optional), then press Withdraw to confirm. Press Keep my slot if you changed your mind.
Tip: you can do the same from the train page. In the Lineup, press Can't make it? on your slot, then Give up my slot. Add a note if you like, then press Give up slot to confirm. The same window also lets you ask another streamer to swap or send a heads-up instead. If the slot came from an invitation, you can also withdraw from its card in Invitations › Answered.
Good to know: once you withdraw, you can't take the slot back yourself. On a published train you can ask to come aboard again if the slot is still open; otherwise ask the organizer to put you back.
Send a message to someone on a train
Who: Streamers on the train, its event moderators, Crew, Moderators, Organizers and OwnersUnder a minute
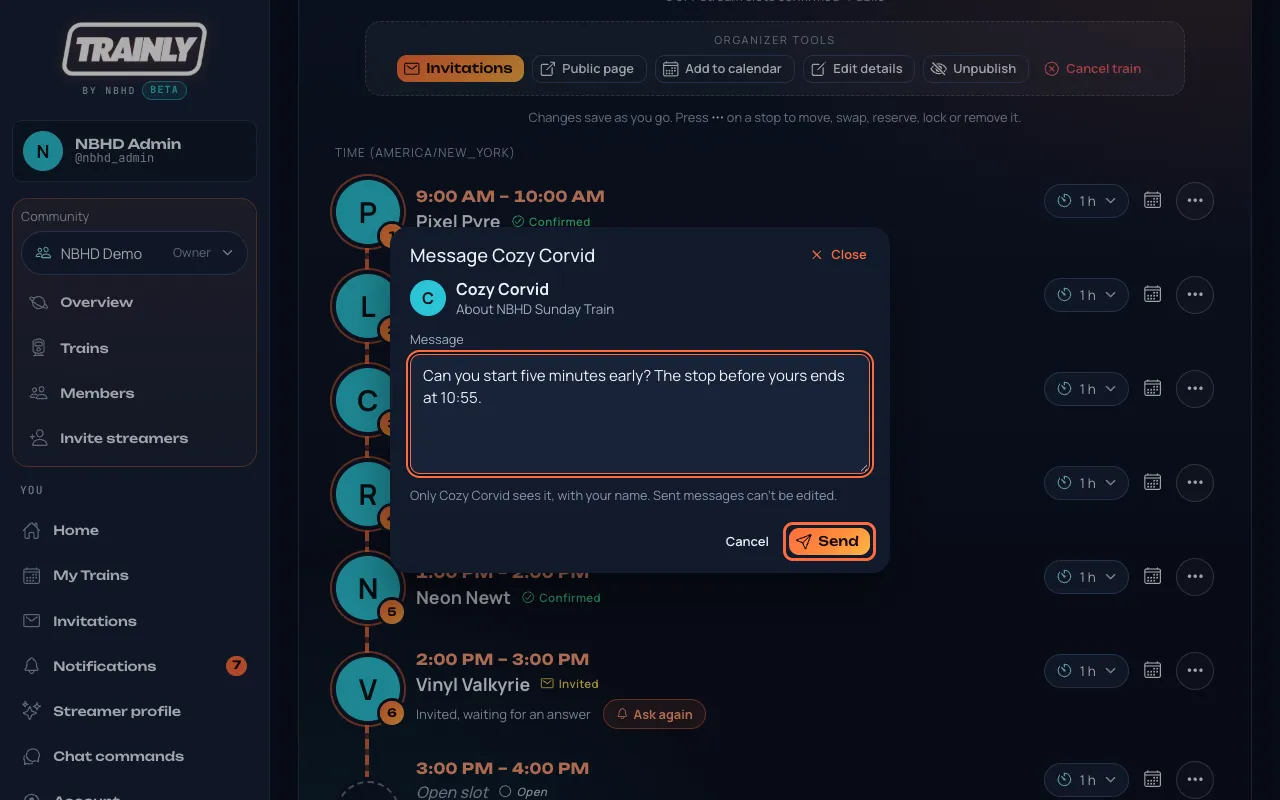
Need to tell one streamer something about a train, like starting a few minutes early? Send it from the lineup. Only they see it, and they get a notification.
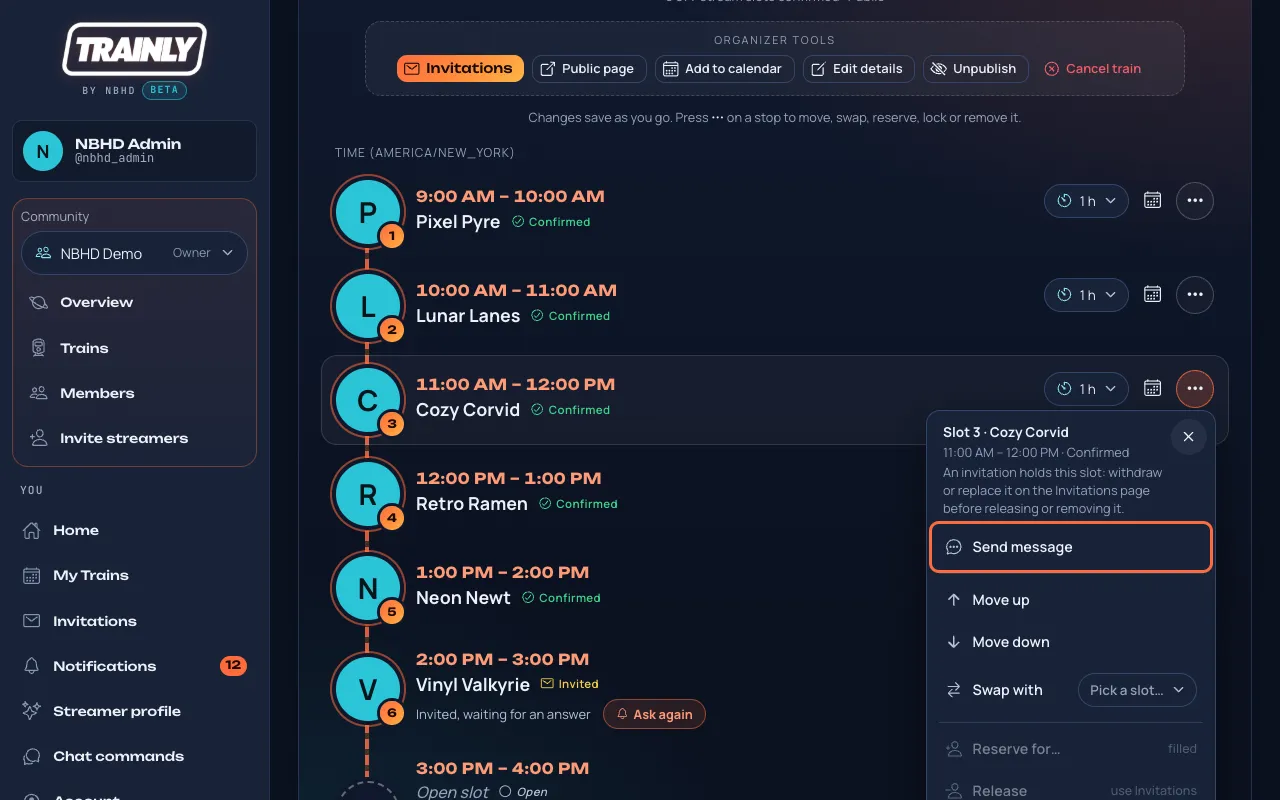
Open the train. In the Lineup, press ⋯ on the stop of the person you want to write to, then Send message.
Send message is at the top of the ⋯ menu. Streamers see ⋯ only on other people's stops, with just Send message in it.
Write your message (up to 500 characters) and press Send. Cancel closes the window without sending.
Only the person you write to sees it, with your name. A sent message can't be edited or taken back, so read it once before you press Send.
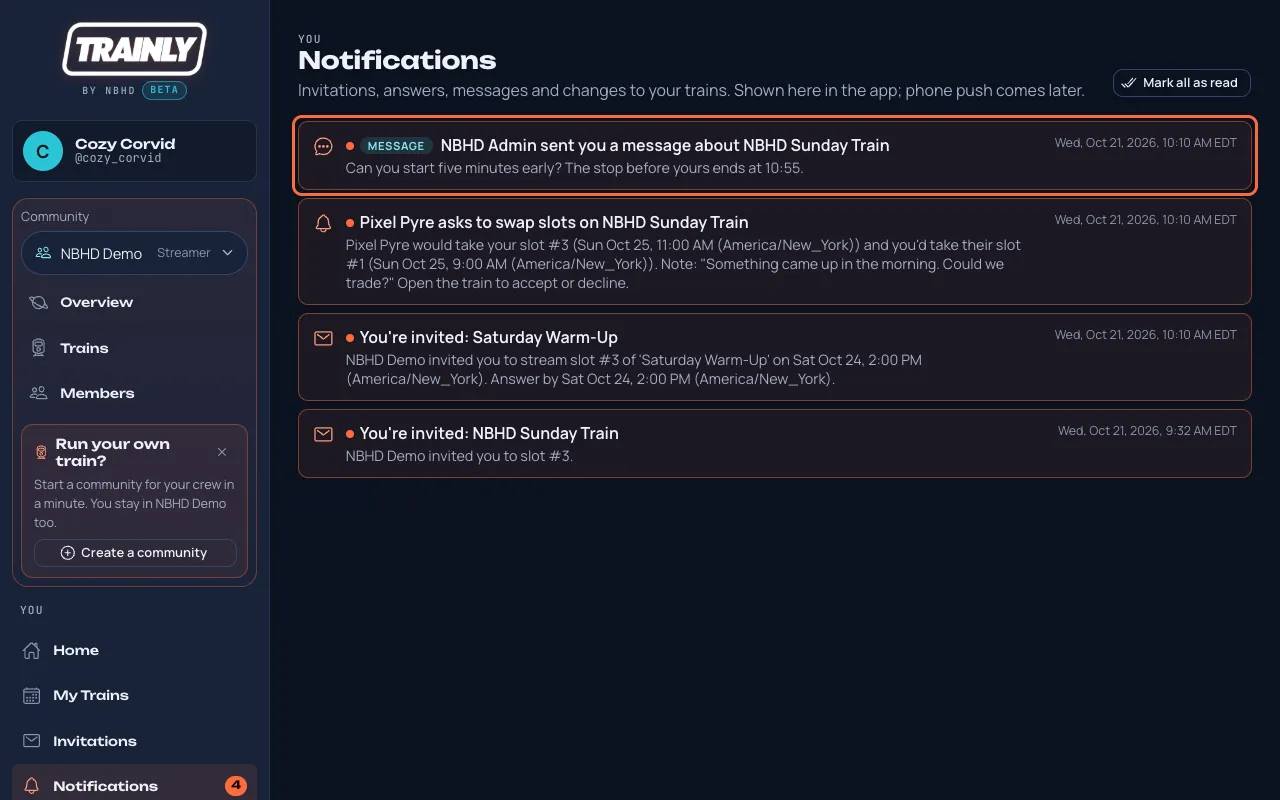
They get a notification marked Message with your name, the train and the start of your message. Pressing it opens the train at their messages. Every message also lands on Messages in that community's part of their menu.
What the person you wrote to sees in Notifications.
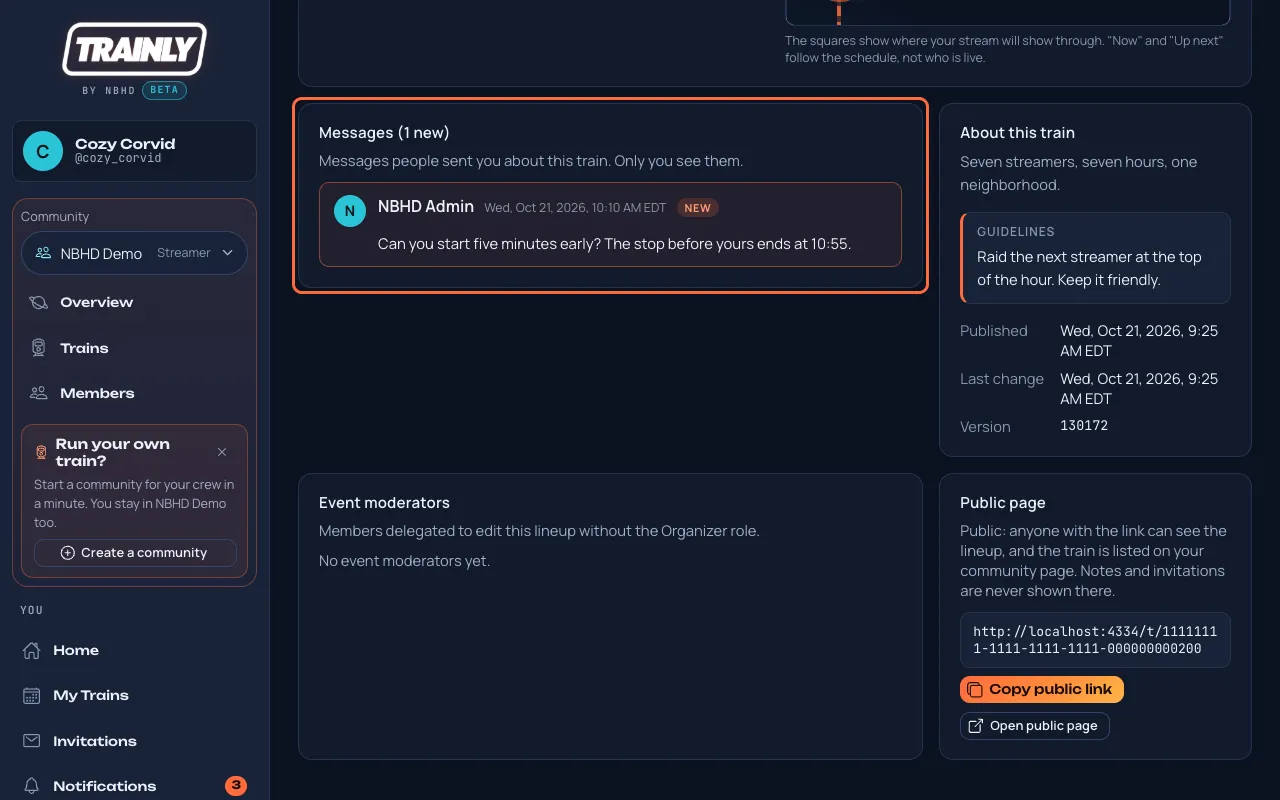
On the train page, a Messages card shows the three newest messages sent to them about that train, by anyone, with who sent it and when. With more, See all … on the Messages page opens the rest. The first time they see a message it's tagged New.
The Messages card sits with the other cards of the train, next to About this train.
Good to know: the Messages card only shows up for someone who has received a message about that train, and each person sees only their own. Seeing it marks the messages and their notifications as read. To answer, press Reply on the Messages page: once per message.
No Send message? You can write to people on a train's lineup if you have a slot on it (reserved, invited or confirmed), you're one of its event moderators, or you're Crew, a Moderator, an Organizer or an Owner of the community. A Streamer who isn't on that train can't. You can only write to someone on the lineup, never to yourself. "You've sent a lot of messages in the last hour" means you reached the limit (10 an hour to the same person, 30 an hour in all): wait a little and try again.
Send a message to a member from Members
Who: every memberUnder a minute
Want to welcome a new member or tell someone something that isn't about one train? Write to them from the community's member list. Only they see it, and they get a notification.
Open the community and press the Members tab (or Members in the menu). Find the person; Search by name or Twitch name helps in a big community.
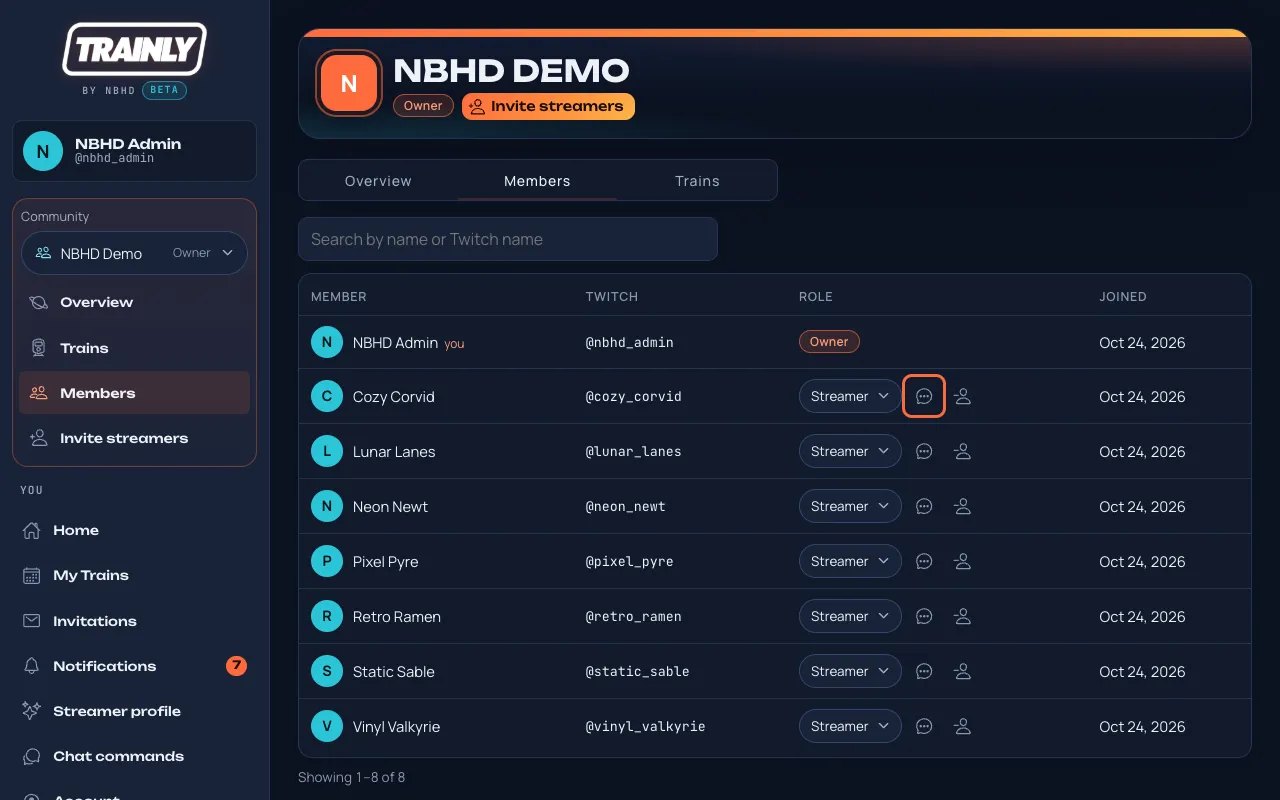
On their row, next to their role, press the chat bubble (Send message). It isn't on your own row.
The chat bubble on a member's row is Send message.
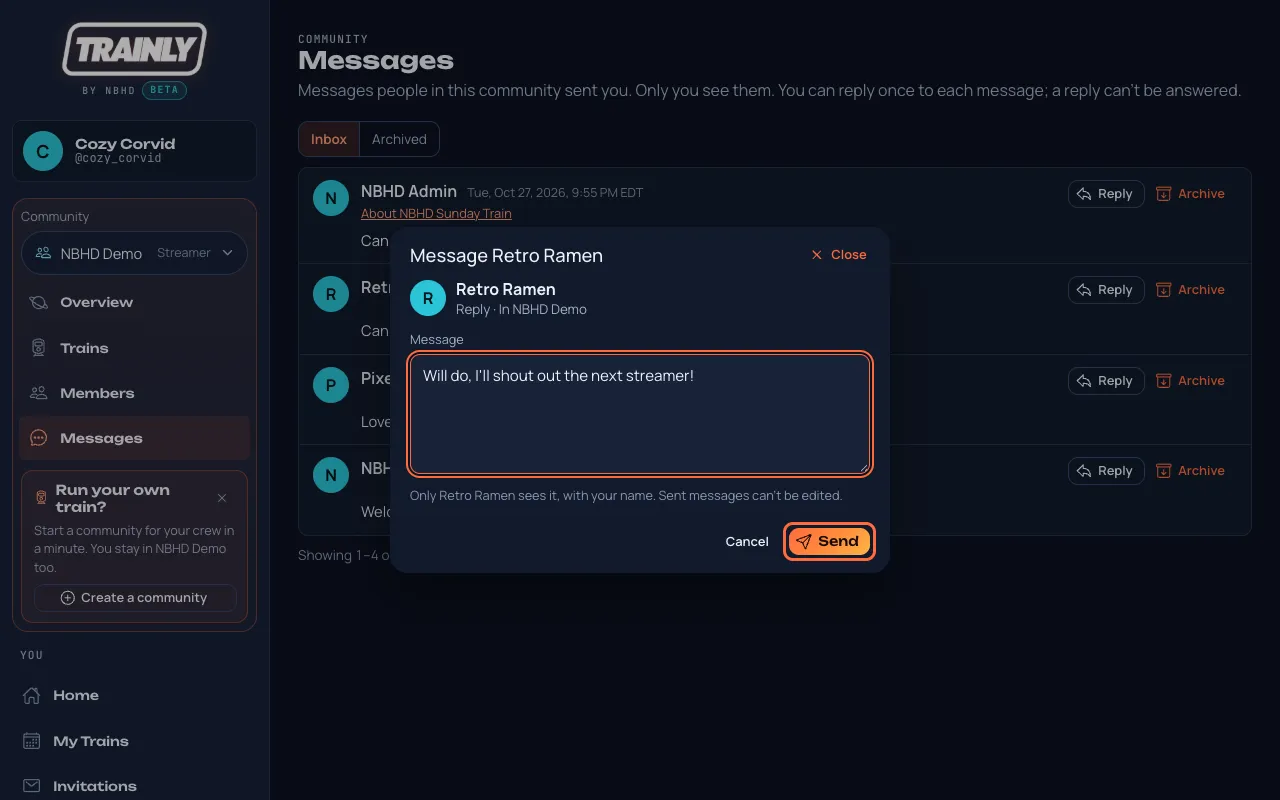
The same window as on a train opens, with In and your community's name under theirs. Write your message (up to 500 characters) and press Send. Cancel closes it without sending.
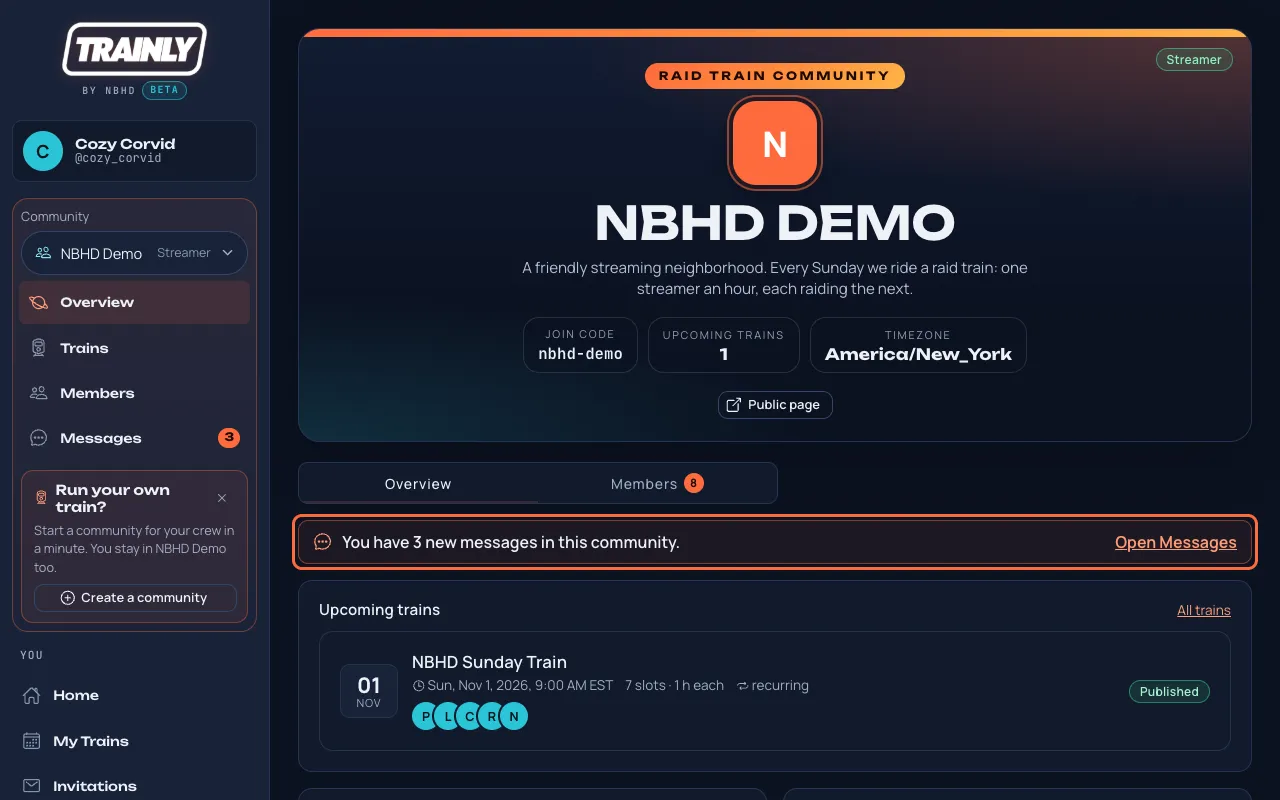
They get a notification marked Message: "… sent you a message in" your community. Pressing it opens that community's Messages. On the community's Overview, one line says how many messages there are new, with Open Messages.
The Overview keeps it to one line, so Upcoming trains stays near the top. It shows only while something is new.
Good to know: every member, Streamers and Crew included, has the chat bubble on Members. A sent message can't be edited, and the same limits apply to everyone: 10 an hour to the same person, 30 an hour in all, counting messages about trains too. Messages are short notes, not a chat; see Read and answer your messages.
Read and answer your messages
Who: everyoneUnder a minute
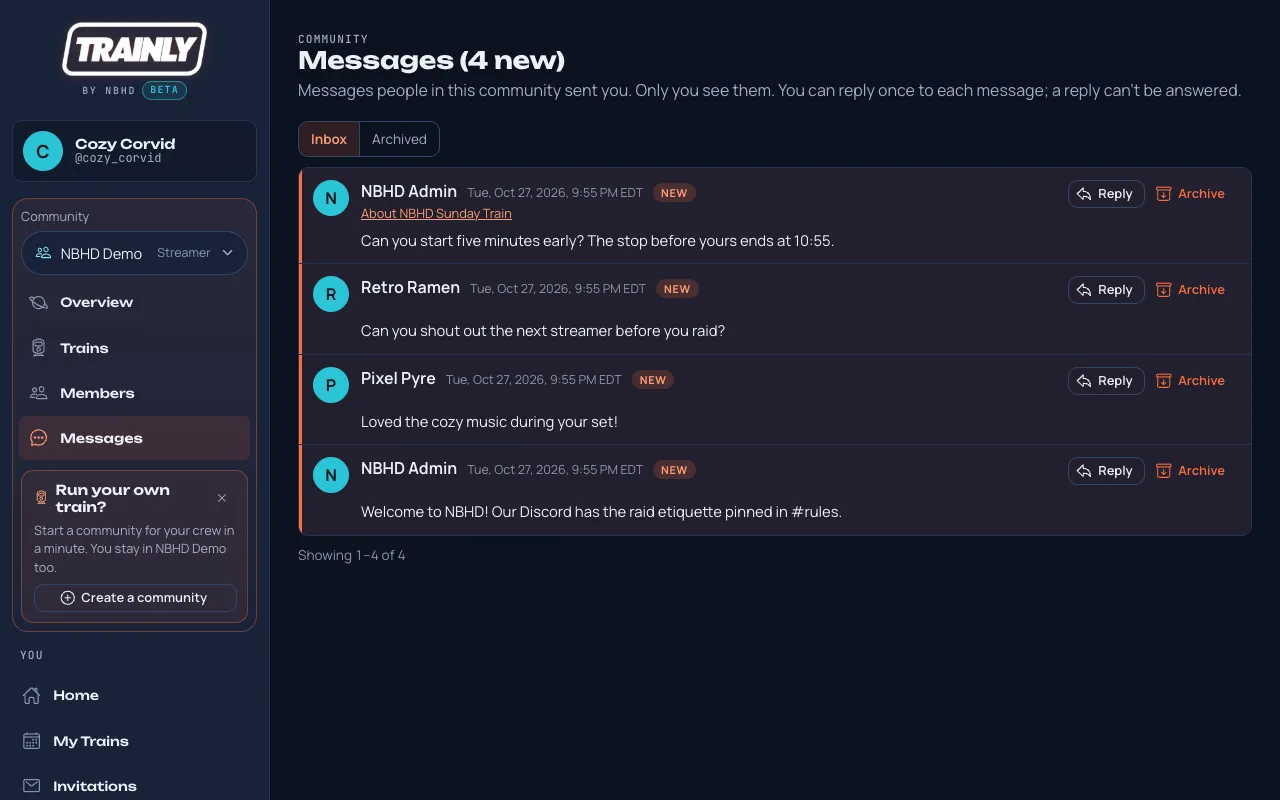
Each community has its own Messages, right under Members in the menu: what people in that community sent you, about a train or from Members. Answer one with a single reply, and archive the ones you're done with.
Pick the community at the top of the menu, then press Messages under Members (on a phone, open the menu with ☰ first). The number next to it is how many you haven't read in that community. Open Messages on the community's Overview and a Message notification open it too.
Newest first, ten a page. A message about a train says About and the train's name (press it to open the train).
The first time you see a message it's tagged New; seeing it marks it read. With more than ten, use Previous, Next or a page number at the bottom. In more than one community? New in your other communities: above the list names the others with unread messages; press one to read them, or switch with the Community button.
To answer, press Reply. The same window as Send message opens, for the person who wrote it. Write up to 500 characters and press Send. You can reply once; after that the message says You replied and when.
A reply goes only to the person who wrote the message, in the same community or about the same train.
When someone answers you, their reply starts with Replying to your message: and the start of what you wrote. A reply can't be answered; to write again, use Send message on the Members tab.
Done with a message? Press Archive to move it out of your inbox. Archived lists them; Move to inbox brings one back.
Good to know: messages are short notes, not a chat. There's no typing indicator and no "seen" for the sender, and the page doesn't update by itself: open it again to see new ones. Only you see your messages.
No Reply button? You already replied (the message says You replied), the message is itself a reply, or the person who wrote it has left the community.
Check your notifications
Who: EveryoneUnder a minute
Trainly tells you when you're invited, when someone answers your invitation, when someone sends you a message, and when a train you're in changes.
Open Notifications in the menu (on a phone, Alerts in the bottom bar). The number next to it is how many you haven't read.
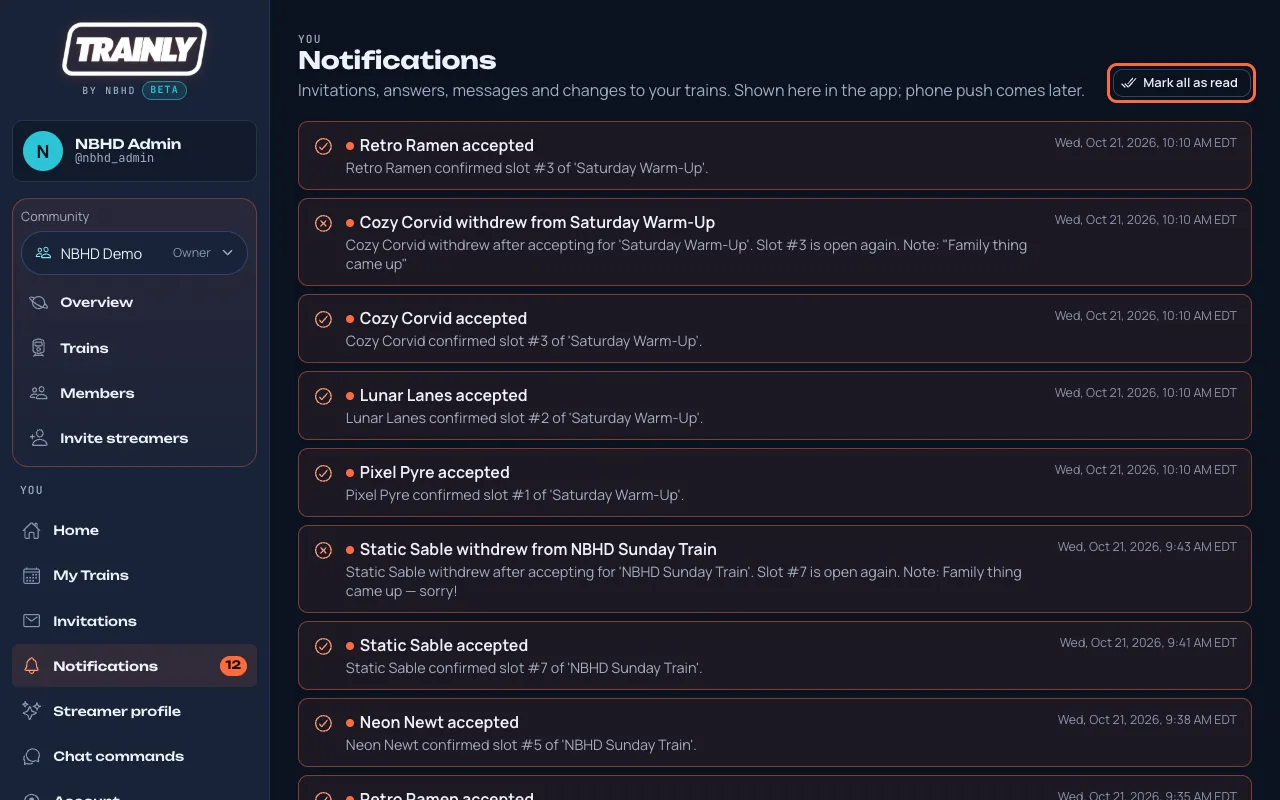
Unread notifications have a coral dot. Press one to open the page it's about; it's marked as read.
Press Mark all as read to clear the count.
An organizer's notifications: who accepted, who withdrew (with their note). Mark all as read is outlined in coral.
Twenty notifications fit on a page, newest first. Under the list, "Showing 1–20 of …" says how many you have; press Next, Previous or a page number for older ones.
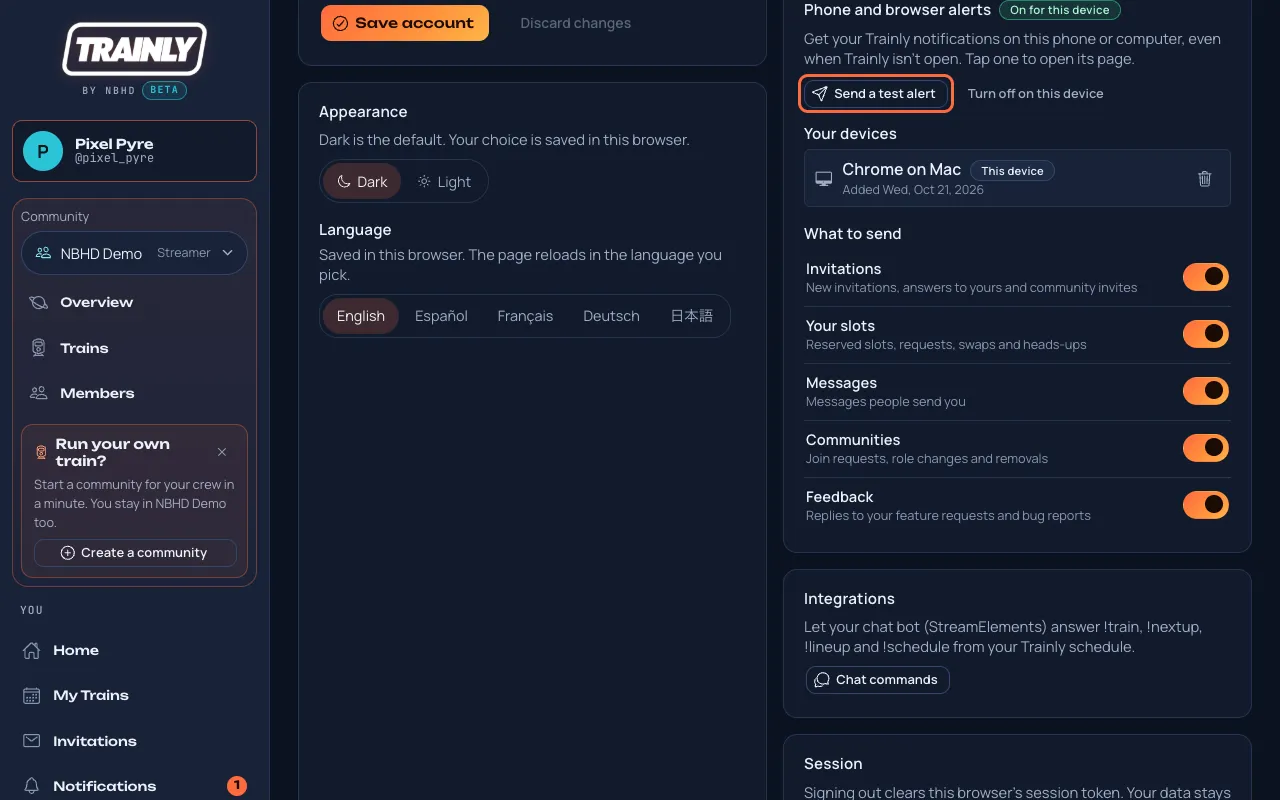
Trainly can show your notifications on your phone or computer, even when Trainly isn't open. Tap one to open its page.
Open Account in the menu.
Under Phone and browser alerts, press Turn on alerts on this device. When the browser asks, press Allow.
Press Send a test alert to check. It can take a few seconds to show up.
Alerts are on for this browser. Press Send a test alert (outlined in coral) to check, and choose what to send below.
Under What to send, switch off any kind you don't want on your devices: Invitations, Your slots, Messages, Communities or Feedback.
To stop alerts on a device, press Turn off on this device, or the bin next to it under Your devices.
iPhone and iPad: alerts work once Trainly is on your Home Screen (iOS 16.4 or later). In Safari, press Share, then Add to Home Screen, open Trainly from the new icon, sign in, and turn alerts on there.
Good to know: alerts copy your notifications; everything still shows under Notifications. Signing out turns alerts off on that browser, so the next person doesn't get yours. If the card says alerts aren't switched on for this site yet, they're on their way.
Ask for a feature or report a bug
Who: Everyone2 minutes
Tell the Trainly team what you'd like Trainly to do, or what doesn't work. You see our answer on the same page.
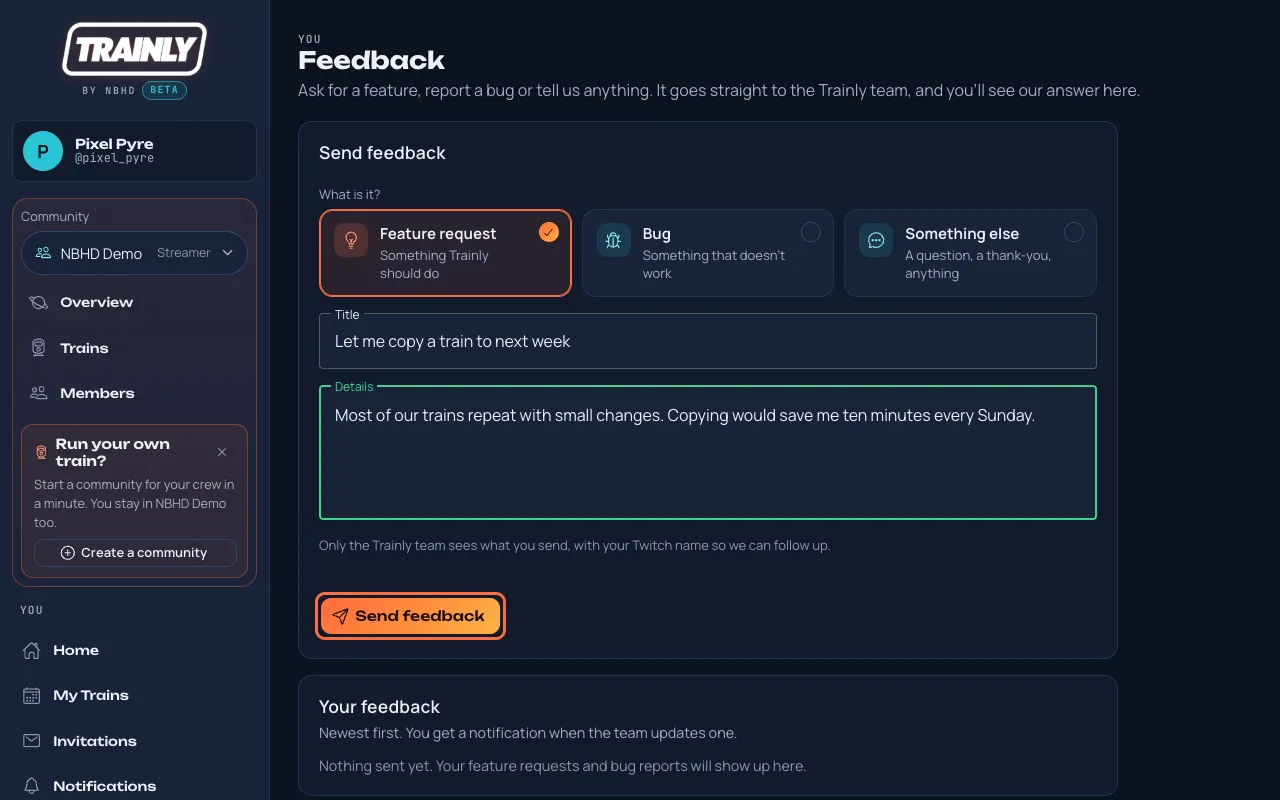
Press Send feedback at the bottom of the menu, under Help center (on a phone, open ☰ first).
Pick what it is: Feature request, Bug or Something else.
Give it a short Title and write the Details. For a bug, say what you did, what you expected and what happened, and which phone or browser you use.
Press Send feedback. It shows up under Your feedback as New.
Pick what it is, fill in the title and details, and press Send feedback (outlined in coral).
When the team looks at it, its status changes to Planned, Done or Declined, sometimes with a Reply from Trainly. You get a notification each time.
Good to know: only the Trainly team sees what you send, with your Twitch name so we can follow up. If you open Feedback from the menu, the page you were on goes along to help us find the problem; press Leave it out if you'd rather not. You can send up to 10 a day.
Tell us about your raid trains
Who: Everyone, no account needed3 minutes
Ten quick questions about how your raid trains really go. Your answers go straight to the people building Trainly, and at the end you see what Trainly already does about the parts you find hardest.
Open the survey. You can also press Take the survey on the front page, or Raid train survey at the bottom of any public train or community page.
Press Start the survey.
Answer one question per screen and press Next. Questions that are optional say Skip until you answer them. Back takes you to the question before.
Pick every answer that fits (outlined in coral), then press Next.
On the last screen, leave your Twitch name if you want early access or a short chat with us, and tick the box. Leave it empty to stay anonymous. Then press Send my answers.
The thank-you screen shows what Trainly already does about the parts you picked as hardest. Press See how it works on a card to open its guide, or Copy the survey link to pass it on.
Good to know: you don't need an account. The survey doesn't use cookies or keep your IP address, and only the Trainly team reads the answers. Your Twitch name is kept only if you tick the box, and we use it only to contact you about the survey and early access.
Sign out
Who: EveryoneUnder a minute
Press Sign out at the bottom of the menu, or on the Account page.
Tip: sign out on shared or public computers. Your profile and communities stay saved; they'll be there next time you sign in.
Sign in as another user
Who: EveryoneAbout 1 minute
Share a computer, or have a second account? Switch accounts without hunting for Sign out first.
At the bottom of the menu, press the round icon with two arrows next to Sign out (point at it and it says Sign in as another user). On the Account page, press Sign in as another user next to Sign out. You can also just open the Sign in page.
The icon next to Sign out (outlined in coral). Point at it to see Sign in as another user.
The Sign in page shows who is signed in on this browser. Press Continue as … to keep going as that person, or Sign in as another user to switch.
Already signed in: Continue as …, or Sign in as another user (outlined in coral).
Sign in as another user signs the current person out of this browser, exactly like Sign out (their alerts on this device stop too). The page then says they are signed out and shows the usual sign-in options.
Sign in as the other person: Sign in with Twitch, or a test account on test sites (see Sign in to Trainly).
Switching Twitch accounts: after Sign in as another user, Twitch shows its screen instead of signing you straight back in, so you can check which Twitch account it is. Twitch offers the account that is signed in on twitch.tv in this browser. To use a different Twitch account, sign out on twitch.tv first.
Your Twitch connection: sync or disconnect
Who: Everyone who signed in with TwitchAbout 1 minute
Trainly keeps your Twitch name and picture up to date, and you can cut the connection whenever you like.
In the menu, open Account. The Twitch box on the right shows your connection: Connected, Needs reconnecting, Disconnected, or Test account.
The Twitch box on the Account page. Sync from Twitch is outlined in coral; Disconnect Twitch is below it.
Changed your name or picture on Twitch? Press Sync from Twitch. You'll see "Synced from Twitch". Trainly also syncs every time you sign in. Your Twitch picture shows next to your name in the menu, on Home and in this box; test accounts show the first letter of the name instead.
To stop Trainly using your Twitch account, press Disconnect Twitch, then Disconnect Twitch again in the box that asks "Disconnect Twitch?" (or Keep connected to stop). Trainly deletes its Twitch keys, tells Twitch, and signs you out on every device.
Your trains are safe. Disconnecting doesn't remove your communities, invitations or My Trains. Press Sign in with Twitch any time to connect again; your Twitch id never changes, so you get the same account back, even after renaming yourself on Twitch.
It says "Needs reconnecting"? Twitch stopped accepting Trainly's access, for example after you changed your Twitch password or removed Trainly on Twitch. Trainly signs you out when that happens. Press Sign in with Twitch again (or sign in normally) to reconnect. Disconnected, but Twitch couldn't be reached? Trainly still deleted its keys. To be sure, open Twitch › Settings › Connections and remove Trainly there.
See who is live on Twitch
Who: Every member of the communityUnder a minute
During a train, the train page can ask Twitch who is actually live, so you don't have to open every channel.
Open the train (Trains, then the train's name).
Find the On Twitch box below the lineup. Each streamer who signed in with Twitch shows Live on Twitch since …, Offline on Twitch, or Unknown.
The On Twitch box. The badge outlined in coral comes from Twitch itself. Press Check again for a fresh look.
Press Check again to ask Twitch again. "Checked at" shows when Twitch was last asked; it can be up to a minute old.
You can also spot live members anywhere you see their picture on Members or in a train's lineup: Twitch-live members get a green ring around their picture and a LIVE NOW tag next to their name. This updates by itself about once a minute.
Press a live member's picture or name to open their profile. It says how long they've been live (for example Live for 1 h 12 min) and has a Watch on Twitch button that opens their channel in a new tab.
Checked with Twitch, not reported. This box only shows what Twitch says. It is separate from anything a streamer tells the team themselves. Unknown means Twitch didn't answer; it does not mean the streamer is offline. Test accounts and open slots have no Twitch status.
Don't see the box? It only appears on Trainly sites with Twitch sign-in turned on. Test sites, like the demo, don't show it.
For organizers
Run your community's trains: create the community, invite streamers, schedule trains and build lineups. Some steps need the Organizer or Owner role; each guide says which.
Create your community
Who: Anyone (you become the Owner)About 2 minutes
A community is your own space in Trainly, with its own members, trains and code. NBHD is just one community among many.
In the menu, open Create community. Two other ways in: press the Community switcher at the top of the menu and choose Create your own community under your communities, or, if you don't run a community yet, press Create a community on the Run your own train? tip in the menu.
Type a Name, for example "Riverside Raiders". Trainly suggests a Code for you; you can change it.
Add a short Description so streamers know they found the right place.
Choose the Community timezone. New trains start in this timezone, for example America/New_York.
Press Create community. You are now its Owner.
Right away Trainly asks Create your 1st raid train? Creating a train is easy: press Create my first train and the New train helper opens for your new community. Not ready yet? Press Not now (or Esc). Trainly asks only once.
Right after Create community. Press Create my first train (outlined in coral) to set up your first train now, or Not now to do it later.
Pressed Not now? Until your community has a train, its Overview shows Creating a train is easy under Upcoming trains, with the same Create my first train button. On the Trains page (in the menu), Create a train does the same. Organizers and Owners see it.
The Overview of a community with no train yet. Create my first train (outlined in coral) opens the New train helper.
Good to know: creating your own community doesn't take you out of the ones you joined; you're in all of them and switch with the Community switcher. Don't want the Run your own train? tip? Press its × (Not now) and it stays hidden in that browser; it also goes away once you own a community.
"Already in use"? Another community has that code. Add a word or a number to make yours unique, for example riverside-raiders-tx.
Invite streamers with your join link or community code
Who: Owners and organizersAbout 1 minute
The fastest way to bring your whole community over: paste one message in Discord. Everyone who opens the link signs in with Twitch and lands on your community, ready to join.
Open Overview for your community. Under About you'll find your Join code and your Join link (it looks like …/join/nbhd-raid-train).
Press Copy invite message. You get a short, friendly announcement that explains Trainly is our new platform, includes the join link, the three steps (open the link, sign in with Twitch, press Join as Streamer) what to do once in (watch for your invites, Come aboard, timezone, help) and a line for people who run or moderate their own train. Paste it in your Discord channel. Edit the words if you like; keep the link.
Prefer just the link? Press Copy join link and send that. People who are signed out are asked to sign in first and then land on your community with the code already filled in.
Old school still works: send the Join code and tell people to open Join by invite code in Trainly and type it.
When they join, they show up under Members as Streamer.
The message you get (with your community's name, link and your name filled in):
Hey everyone! We're moving our raid trains to Trainly, a new platform built for communities like ours. It's where you'll see every upcoming NBHD Raid Train train, grab an open slot, and get a heads-up when you're up next.

Joining takes a minute:
1. Open https://www.trainlybynbhd.com/join/nbhd-raid-train
2. Sign in with your Twitch account (Trainly only reads your public name and picture; it never raids or chats for you)
3. Press "Join as Streamer" and you're in (helping without streaming? press "Join as Crew")

Once you're in:
- Watch for train invites from NBHD Admin. They show up under Invitations and as a notification; press Accept to lock in your slot.
- Want a specific slot? Open the train and press "Come aboard" on any open slot, and we'll confirm you.
- Set your timezone under Account so every train shows in your local time.
- Need help? Press "Help center" in the menu.

Run your own raid train, or moderate one? You can use Trainly for that too: press "Create community" in the menu, then open "Trains" and press "New train" to set up your lineup and invite your streamers. Step-by-step instructions are in the Help center.

See you on the train!
– NBHD Admin
Good to know: by default anyone with the code or link joins right away. Owners can make people ask first, or stop new members joining, in community rules; the link then shows Ask to join instead.
Change your community's name, its description or its timezone whenever you like.
Open Overview for your community. In the About box, press Edit details.
Change the Name (2 to 80 characters) and the Description (up to 2000 characters; line breaks are kept). Leave the description empty if you don't want one.
Pick a Timezone: press it, type a city such as London and choose it. New trains start in this timezone.
Press Save details. The card at the top of the page, the About box, the menu and the public page show the new details straight away. Cancel leaves everything as it was.
Good to know: trains you already made keep their own timezone, so their times don't move. The join code stays the same; to change it, see Change your join code.
Didn't work? Only Owners see Edit details. "Use at least 2 characters" means the name is too short.
Change your join code
Who: OwnersAbout 1 minute
Pick a code that is easier to say, or replace a code that got shared somewhere it shouldn't have.
Open Overview for your community. Under About, press Change join code.
Type the new code in New join code. Use letters, numbers and hyphens, 3 to 48 characters, for example nbhd-sunday-crew. Capital letters are fine; Trainly saves the code in small letters. Under the box you see what your public page address will become.
Read the warning, then press Save new code. The new code, the public page address and the join link change straight away.
Press Copy join link or Copy invite message and share the new link, for example in Discord.
Good to know: the old code stops working right away. Join links and public page links you shared before (in Discord, on a flyer) no longer open your community, so post the new link. Nobody else can ever take your old code, so old links never lead to another community. You can switch back to one of your own old codes later. Members stay members, and personal invite links you sent by Twitch name keep working.
Didn't work? "That join code is already in use" means another community has it or used it before: add a word or a number. Only Owners see Change join code.
Invite someone to your community
Who: Moderators, Organizers and Owners (Organizers and Owners only if the Owner chose that in community rules)About 1 minute
Invite one streamer, whether they already use Trainly or not. People on Trainly get a notification straight away; anyone else gets a personal link you send them. Only their Twitch account can use it, so you can send it anywhere, even in a public Discord channel.
Pick your community and open Invite streamers in the menu. You can also press Invite streamers at the top of the community's Overview.
In Who do you want to invite?, type two or more letters of their name or Twitch username. You can also paste their channel link, like twitch.tv/pixel_pyre. The list has two parts:
On Trainly: people who already use Trainly, with their Twitch picture. Each one says Gets a notification, or Already a member, Invite sent or Asked to join.
Not on Trainly yet? The last row, Invite "…" by Twitch name, marked Link only. Use it for anyone who hasn't signed in to Trainly.
Type in Who do you want to invite? and press someone in the list (outlined in coral): a person On Trainly, or the Twitch name row at the bottom.
Press the person or the Twitch name. A card under Inviting says how the invite will reach them:
On Trainly (green): they get a notification in Trainly right away, plus a link you can share.
Link only (blue): Trainly can't reach them yet. You get a personal link to send them in Discord or a Twitch whisper.
Picked the wrong one? Press Change.
Someone On Trainly: they're told in Trainly as soon as you press Send invite.A Twitch name that isn't on Trainly yet: Link only, so the button is Create invite link.
If you like, add a short note in Message (optional). If your community has a Discord channel connected, leave Also post in our Discord channel ticked and Trainly posts the invite there for you.
Press Send invite (someone on Trainly) or Create invite link (a Twitch name). A box says … was notified in Trainly or Send this link to …, and shows the link.
Send the link the way you like (for someone on Trainly this is optional, they already have the notification):
Copy link copies just the link.
Copy message for Discord copies a ready-made message with the link. Paste it in a Discord message, a Twitch whisper or anywhere else.
Post to Discord posts it in your community's Discord channel (only when one is connected).
A link-only invite is ready. Use one of the three buttons (outlined in coral) to send it.
Under Sent invites a table shows every invite and how it's going: Reached by (Notified in Trainly or Link only), Waiting, Joined, Withdrawn or Expired, who invited them and when, when the link expires or when they joined, and whether it was posted to Discord. You get a notification when someone joins.
It shows 10 invites at a time. Use Previous, Next or a page number to see more; Showing 1–10 of 24 under the table says where you are.
Press All, Waiting, Joined or Withdrawn or expired to see only those invites; each button shows how many there are. To find one person, type their Twitch name in Search by Twitch name.
A waiting invite has small buttons at the end of its row. Point at one to see its name: Copy link, Copy message for Discord, Post to Discord and, in red, Withdraw invite. On a phone each invite is a small card and the buttons say Copy link, Message, Post and Withdraw.
Changed your mind? Press Withdraw invite and the link stops working. You stay on the same page of the table.
Sent invites (outlined in coral). Reached by says whether the person was told in Trainly or only has the link.
Good to know: an invite link works for 14 days and only once. It lets the person in as a Streamer even if your community rules make people ask first or stop new members joining. Someone whose streamer profile is Private isn't in the list: type their Twitch name instead. If they use Trainly they still get the notification, but Reached by says Link only so their account stays private.
Can't find someone in the list? They haven't signed in to Trainly yet, or their streamer profile is set to Private. Type their Twitch username and press the Invite "…" by Twitch name row; the invite works once they sign in. "There's no Twitch account called …"? Check the spelling on their Twitch channel, then press Change and try again. "… already has an open invite"? Type their name in Search by Twitch name under Sent invites and press Copy link on their row, or withdraw it and make a new one. "Not posted to Discord"? The message under it says why; see My invite wasn't posted to Discord. Email invites are coming soon.
Connect your Discord channel
Who: Owners (and you need permission to manage webhooks in your Discord server)About 3 minutes
Connect one channel of your Discord server so invites can be posted there with one press of Post to Discord.
In Discord, open your server's Server Settings, then Integrations, then Webhooks, and press New Webhook.
Open the new webhook, pick the channel invites should go to (for example #raid-train), and press Copy Webhook URL.
In Trainly, open your community's Overview and find the Discord channel box. Paste the link into Discord webhook URL.
Press Save Discord channel.
The Discord channel box on the Overview (outlined in coral). Paste the webhook link and press Save Discord channel.
Press Send test message and check that the message appears in your Discord channel.
Good to know: anyone who has the webhook link can post in that channel, so Trainly never shows it again after you save it. You'll only see its last four digits, for example Webhook …4321. Trainly's posts never ping @everyone or anyone else. To use another channel press Replace webhook; to stop posting press Disconnect. If the box says "Test mode", you're on a Trainly test site: posts are recorded but nothing is sent to Discord.
"Paste a Discord webhook URL"? The link must start with https://discord.com/api/webhooks/. A link to a channel or a server invite won't work. "Discord says this webhook no longer exists"? Someone deleted it in Discord. Make a new one and press Replace webhook.
Add your community logo
Who: OwnersAbout 1 minute
Your logo appears next to the community name, so streamers and viewers recognize your community at a glance.
Open your community: in the menu, under Communities, press All communities and pick it. Stay on Overview.
Find the Community logo box and press Upload logo. Pick a picture from your computer or phone.
The Community logo box after an upload. Replace logo (outlined in coral) picks a new picture; Remove logo goes back to the first letter.
Wait for "Logo saved". The logo now shows on this page, in everyone's communities list and on Home, on your public community and train pages, and on invites.
Tip: a square picture works best (for example 512 × 512). PNG, JPEG or WebP; bigger pictures are shrunk for you. A PNG with a transparent background looks good on the dark screens.
Didn't work? "Use a PNG, JPEG or WebP image" means the file is another type (for example SVG): save it as PNG first. Only Owners see the Community logo box. To go back to the letter, press Remove logo and then Remove logo again to confirm.
Add a community banner
Who: OwnersAbout 1 minute
Your banner is the wide picture behind your community's name at the top of the Overview and on your public community page, so the community looks like yours.
Open your community: in the menu, under Communities, press All communities and pick it. Stay on Overview.
Scroll to the Community banner box and press Upload banner. Pick a wide picture from your computer or phone.
The Community banner box after an upload. Keep faces and words inside the dotted box. Replace banner (outlined in coral) picks a new picture; Remove banner goes back to the Trainly colors.
Wait for "Banner saved". The picture now fills the card at the top of the page, for everyone in the community, and on your public community page.
The card at the top of Overview with a banner. The picture is darkened a little so the name and buttons stay easy to read.
Tip: use a picture about 3 times as wide as it is tall, for example 1500 × 500. Phones show less of the sides, so keep faces and words near the middle. PNG, JPEG or WebP; bigger pictures are shrunk for you. If a picture is small or tall, Trainly tells you under the buttons.
Good to know: until you upload a banner, Trainly makes one from your logo: your logo repeated on a slant over your community color, on this card, on your public page, on your community's card under All communities and on Home. Without a logo, those places show your color and first letter. Once you upload a banner, it shows in all of them.
Didn't work? "Use a PNG, JPEG or WebP image" means the file is another type (for example SVG): save it as JPEG or PNG first. Only Owners see the Community banner box. To go back to the Trainly colors, press Remove banner and then Remove banner again to confirm.
Give your community its own colors
Who: OwnersAbout 1 minute
Pick two colors and your public train pages, community page and members page use them instead of Trainly's coral and amber, so your trains look like yours.
Open your community: in the menu, under Communities, press All communities and pick it. Stay on Overview.
Scroll to the Community colors box. Press the Main color swatch to open your computer's or phone's color picker, and do the same for the Second color. You can also type a color code such as #7c5cff, or press one of the ready-made pairs under Or pick a pair.
Pick the two colors. The preview shows what your public pages will look like.
Check the preview, then press Save colors. Your public pages use the new colors within a minute.
A public train page in the community's colors.
Tip: Trainly keeps the text readable whatever you pick: very dark or very light colors are shown a little lighter or darker for words, and the writing on buttons turns white or dark to match. Press Open the public page to see it for real.
Good to know: only Owners see the Community colors box. Inside Trainly, pages keep Trainly's colors. To go back to coral and amber, press Use Trainly's colors.
Set your community rules
Who: OwnersAbout 1 minute
Decide how people join your community and who may send invitations.
Pick your community and open Overview. Find the Community rules box.
Under Who can join with the community code, pick one:
Anyone with the code joins right away (the default).
Anyone with the code can ask; a Moderator or above approves. See Approve join requests.
Nobody can join right now. People who look up your code are told you're not accepting new members.
Under Who can send invitations, pick Moderators, Organizers and Owners or Organizers and Owners only.
Under Who can find this community, pick Listed on Trainly (the default: it shows on the front page, in Find a community and in Discover) or Only people with the link or code. Hidden communities keep their public page, join link and code; their members still see them.
Press Save rules. You'll see "Community rules saved".
The Community rules box (outlined in coral). Only Owners see the menus and the Save rules button; everyone else sees the rules as text.
Good to know: members you pick as event moderators on a train can always invite streamers for that train, whatever this rule says. Personal invite links let people in even when joining needs approval or nobody can join; Who can send invitations also decides who may make them. Hiding can take up to a minute to show on the public lists.
Approve or decline join requests
Who: Moderators, organizers and ownersUnder a minute
When your community asks people to wait for approval, their requests wait for you here.
You get a notification, "… asked to join …". Open it, or open Members in the menu.
Under Join requests, press Approve to add the person as a Streamer, or Decline.
A waiting request. Press Approve (outlined in coral) to let them in.
The person gets a notification either way. Someone you declined can ask again later.
Create a train
Who: Organizers and ownersAbout 4 minutes
The New train helper walks you through four short steps and shows a preview of the times before anything is saved.
Pick your community, open Trains in the menu and press New train. Changed your mind? Every step has a Cancel button that leaves without saving anything. In a community with no train yet, Create my first train on its Overview does the same.
Basics: type a Title (for example "NBHD Sunday Train"), pick the First date and the Start time (wall clock): the time as people in that timezone would read it on their clock, for example 9:00 AM. Check the Event timezone. Press Next.
Step 1, Basics. Under Train type, keep Draft, then publish or pick Open to members. Press Next (outlined in coral) when the title, date and time are filled in.
Slots: choose the Number of slots and the Slot duration (minutes), for example 7 slots of 60 minutes. The Preview lists every slot's time. Press Next.
Step 2, Slots. As soon as you type, the Preview on the right shows every slot's time.
Recurrence: leave it as One-off, or make it repeat (see Make it repeat weekly). Press Next.
Step 3, Recurrence, set to repeat every Saturday four times. The Preview lists every date it will create.
Review and create: add Guidelines for streamers if you have any and check the summary. Press Create draft train for a one-off train, or Create series if it repeats.
Step 4, Review and create. Because this train repeats, the button says Create series (outlined in coral). For a one-off train it says Create draft train.
Your train starts as a draft. Only moderators and above, and the streamers you invite or reserve a slot for, can see it until you publish it. That gives you time to build the lineup first, and nobody asks to come aboard before you're ready.
Want members to take slots themselves? On the first step, under Train type, pick Open to members. The train skips the draft: every member sees it right away and takes an open slot without an invitation, and the last button says Create open train (how it works).
Tip: use Back to change an earlier step. Nothing is saved until the last button.
Open a train to your members
Who: Organizers and ownersAbout 4 minutes
Want your members to fill the lineup themselves? A train that is open to members skips the draft and the invitations: every member sees it as soon as you create it and takes an open slot with one press.
Open Trains, press New train and, under Train type, pick Open to members.
Under Train type, pick Open to members (outlined in coral).
Fill in the other steps as for any train. On Review and create, the visibility is Private: only members of your community see the train, and it isn't on your public pages. Press Create open train, or Create open series if it repeats.
That's it: there is nothing to publish. The train page says Open to members next to the title, and members see Take this slot on every open slot (what they see).
Each time a member takes a slot, you get a notification, for example "Pixel Pyre took slot #2 of Saturday Spotlight". The slot shows their name and Confirmed.
You can still work on the lineup like on any train: reserve a slot for someone, invite a streamer, or lock a slot so nobody can take it (lineup guide).
Want a public page later? Press Edit details and choose Public or Unlisted under Visibility (what they mean). Members can still take open slots. Unpublish turns it back into a draft: then only the people you invited or reserved see it until you publish it again.
Tip: each member can hold one slot per train, first come, first served. Breaks, locked slots and slots that have started can't be taken.
Make a train repeat every week
Who: Organizers and ownersAbout 2 minutes
Schedule a regular train, like every Sunday at 9:00 AM, in one go.
In the New train helper, go to the Recurrence step.
Under Repeat, choose how often: Weekly, Biweekly (every two weeks), Monthly, or Custom for your own pattern.
For weekly trains, tick the day under On these weekdays, for example Sunday.
Set How many occurrences to create now, for example 4 for the next four Sundays. You can create up to 52.
Check the Preview: it lists every date and its start time.
Every Saturday at 7:00 PM, four times. Clocks change on November 1, so the preview shows EDT before and EST after, but the train stays at 7:00 PM.
Clocks changing? Trainly keeps your train at the same time on the clock, for example always 9:00 AM, even when daylight saving time starts or ends. In the preview you'll see the time-zone letters change (for example EDT to EST). If a train itself runs through the moment the clocks change, that date is marked "DST" so you can double-check.
Good to know: each date becomes its own train with its own lineup. You can change one Sunday without touching the others. The series is listed under Recurring trains on the Trains page.
Change a repeating train
Who: Organizers and ownersAbout 3 minutes
Change every upcoming date at once, change or skip one date, or add more dates.
Open Trains, then press the series name under Recurring trains. You can also press recurring series at the top of any of its trains.
Trains in this series lists every date. A date marked Edited on its own or Skipped no longer follows the series.
The series page. Add trains (outlined in coral) adds more dates; the box on the right lists dates that were changed on their own.
To change every upcoming date: under Edit the whole series, change the title, description, guidelines, visibility or start time, then press Save for upcoming trains. A green message says how many trains changed.
Edit the whole series, then press Save for upcoming trains (outlined in coral).
To change one date only: open that train and use Edit details. It becomes Edited on its own, and later changes to the whole series leave it alone.
To skip one date: open that train and press Cancel train. It shows as Skipped, and adding more dates never brings it back.
To add dates: pick a number under How many more dates and press Add trains. New dates follow the schedule and start as drafts.
Why didn't the start time change on a published train? A new start time only moves drafts. Published trains keep the time streamers already accepted. To move one, unpublish it, change it with Edit details, then publish it again.
Add a flyer and a lineup command
Who: Organizers and ownersAbout 2 minutes
Give your train a flyer image and a ready-to-paste line of text, such as a !lineup chat command. Everyone in the community sees them on the train page.
Open the train. Right below the Lineup you'll find Flyer and lineup command.
Press Add a flyer and pick an image. PNG, JPEG and WebP work. Trainly shrinks big images to fit 2 MB before uploading. Use Replace flyer or Remove flyer to change it later.
Your flyer is also the picture on the train's card: on Trains, Home and My Trains, and for Public trains on Find a raid train and your community's public page. Without a flyer, the card shows your community's banner (or a pattern of your logo).
A train card with its flyer (outlined in coral). A train without one shows its community's banner.
No flyer of your own? Press Download flyer right under the Flyer: Trainly draws a flyer of the train and its lineup in the size you pick (more). Everyone in the community has the same button. Or pick Use as train flyer in that menu to make the generated square flyer the train's flyer in one press.
Press Add lineup command. Type the text streamers should paste into their chat, or press Fill from lineup to start from the current lineup in the train's timezone, then edit it. Want one line per stop with Twitch links instead? Use Generate lineup command.
Press Save command. Streamers see it with a Copy command button. Press Edit any time to change it, and save an empty box to remove it.
Good to know: the lineup command doesn't update itself when the lineup changes. Press Edit, then Fill from lineup again after big changes. A draft train's flyer is only visible to moderators and above, and the streamers you invited or reserved, until you publish. Visitors see a train's flyer on cards only while its public page is open to them (Public and Unlisted trains, once published); a Private train's flyer stays inside your community.
Generate a lineup command
Who: Organizers and ownersAbout 1 minute
Get the whole lineup as text ready to post: one line per stop with each streamer's Twitch link, to paste in Twitch chat, Discord or your socials.
Open the train. In Flyer and lineup command, under Lineup command, press Generate lineup command.
The generated lineup (outlined in coral). Stops without a confirmed streamer show as "open slot".
Check Word for the streamers. It starts as DJ, as in "Raid Train DJ Lineup!" and "follow all the DJs". Type another word, such as streamer, and the text is written again with it. Trainly remembers your word for this community on this browser.
Read the text in the box and change anything you like. It starts with your community's name and the train's date, then the header with the train's time zone, one line per stop with its start time and Twitch.tv/ link, a thank-you line and the Trainly footer.
Press Copy lineup and paste it where you post. Or press Save as lineup command to make it the train's lineup command, so every member can copy it with Copy command (it replaces the one there). Press Close when you're done.
Good to know: times are in the train's time zone. Only confirmed streamers are named: invited, reserved and requested stops show as open slot, and breaks are left out. The text is in English whatever language Trainly shows, like Trainly's chat commands; edit it freely. A short one-word community name such as NBHD is written in boxed letters (🅽🅱️🅷🅳). The text doesn't update itself when the lineup changes: generate it again after changes.
Didn't work? The counter under the box shows characters used out of 500. Twitch chat and the lineup command take 500 at most (an emoji counts as 2), so a long lineup turns the counter red, shows a warning and switches off Save as lineup command: remove lines or shorten the text before you post it in Twitch chat. Discord takes longer posts. Twitch chat puts the whole text on one line. If Copy lineup says to select the text, press and hold (or press Ctrl+C) in the box to copy it yourself.
Build the lineup
Who: Organizers, owners and event moderatorsAbout 5 minutes
Put a streamer in each slot and arrange the order. Every change saves straight away.
Open the train. The Lineup is the route on the train's flyer: each stop is one slot, with the streamer's picture, the time and who is in it. A coral number on each picture is the slot number.
To put someone in an open slot, press Reserve streamer… on that stop. A window opens with the members of your community: type part of a name or Twitch name in the search box, then press the streamer. That one person gets the slot and the window closes. Next to it, Invite opens the invitations page.
Reserve streamer… on an open slot, and the ⋯ menu of slot 2 (both outlined in coral) with Send message and every other change: Move up, Move down, Swap with, Reserve for, Release, Lock slot and Remove slot.Type part of a name in the search box, then press the streamer. The coral box shows the search box.
Every other change is in the slot's ⋯ button (Manage slot). It opens a menu, or a sheet at the bottom of a phone:
Send message writes to the streamer on that stop (more).
Move up and Move down move the slot one place.
Swap with trades places with any other slot.
Reserve for… opens the same window to change who a reserved slot is held for, and Release empties it. Invited or confirmed slots are changed from Invitations, so the streamer is told.
Lock slot keeps a slot from being changed by mistake; Unlock slot allows changes again. A locked stop shows a yellow lock.
Remove slot deletes the slot.
Greyed-out items say why they can't be used right now.
To change a slot's length, use the length chip (for example 1 h) next to ⋯. On a phone it's in the ⋯ sheet as Length.
To add a slot or a break, use Add a stop at the end of the route: choose Stream slot or Break, its length and its position, then press Add.
Add a stop at the end of the route (outlined in coral). Pick what to add, its length and its position, then press Add.
The position decides where the time goes:
At the end adds the stop after the last one. The train ends later; every other stop keeps its time.
At the start adds the stop before the first one. The train starts earlier by the stop's length (a 30 min stop on a 9:00 train makes it start at 8:30); every other stop keeps its time, locked stops too. When you pick it, the screen says how much earlier the train will start.
After #2 (and so on) puts the stop in the middle, so every stop after it moves later by its length.
"Someone else changed this lineup"? Another organizer edited it at the same moment. Press Reload lineup to see their change, then make yours again. Trainly never silently overwrites someone else's work.
"Adding this stop at the start would make the train start in the past"? The train starts too soon for a stop that long. Pick a shorter length, or add the stop at another position.
"This change would move locked slot"? A stop added in the middle pushes the stops after it later, and a locked stop can't move. Unlock that stop, or add the new one At the start or At the end, which never moves other stops.
Can't add a streamer? Each streamer can only be in one slot per train, and locked slots can't be moved. Unlock the slot first.
Release and Remove are greyed out? Someone was invited to that slot or already confirmed it. Use Withdraw or Replace on the Invitations page instead, so the streamer is told. A streamer who came aboard or accepted a reserved slot can also free it themselves with Can't make it? › Give up my slot (how); ask them if you need the slot back. If they sent a Heads-up, you'll see it on their stop.
Missed the notification? A reserved or invited stop shows Ask again next to "waiting for an answer". Press it to send the streamer the same notification again as a reminder (for an invitation it's the same as Resend on the Invitations page). Nothing in the lineup changes. Already said yes in chat? Press Confirm for them instead (guide).
Reserve or invite?Reserve for… puts a streamer in the slot and tells them straight away, on a draft too: they can see the train and accept or decline the slot. When you publish a draft, everyone still holding a reserved slot gets a reminder. To send a request with a deadline and a message, invite them. Streamers can also ask for open slots themselves.
Confirm a slot for a streamer
Who: Organizers, owners and event moderatorsAbout 1 minute
A streamer said yes in chat or on Discord but never pressed Accept. Confirm the slot for them so the lineup, the flyer and the public page show them.
Open the train. A reserved or invited stop says "waiting for an answer" and shows Confirm for them next to Ask again.
Confirm for them on a reserved stop (outlined in coral).
Press Confirm for them. Trainly asks first, because you're answering for the streamer: only do it if they already said yes.
Press Confirm for them in the window. The stop turns Confirmed, with "Confirmed by" and your name under it. If it was an invitation, the invitation is marked accepted too.
Good to know: the same rules apply as when the streamer accepts: the train must still be taking answers, the slot can't have started, and the streamer can't already have a confirmed train at that time. The streamer can still withdraw like from any confirmed slot.
Fill the lineup from a list
Who: Organizers, owners and event moderatorsAbout 3 minutes
Already have the streamers in order, say 20 DJs for a night? Paste the list once and Trainly puts each one on the next open slot.
Open a draft or published train and press Fill from a list in Organizer tools.
Paste the streamers in the order they go on, one per line. A Twitch username (djnova), @djnova, a twitch.tv/djnova link or a member's display name all work. Numbers and bullets at the start of a line are ignored, so a numbered list pastes as it is. Then press Check the lineup.
Check the lineup Trainly made. Each name gets the next open slot, with its time. Use the ˄ and ˅ arrows to change the order, and ✕ to take a name off the list; the slots follow straight away. Each row also says when a name can't get a slot:
Step 2: the lineup from the list (outlined in coral). Cozy Corvid has no open slot yet, and mixmaster_k isn't in the community.
No open slot left: the list is longer than the open slots. Tick Add … slots at the end to add stream slots of the train's usual length for them.
Already in this train, Already invited to pick a slot or Already on this list: they keep what they have; nobody gets two slots.
On another train at that time: with invitations, that slot goes to the next name instead; with reserved slots, they still get it and can decline.
Crew, doesn't stream and Not a Twitch username or member are left out. Check the spelling.
Choose what happens to each slot: Send invitations (each streamer gets an invitation for their slot and answers it from Invitations) or Reserve slots (each slot is held for its streamer, who is told and can accept or decline it on the train page). With invitations you can press Add a note to every invitation.
Press Send … invitations or Reserve … slots. Everything happens in one go, and only then is anyone told. The lineup shows the new streamers right away.
Good to know: nothing is sent while you check, reorder or switch between invitations and reserved slots. Locked slots, breaks and slots that already started are skipped. Pressing the button twice, or pasting the same list again later, never sends anyone a second invitation: they're already in the train. Up to 100 names at a time. Sending invitations needs the right to invite streamers; reserving slots only needs to edit the lineup.
"Someone else changed this lineup while you were checking it"? Another organizer changed the train at the same moment. The window now shows the lineup as it is: check it and press the button again.
Publishing makes a draft train visible to every member of your community and opens its free slots to come-aboard requests.
Open the train. The badge at the top shows its status, for example Draft.
Press Publish when the lineup is ready. The badge changes to Published.
A draft train. The Publish button in Organizer tools is outlined in coral; the Draft badge is next to the title.
Need to hide it again while you fix something? Press Unpublish; it goes back to a draft.
If the train won't happen, press Cancel train and confirm. Streamers who saw it will see it as canceled, so nobody shows up by mistake.
Tip: build the lineup while the train is a draft, then publish. Streamers see one finished schedule instead of many changes.
Draft or published? A draft is invite-only: you can invite streamers or reserve slots for them, and they're told, see the train and answer, but nobody else in the community sees it or can ask for a slot. Publish it when you want an open train that everyone sees and anyone can ask to come aboard. Unpublishing puts it back to invite-only; streamers already invited, reserved or confirmed still see it.
Archive or restore a train
Who: Organizers and ownersUnder a minute
Archiving puts a train away: it leaves the Trains lists, Home and My Trains, and streamers no longer see it. Use it for trains that are over, old drafts and canceled trains.
Open the train. In Organizer tools, press Archive train. You can archive a draft, a canceled train or a train that is over. A train that hasn't happened yet is canceled first (Cancel train), so its streamers are told.
Archive train in Organizer tools (outlined in coral).
Confirm with Archive train. Nobody is notified. The page now says Archived and when.
To find it again, open Trains and press Archived (Moderators and above see this tab).
Trains › Archived (outlined in coral): every archived train. Open one to restore it.
Changed your mind? Open the train and press Restore train. It comes back exactly as it was: a draft stays a draft, a published train is published again.
Good to know: archived trains keep their lineup and history. Only the Archived tab lists them, and only Moderators and above can open them.
Choose who can see a train
Who: Organizers and ownersUnder a minute
Visibility decides whether people outside your community can see the lineup.
Open the train and press Edit details. You can also set it when you create the train with New train.
Pick a Visibility:
Public: anyone with the link can see the lineup, and the train is listed on your community page.
Unlisted: anyone with the link can see the lineup; it is not listed anywhere.
Private: only members of your community can see it. There is no public page.
Press Save details. The Public page box on the train tells you what applies now.
Good to know: drafts never have a public page, whatever their visibility. Publish first, then share the link. Switching a train to Private stops an old link from working.
Invite streamers to your train
Who: Moderators, organizers, owners and event moderatorsAbout 2 minutes
Ask a streamer to take a slot. They answer from their inbox and you see the result straight away.
Invite on a draft or a published train. On a draft, only the streamers you invite can see the train, so you can fill the lineup quietly and publish later (see Publish).
Open the train and press Invitations at the top.
On an open slot, press Invite streamer…, then press Choose a member… and pick a name (type a name or Twitch username to find someone fast). Names that can't be picked are greyed out and say why: already invited, already in this train, or busy at that time (they accepted another train that overlaps, maybe in another community).
Add a Message and an Answer by date if you like. Without a date, the invitation stays open until the slot starts.
Press Send invitation. The streamer gets a notification and the slot shows their name as Pending.
Inviting someone to the open slot 3 (the form is outlined in coral): pick the member, add a message if you like, then press Send invitation.
Tip: to fill many slots fast, press Invite the whole roster. Every Streamer member without a slot gets an invitation to pick an open slot; the first to accept a slot gets it.
Privacy: "busy at that time" never says which train or community the streamer is in.
Inviting the whole roster on a draft? Everyone who gets an invitation can see the train, so a roster-wide invitation on a draft shows it to every Streamer member. They still can't come aboard until you publish.
"This train can no longer take invitations"? The train is live, completed or canceled. Invitations work on drafts and published trains only.
"Already has an active invitation"? That person was already invited to this train. Use Resend on their slot instead.
Track who confirmed
Who: Moderators, organizers, owners and event moderatorsAbout 1 minute
See at a glance which slots are confirmed, who hasn't answered yet and which slots are still open.
Open the train and press Invitations.
The boxes at the top count confirmed slots, invitations waiting for an answer, open slots, and invitations that were declined or expired.
A fully confirmed train. The count chips (outlined) are the summary; the History card below the flyer keeps every invitation and answer.
Each slot shows who it's for: Pending with how long they have to answer and how many times it was sent, or Confirmed with when they answered.
No answer yet? Press Resend to notify them again. To take the invitation back, press Withdraw; the slot opens and the streamer is told.
History at the bottom lists every invitation, including declined ones and the notes streamers left.
Tip: you also get a notification each time someone accepts, declines or withdraws. Press it to jump to this page.
Replace a streamer or fill a gap
Who: Moderators, organizers, owners and event moderatorsAbout 1 minute
When someone declines, withdraws or doesn't answer in time, their slot opens again. Invite someone else in a couple of clicks.
Open the train and press Invitations. A slot that opened up says Open slot, with who left it and why (for example Declined and their note).
Press Fill vacancy…, choose a member, then press Send invitation. The new invitation is marked replacement.
To swap out someone who is still pending or confirmed (for example a last-minute change), press Replace on their slot, choose the new member and send. The first streamer is told their slot was withdrawn.
Press Replace (outlined) on a slot to give it to someone else.
Good to know: the old invitation and the new one change together, so the slot is never given to two people.
Decide who comes aboard
Who: Moderators, organizers, owners and event moderatorsUnder a minute
Streamers can ask for open slots of a published train. You get a notification and say yes or no on the train page.
Open the train (the notification "… wants to come aboard" links to it). Scroll to Come aboard requests: each row shows who asked, which slot, and their message.
The Come aboard requests box on the train page. Accept (outlined in coral) puts the streamer on the slot.
Press Accept to put that streamer on the slot. It becomes Confirmed right away (no invitation to wait for), and any other request for the same slot is declined for you.
Press Decline to say no, with an optional note. The streamer is told and can ask for another slot.
Earlier requests at the bottom keeps the ones already decided.
Tip: a request never blocks you. You can still Reserve for… or invite someone for that slot; the request then can only be declined. If a train is canceled, open requests close by themselves and the streamers are told.
Reserved slots now ask the streamer. When you Reserve for… a slot on a published train, the streamer gets a notification and answers with Accept slot or Decline. You're told either way; a declined slot opens again.
Edit a train's details
Who: Organizers and ownersAbout 1 minute
Open the train and press Edit details.
Change the Title, Description or Guidelines for streamers.
Press Save details.
Good to know: the date, time and timezone can only be changed while the train is a draft. Unpublish it first if you need to move a published train.
Part of a repeating train? Saving here marks this date as Edited on its own; changes to the whole series will leave it alone. See Change a repeating train.
Let helpers edit a train's lineup
Who: Organizers and ownersAbout 1 minute
Event moderators can edit one train's lineup without being organizers of the whole community.
Open the train and find Event moderators, next to About this train. The train's event moderators come first, ticked, followed by a few other members.
Tick a member to make them an event moderator, or untick them to take it back. Each tick saves straight away and you see Event moderators updated.
Tick a member in the card, or press See all members to find anyone else. The coral box shows the button.
Can't see the person? Press See all members (the number is how many members you can pick from). Type part of their name or Twitch name in the search box and tick them there. A long list shows 25 people a page, with Previous and Next at the bottom. Press Close or the Esc key when you're done: the card then lists the new event moderators first. On a phone the list fills the screen.
Good to know: only organizers and owners see the tick boxes. Everyone else sees who the event moderators are, and a See all moderators button when there are more than eight. Organizers and owners already edit every lineup, so they are not in the list.
Every member can see who else rides the trains: handy for finding people to raid or to ask about a slot.
Pick your community, then open Members in the menu, or press the Members tab on the community's page. The tab shows how many members the community has (for example Members 12).
Streamers see the same member list as the team (Members in the menu, outlined in coral), without the role buttons.
Looking for someone? Type part of their name or Twitch name in Search by name or Twitch name above the list. Capital letters don't matter, and @name or a twitch.tv/name link works too. The list shows 25 members a page: use Previous, Next or the page numbers under it. If nobody matches, press Clear search.
You'll see each member's picture, name, Twitch username, role and the date they joined. Members who signed in with Twitch show their Twitch picture; test accounts show the first letter of their name.
Press a member's picture or name to open their profile: their bio, category, language, typical stream length, when they joined and, for Twitch accounts, Open Twitch channel. Press Close to go back.
Members who are live on Twitch right now have a green ring and a LIVE NOW tag. Their profile shows how long they've been live and Watch on Twitch instead of Open Twitch channel (live on Twitch).
Good to know: a profile set to Private on Streamer profile shows only its name, Twitch name, role and join date; Organizers and Owners of the community still see all of it. Your time zone and availability never appear there. Only Owners can change roles, and only Moderators and above see the people waiting to join at the top (join requests).
See all of a community's trains
Who: Everyone in the communityUnder a minute
The Trains page lists every train of the community, upcoming, drafts and past, in one place.
Pick your community with the Community button, then open Trains in the menu. From the community's Overview, All trains under Upcoming trains goes there too.
The Trains page, opened from Trains in the menu.
Press Upcoming for what's next, All for every train including past ones, and (Moderators and above) Drafts. Times are in your timezone, and a train that is running right now says Live now. Press Past for the trains that are over, most recent first, 20 a page; their cards say Ended.
Press a train to open its page.
Good to know: Streamers see published trains; Moderators and above also see drafts. Organizers get a New train button on the page. The community page itself has Overview and Members.
Change a member's role
Who: OwnersUnder a minute
Give helpers more access, for example make a trusted streamer a Moderator.
Open Members in the menu.
In the Role column, pick the new role for that person. It is saved right away and you'll see "… is now …". They get a notification.
Owners see a role button next to each member (one is outlined in coral): press it and pick the new role. Your own role can't be changed here.
Good to know: see Roles and permissions for what each role can do. You can't change your own role, and a community always keeps at least one Owner; ask another Owner if you want to step down.
Remove or ban a member
Who: OwnersUnder a minute
Take someone out of your community. Ban them too if they shouldn't come back.
Open Members. Find the person (the search box helps) and press the Remove button with the person icon, next to their role.
Pick Remove from community, or Remove and ban to keep them out. For a ban you can add a reason; only Owners see it.
They are out straight away: they can no longer open the community, its member list or its trains. Their stops on trains still to come become open slots, and their invitations, requests to come aboard and swap requests are closed. Past trains still show them.
Banned people are listed under Banned on Members. Press Unban to let them join again.
Good to know: someone who was only removed can join again with your join code or link, like anyone else. Someone who is banned can't join with the code, ask to join, or use an invite link, and you can't send them a new invite until you unban them. Unbanning doesn't make them a member; they join again themselves. To stop everyone from joining for a while, use community rules, or change your join code.
Didn't work? Only Owners can remove or ban. You can't remove yourself, and a community always keeps at least one Owner.
See who changed what on a train
Who: Moderators, organizers, owners and event moderatorsUnder a minute
Every change to a train is recorded: details, publishing, lineup and invitations.
Open the train and scroll down to History.
Press Show history. The newest change is at the top, with who made it and when, in your timezone.
A train's history, newest first. The top line (outlined in coral) shows Static Sable withdrew from slot 7.
Repeating trains have a history too, on the series page: series edits, added dates and each date's own changes.
Roles and permissions
Your role is per community. You can be an Owner in your own community and a Streamer in someone else's. Your role is shown next to the community name in the menu. Crew is for helpers who don't stream (more).
What you can do
Streamer
Crew
Moderator
Organizer
Owner
See the community and its published trains
Yes
Yes
Yes
Yes
Yes
Open public train pages (no account needed)
Yes
Yes
Yes
Yes
Yes
See who in a train's lineup is live on Twitch
Yes
Yes
Yes
Yes
Yes
Edit your own streamer profile
Yes
Yes
Yes
Yes
Yes
Set up your own chat commands. Only you can change yours; organizers can't
Yes
Yes
Yes
Yes
Yes
Add TrainlyBot to your own chat, or turn it off. Only you decide for your channel
Yes
Yes
Yes
Yes
Yes
Let TrainlyBot start your own raids with !raidnow
Yes
Yes
Yes
Yes
Yes
Use the streamer commands in your own chat (!ready, !late, !cantmake, !trainlybot pause)
Yes
Yes
Yes
Yes
Yes
Turn TrainlyBot posts on or off for a train and pick which posts
Only if picked as event moderator
Only if picked as event moderator
See them; change them only if picked as event moderator
Yes
Yes
Write a train's TrainlyBot organizer messages
No
No
See them only
Yes
Yes
Answer invitations, see My Trains and notifications
Yes
Yes
Yes
Yes
Yes
See draft trains
No
Yes, read only
Yes
Yes
Yes
See the member list
Yes
Yes
Yes
Yes
Yes
Ask to come aboard an open slot of a published train; answer a slot reserved for you
Yes
No (Crew doesn't stream)
Yes
Yes
Yes
Take an open slot of a train open to members, without an invitation
Yes
No (Crew doesn't stream)
Yes
Yes
Yes
On your own confirmed slot: ask another streamer to swap, send the organizers a heads-up
Yes
No
Yes
Yes
Yes
Send a message to someone on a train's lineup
On trains you have a slot on, or as event moderator
Yes
Yes
Yes
Yes
Read the messages sent to you on a train's Messages card
Yes
Yes
Yes
Yes
Yes
Send a message to any member from the Members tab
Yes
Yes
Yes
Yes
Yes
Read your messages on the Messages page, reply once to each and archive them
Yes
Yes
Yes
Yes
Yes
See streamers' heads-ups on the lineup
No
No
Yes
Yes
Yes
Accept or decline come-aboard requests
Only if picked as event moderator
Only if picked as event moderator
Yes
Yes
Yes
Edit a lineup, including Fill from a list
Only if picked as event moderator
Only if picked as event moderator
Only if picked as event moderator
Yes
Yes
Invite streamers, resend, withdraw and replace invitations
Only if picked as event moderator
Only if picked as event moderator
Yes (unless the Owner limits it to Organizers)
Yes
Yes
Invite someone to the community by Twitch name (invite links), or find them on Trainly
No
No
Yes (unless the Owner limits it to Organizers)
Yes
Yes
See a train's history
Only if picked as event moderator
Only if picked as event moderator
Yes
Yes
Yes
Approve or decline join requests
No
No
Yes
Yes
Yes
Create, publish, edit, cancel and archive trains; change a whole series
No
No
No
Yes
Yes
Set community rules (joining, who can invite, who can find it) and change roles
No
No
No
No
Yes
Remove or ban a member, and unban
No
No
No
No
Yes
Connect the community's Discord channel
No
No
No
No
Yes
Upload or remove the community logo
No
No
No
No
Yes
Upload or remove the community banner
No
No
No
No
Yes
Edit the community name, description and timezone
No
No
No
No
Yes
Change the join code (also the public page address)
No
No
No
No
Yes
Change community colors
No
No
No
No
Coming soon
Why don't I see a menu item? Trainly hides what your role can't use. If you think you need more access, ask your community's owner.
Feature list
Everything Trainly can do today, who it's for and where to find it. This list grows with every release.
Download a flyer of the train (Square, Story or Wide; Dark or Light; community logo and color, QR code to the public page; organizers can save it as the train's flyer)
Anyone with the link; members on the train page
Public train page › Download flyer; train page › Flyer and lineup command › Download flyer
Chat commands: your StreamElements bot answers !train, !nextup, !lineup and !schedule from your live schedule (you paste four lines into your chat once)
TrainlyBot: Trainly's own chat bot joins your Twitch chat after you approve one permission on Twitch (or make it a moderator). Send a test post or turn it off at any time
TrainlyBot streamer commands: !ready checks you in, !late 10 and !cantmake send the organizers a heads-up, !trainlybot pause stops train posts until the stream ends
TrainlyBot !raidnow / !raidcancel: raid the next stop on the lineup from your own chat, after a separate Twitch permission; Twitch's pop-up and countdown stay yours
Messages, in each community: the messages people there sent you, ten a page, with one Reply each, Archive and an unread count in the menu; the Community list says which other communities have new ones
Everyone
Menu › community › Messages (under Members); community › Overview › Open Messages
On Twitch, sending your viewers to another live channel when you end your stream.
Raid train (train)
A planned relay of streams where each streamer raids the next one on the list.
Community
A group that runs trains, with its own members and code. You can belong to several.
Crew
A member who helps run the trains without streaming: sees drafts, is never put in a lineup. More.
Conductor
TrainlyBot's mascot: the little robot in an amber conductor's cap, with a T on his chest, that you see on the TrainlyBot page. More.
Community code (slug)
The short name used to join a community, like nbhd-demo. It is also the end of the community's public page address. Owners can change it.
Discover
The tab under All communities that shows every community on Trainly as a card, so you can find one to join. More.
Listed community
A community that shows on Trainly's front page, in Find a community and in Discover. Every community is listed unless its Owner hides it in Community rules.
Join link
A community's shareable link, like …/join/nbhd-raid-train. Opening it signs you in and fills the code in for you.
Invite link
A personal link that invites one Twitch account to join a community. Only that Twitch account can use it, once, within 14 days.
Discord webhook
A link Discord gives you so an app can post messages in one channel. Trainly uses it to post invites. Keep it private: anyone who has it can post in that channel.
Beta
Shown as a BETA label next to the Trainly logo. Trainly is new and still changing: features get added and improved often, and now and then something may not work as expected.
Slot
One streamer's turn in a train, for example 9:00 to 10:00 AM.
Message
A short note one member sends another: about a train, from the ⋯ menu of the lineup (more), or from Members (more). Only the person it's for sees it, in Notifications and under Messages in that community's menu, where they can reply once (more).
Break
A slot with no streamer, used for a pause in the train.
Lineup
The ordered list of slots and who streams in each.
Stream overlay
Something shown on top of your stream, such as a webcam frame or a chat box. Trainly's stream overlay is the train's lineup, added to OBS or Streamlabs as a Browser Source (a source that shows a web page in your scene).
Animated train
A look for the stream overlay: the lineup as a train rolling along the bottom of your stream, one car per streamer. It is RaidTrainOverlay by GOPROSLOWYO (GitHub), hand-built by the brilliant GOPROSLOWYO.
Chat command
A word starting with ! that viewers type in chat, like !train, so a chat bot answers. Trainly's commands answer from your live schedule (more).
Chat bot (StreamElements)
An account that sits in your Twitch chat and answers commands. StreamElements is a popular free one. Your bot asks Trainly for the answer. Trainly also has its own bot, TrainlyBot.
Command link
The web address your bot reads to answer a Trainly command. It only shows your public schedule. Make new links replaces all four.
TrainlyBot
Trainly's own chat bot. You add it to your Twitch chat from TrainlyBot in the menu, and you can turn it off there at any time (more).
TrainlyBot posts
What TrainlyBot posts in the chat of each live stop during a train, such as who's next and the raid reminder. Organizers turn them on for each train (more).
Checked in
The streamer typed !ready in their Twitch chat to say they're ready for their stop. Organizers see it on the lineup (more).
Reserve
Put a specific streamer in a slot. On a published train they are asked to accept or decline it.
Come aboard
Asking for an open slot of a published train. An organizer accepts or declines; asking does not hold the slot.
Lock
Keep a slot in place so it can't be moved by accident.
Draft
A train that's still being planned. Only moderators and above can see it.
Published
A train that every member of the community can see.
Open to members
A train type an organizer picks when creating a train. Every member of the community sees it right away and takes an open slot themselves, with no invitation and no approval, first come, first served. It stays Private (members only) unless the organizer changes its visibility.
Series (recurring train)
A set of trains created together on a repeating schedule, like every Sunday.
Occurrence
One date in a series. Each occurrence has its own lineup.
Timezone
Your local clock, written as Region/City, for example America/New_York.
Daylight saving time (DST)
When clocks move forward or back an hour. Trainly keeps trains at the same clock time when it happens.
Event moderator
A member picked to help with one specific train: its lineup and its invitations.
Invitation
An organizer asking you to take a slot. You answer with Accept or Decline.
Pending
An invitation nobody has answered yet.
Confirmed
The streamer accepted: the slot is theirs.
Answer by (deadline)
The last moment to answer an invitation. After it, the invitation expires and the slot opens again.
Heads-up
A short warning from the streamer on a slot to the organizers (running late, tech trouble, might not make it). The streamer keeps the slot; organizers see an amber badge on that stop.
Swap request
One streamer asking another streamer on the same train to trade times. Nothing moves until the other one presses Accept swap.
Withdraw
Giving up a slot you hold, from My Trains or with Can't make it? › Give up my slot on the train page, or (for organizers) taking an invitation back. The other person is told.
Vacancy (open slot)
A slot with nobody in it, for example after someone declined.
Replacement
A new invitation that fills a slot someone else left.
Roster call (pick a slot)
An invitation sent to every streamer in a community; each picks a free slot, first come, first served.
Busy
The streamer already accepted another train at that time, in any community. Trainly doesn't say which one.
My Trains
Your personal list of every slot you accepted, across all your communities.
Public page
A page with a train's lineup that anyone can open with its link, even without a Trainly account.
Community page
A community's public page that lists its upcoming Public trains and its members.
Visibility (Public, Unlisted, Private)
Who can see a train: everyone and listed; everyone with the link; or only members.
Community rules
An Owner's choices for how people join and who may send invitations.
Join request
A person asking to join a community that approves new members. A Moderator or above says yes or no.
Edited on its own
One date of a repeating train that was changed by itself. Changes to the whole series leave it alone.
Skipped
One date of a repeating train that was canceled. Adding more dates never brings it back.
History
The record of who changed what on a train or series, and when.
Twitch connection
The link between your Trainly account and your Twitch account. Trainly can read only your public name and picture. You can disconnect it on Account.
Test account
An account on a test site (like the demo) that isn't linked to Twitch. Anyone can pick one.
LIVE NOW
The green ring and tag on a member's picture when Twitch says they are streaming right now. Press the picture to open their profile and Watch on Twitch.
Live on Twitch (checked with Twitch)
Twitch itself says the channel is broadcasting right now. It is never based on what someone types into Trainly.
Needs reconnecting
Twitch stopped accepting Trainly's access to your account. Sign in with Twitch again to fix it.
Now (scheduled) and Up next
Which slot the schedule says is running, and who is on next. They follow the clock, not whether a channel is live.
Problems and answers
Quick fixes for the things people ask about most.
Who made the animated train?
GOPROSLOWYO did. The animated train is RaidTrainOverlay by GOPROSLOWYO (GitHub), a stream overlay they built for raid trains, with every car, theme and puff of smoke drawn by hand. Trainly sends it your train's lineup so you can use it with one link from the Stream overlay box. Thank you, GOPROSLOWYO!
Why does it say BETA next to the logo?
Trainly is in beta: it is new and still changing. The features in this help center work, and new ones arrive often. Now and then something may not behave as expected; if it does, tell your community's Owner or NBHD what you pressed and what you saw. The label goes away when Trainly leaves beta.
I can't find Send message, or it says I've sent a lot of messages
Send message is in the ⋯ menu of a stop on the train's lineup. You see it if you have a slot on that train, you're one of its event moderators, or you're Crew, a Moderator, an Organizer or an Owner; it never shows on your own stop. "You've sent a lot of messages in the last hour. Try again later." means you reached the limit of 10 messages an hour to the same person, or 30 in all. Wait a little and send it again (guide). On the community's Members tab, every member has the chat bubble (Send message) on each row but their own (guide).
Where did Messages go in the menu?
You can only message people in a community, so each community now has its own Messages, right under Members in the menu. Pick the community with the Community button first. The Community list shows … new next to your other communities with unread messages, and the Messages page names them under New in your other communities: (guide).
Can I chat with someone in Trainly?
Not on purpose: Trainly messages are short notes for the trains. You can send a message from Members or a train's lineup, and the person can answer once with Reply on their Messages page; a reply can't be answered. For a longer talk, use Twitch or Discord (guide).
I pressed Not now. Where do I create my first train?
Trainly asks Create your 1st raid train? only once, right after you create a community. After that, open the community's Overview: until it has a train, Upcoming trains shows Create my first train. You can also press New train at the top of the Overview, or open Trains in the menu and press New train (guide).
Trainly is in my language but some words are still in English
Names people typed stay as they wrote them: community names, train titles, bios and notes. The posts Trainly makes in Discord are in English for now. Everything else should be in your language; if you find a button or message in English, tell your community's Owner or NBHD where you saw it. Wrong language altogether? Pick yours in the language list (🌐) at the bottom of the menu (guide).
Does Trainly use cookies? Why is there no Accept button?
Trainly uses no cookies, ads or tracking, so there is nothing to accept or decline. It only remembers your sign-in and settings in your browser, which it needs to work. A one-time note says so, and Cookies and privacy lists exactly what it remembers.
My chat bot doesn't answer Trainly's commands, or says they're off
Open Chat commands and check that Answer chat commands is On (press Save chat settings after changing it). If you pressed Make new links, paste the lines under Lines for after a change into your chat. If the bot says nothing at all, check in StreamElements that its bot has joined your channel. If it says the command already exists, pick another name in Trainly and copy the line again (guide).
Why isn't my bio on my community's public page?
Every member is listed on their community's public page with name, Twitch picture, Twitch username and role. The bio shows only when your streamer profile is Public: open Streamer profile in the menu, set Profile visibility to Public and press Save profile. The page catches up within a minute. If you asked to join and are still waiting for approval, you appear once a moderator lets you in (more).
The train times look wrong for me
Your timezone is probably not set yet; new accounts start on UTC. Open Account, press Use my device timezone, then Save account. Full guide.
It says "Your account could not be loaded" or "Something went wrong"
Trainly couldn't reach its server for a moment. Wait a few seconds and press Retry or Try again. Nothing you saved is lost.
If it keeps happening, tell your community's organizer.
It says "You are not a member of this community"
You followed a link to a community you haven't joined. Ask its organizer for the code and use Join a community.
I can't see the member list
Every member can open Members in the community's menu. If it says you are not a member, you haven't joined that community yet: ask for its code and use Join a community. Changing roles and approving join requests still belong to Owners and Moderators.
There's no Come aboard button on the slot I want
You can ask only for open slots of a published train, and only while you have no slot and no open request in that train. Breaks, locked slots and slots that already started can't be asked for. If you already asked for another slot, press Withdraw request on it first. Full guide.
My friend sees a train that I can't
It's probably a draft. Drafts are only visible to moderators and above until the organizer publishes them.
I pressed Add to calendar and only a file downloaded
On a computer, open the downloaded file and your calendar app adds the train. On an Android phone, Google Calendar can't open that file: press Add to calendar again and choose Google Calendar. See Add a train or your slot to your calendar.
It says my session ended
For safety, sign-ins expire after a while. Disconnecting Twitch, or Twitch stopping Trainly's access (for example after a Twitch password change), also signs you out on every device. Sign in again; everything you saved is still there.
It says "You already have a confirmed train at this time"
You accepted another slot that overlaps this one, in this community or another. Open My Trains, withdraw from the one you can't do, then accept again. How to withdraw.
It says the slot was just taken
Another streamer accepted the same slot a moment before you. If the invitation lets you pick a slot, choose another time and press Accept. Otherwise, ask the organizer.
My invitation expired
The answer-by time passed. The organizer can send you a new invitation if the slot is still free.
I don't see an invitation I was promised
Check that you're signed in with the right account, then open Invitations › All. Invitations only arrive for published trains in communities you've joined.
I can't invite anyone to my train
Publish the train first: drafts are hidden from streamers, so invitations open once it's published. You also need to be a moderator or above, or an event moderator of that train.
Release or Remove is greyed out on a slot
That slot is held by an invitation or confirmed by a streamer. For an invited slot, use Withdraw or Replace on the Invitations page so the streamer is told (Replace a streamer). A streamer who came aboard or accepted a reserved slot frees it themselves with Give up slot on the train page or Withdraw in My Trains; ask them to.
The lineup says someone else changed it
Two people edited the same train at once. Press Reload lineup to see the latest version, then make your change again.
My community code is "already in use"
Codes are unique across Trainly, and a code a community used before stays reserved for it. Add a word or number to yours, for example night-owls-raids.
It says I was removed, or that I can't join a community
An Owner of that community removed you. If you were only removed, you can join again with the community's code or link. If you see "You can't join … Its Owners removed you from the community", they also banned you: only one of its Owners can lift that. Your other communities aren't affected.
We changed our join code and the old link stopped working
That is on purpose: when an Owner changes the join code, the old code and every old join or public page link stop working at once. Share the new link from Overview › Copy join link. Nobody else can take your old code. To go back, an Owner can change the code back to it.
A train link says "This train page isn't available"
The train is still a draft, its organizers made it Private, or the link was cut off when it was pasted. Ask an organizer to press Copy public link again. About visibility.
Why is there no "Watch on Twitch" link?
The link appears for streamers who signed in with their Twitch account. Test accounts have no Twitch channel, so the page says "demo account, no Twitch channel". Streamers who chose a Private profile show as "Confirmed streamer".
I asked to join a community. When do I get in?
When one of its moderators approves you. You'll get a notification either way. Until then the community doesn't appear in your menu. Looking up the code again shows "Request sent".
It says the community "isn't accepting new members right now"
Its owner has closed joining for now. Ask one of its organizers: they can open it again in community rules, or send you a personal invite link, which works even when joining is closed.
My invite link says it's for a different Twitch account
You're signed in with another account than the one invited. Press Sign out on the invite page, then sign in with the Twitch account the invite names. See Accept an invite link.
My invite link was withdrawn, has expired or was already used
Invite links work for 14 days and only once, and the person who sent it can withdraw it. Ask them for a new one. If the page says "This invite link doesn't work", check that you copied the whole link.
It says there's no Twitch account with that name
Trainly asks Twitch whether the account exists. Check the spelling on their Twitch channel, or paste their channel link (twitch.tv/…) into Who do you want to invite?. If it says Twitch is not responding, try again in a few minutes.
Someone I want to invite isn't in the Invite streamers list
The list only has people who already signed in to Trainly, and leaves out anyone whose streamer profile is set to Private. Type their Twitch username in Who do you want to invite?, press the Invite "…" by Twitch name row at the bottom and then Create invite link: the link works as soon as they sign in with that Twitch account. Full guide.
My invite wasn't posted to Discord
The invite itself still works: use Copy link or Copy message for Discord. The message under the invite says why the post failed. "No Discord channel connected" means an Owner has to connect one. "Webhook no longer exists" means someone deleted it in Discord; an Owner presses Replace webhook and pastes a new one. "Slow down" or "didn't answer": wait a minute, then press Post to Discord again.
I edited the whole series but one date didn't change
That date was edited on its own or skipped, so it no longer follows the series. Published trains also keep their start time. Change that date from its own train page. More.
It says "Too many requests"
Trainly limits how often one connection can sign in or open public pages, to keep the site safe. Wait a minute and try again.
Does Trainly start the raid for me?
No. Trainly tells you when you're on and who's next, but you start the raid yourself on Twitch. Trainly doesn't even ask Twitch for permission to raid, chat or change your channel.
What can Trainly do with my Twitch account?
Only read your public Twitch name, display name and picture, and whether your channel is live. It can't post, chat, raid, change your stream or see your email or password. Account › Twitch shows "Permissions: Name and picture only". Disconnect any time.
It says "Twitch is not responding right now"
Twitch is having trouble or is busy. Wait a few minutes and try again. Everything else in Trainly (trains, invitations, My Trains) keeps working while Twitch is down, and the On Twitch box shows Unknown instead of guessing.
It says "This sign-in link has expired" or "Sign-in canceled"
Each Twitch sign-in works once, for 10 minutes, in the browser tab where you pressed Sign in with Twitch. Press Back to sign in and start again in one tab. "Sign-in canceled" means the Twitch page wasn't approved; nothing was shared.
I changed my name on Twitch. Do I lose my trains?
No. Trainly knows you by your Twitch id, which never changes. Sign in as usual, or press Sync from Twitch on Account, and your new name shows everywhere.
Can I use Trainly on my phone?
Yes, in your phone's web browser. The menu moves to a bar at the bottom of the screen; press ☰ at the top left for the full menu. Phone apps for iPhone and Android are coming later.
Who can see my information?
Your email is never shown. Your profile follows the visibility you pick on Streamer profile. Communities only see what you share with them.
What's new
TrainlyBot has its own address
TrainlyBot's site is now www.trainlybot.com, with Add TrainlyBot to my chat in one click. The old address, bot.trainlybynbhd.com, still works.
Every TrainlyBot post, page by page
Recent posts in your chat on the TrainlyBot page now shows every post TrainlyBot made in your chat, 10 at a time, newest first. Use Previous, Next or a page number under the list (guide).
Meet the Conductor
TrainlyBot has a face: the Conductor, a little robot in a conductor's cap. He waves at the top of the TrainlyBot page under Tools and stands next to Add TrainlyBot to your chat. Nothing else on the page changes.
A shorter TrainlyBot card
On the train page, Which posts, Organizer messages and This train's posts on the TrainlyBot card now open and close, so the card takes less room. Organizer messages are written in a window with a bigger box: press Add a message or Edit (guide).
TrainlyBot is open to everyone
Trainly's own Twitch chat bot is here. Open TrainlyBot under Tools in the menu and press Add TrainlyBot to my chat, or use the same button on www.trainlybot.com. Twitch asks you for one permission. Organizers turn on TrainlyBot posts for each train on the train page. (How to add it.)
A way in from Home
Nothing lined up yet? Home now says what to do next. In a community but in no train, Upcoming trains becomes Get on a train, with a big search box and Open slots only. In no community yet, Find your crew offers Find a community, Join with a code and a few active communities (guide).
Train cards with your flyer
Trains now show as cards, like communities: the train's flyer across the top, or your community's banner when it has none, with the date, the lineup's pictures and the same buttons as before. You'll see them on Trains, Home, My Trains, Find a raid train and each community's public page (guide).
Your community's own colors
Owners can now pick two colors under Community colors on the Overview, with a color picker, a code or a ready-made pair. Your public train pages, community page and members page use them instead of coral and amber (guide).
Find a community without an account
The front page now shows Find your crew, with the most active communities, and a new public page, Find a community, lists them all with search, sorting and Open to join only. Each community's public page has a Join … or Request to join button that takes visitors through Twitch sign-in (guide). Owners can hide their community from these lists in Community rules (guide).
Communities as cards
All communities now shows each community as a card with its banner, logo, a short description, its members and its upcoming public trains. Your communities lists yours; Discover lists every community on Trainly, with a search box and Sort (Most members, Most trains, Newest, A to Z). Join or ask to join right from the card. A community without a banner gets one made from its logo and color, here, on Home and on its own page (guide).
See who's live at a glance
On Members and in every train's lineup, members Twitch reports live now get a green ring around their picture and a LIVE NOW tag. Press their picture to open their profile, see how long they've been live, and press Watch on Twitch (guide).
Confirm a slot for a streamer
A streamer said yes in chat but never pressed Accept? A reserved or invited stop now has Confirm for them next to Ask again. The stop turns Confirmed, so the flyer, the lineup command and the public page show the streamer, and the streamer gets a notification (guide).
Messages moved into each community
Messages now sits in the community part of the menu, right under Members, and shows that community's messages. Switch communities while reading and you see the other community's messages. The Community list says … new next to your other communities with unread messages, so you don't have to switch to find them (guide).
Download a flyer in three sizes
Download flyer makes a poster of your train: Square for Instagram and Discord, Story for Instagram and TikTok stories, or Wide for X and Discord banners, in Dark or Light colors. It shows your community's logo and color, every stop with its streamer's picture, and a QR code to the public page. Find it next to Share on the public page and under the Flyer on the train in Trainly. It replaces Download lineup image and Download auto-generated flyer Organizers can also press Use as train flyer to make it the train's flyer in one go. (guide).
Pages on Notifications and Invitations
Notifications now shows 20 at a time and Invitations 10, with Previous, page numbers and Next under the list, so older ones are a click away (notifications, invitations).
Archive a train
Organizers can now put away a train that is over, an old draft or a canceled train with Archive train. It leaves the lists for Trains › Archived, nobody is notified, and Restore train brings it back as it was (guide).
Messages in one place
A new Messages page in the menu lists every message people sent you, ten a page, with how many are unread next to it. Answer a message once with Reply, and Archive the ones you're done with. The community's Overview now shows one line, "You have … new messages", with Open Messages, instead of a long card. And every member, not only Moderators and up, can now send a message from Members (guide).
Past trains
The Trains page has a new Past tab: the community's trains that are over, most recent first, 20 a page, with who streamed on each. A train that is over now says Ended instead of Published (guide).
Generate a lineup command
On a train, Generate lineup command (under Lineup command) writes the whole lineup as text ready to post: your community's name first, the date, the time zone, one line per stop with its time and Twitch.tv/ link, and a thank-you line. Change the word for your streamers (it starts as DJ), edit the text, then press Copy lineup or Save as lineup command. A counter warns when it's too long for Twitch chat (guide).
Tidier sign-in and Sign out
The language list on the Sign in page now sits right under the sign-in buttons. In the menu, Sign in as another user is the round icon next to Sign out; on Account the two buttons sit side by side (guide).
Sign in as another user
Signed in already? The Sign in page now shows who it is, with Continue as … and Sign in as another user, which signs that person out of this browser and lets the next one sign in. It's also at the bottom of the menu and on Account (guide).
Member count on the Members tab
The Members tab on a community's page now shows how many members the community has, right from the Overview (guide).
Raid the next stop with !raidnow
On the TrainlyBot page, press Let TrainlyBot start my raids and approve on Twitch. Then type !raidnow in your chat during your stop to raid the next stop on the lineup. Twitch still shows you its pop-up and 90-second countdown (guide).
Shoutouts at handoff
TrainlyBot can now give the next streamer a Twitch shoutout at each handoff, in chats where it is a moderator. Organizers pick Shoutout under Which posts on the train's TrainlyBot card (guide).
Organizer messages for TrainlyBot
On the train page, the TrainlyBot card now has Organizer messages: up to 5 short messages that TrainlyBot posts one at a time in the chat of the stop on air, every 30 or 60 minutes (guide).
Tell your organizers from your own chat
With TrainlyBot in your chat, type !ready to check in for your stop, !late 10 if you're running late, or !cantmake if you might not make it. Organizers see Checked in and the heads-up on the lineup. !trainlybot pause stops the train posts until your stream ends (guide).
Trains in one place
The community page now has Overview and Members; its trains are on the Trains page in the menu (the old Trains tab had stopped listing them). All trains on the Overview and old links open the Trains page (guide).
TrainlyBot posts during your trains
On the train page, the new TrainlyBot card lets organizers turn on TrainlyBot posts: the train start, who's next, the raid reminder and more, in each live stop's chat. Stops shows who added TrainlyBot, and Copy invite to TrainlyBot helps the others add it (guide).
TrainlyBot joins your chat
New under Tools: TrainlyBot, Trainly's own chat bot. Press Add TrainlyBot to my chat and approve one permission on Twitch, then try Send a test post. You can turn it off at any time (guide).
Streamer pictures on My Trains
Each train on My Trains now shows its confirmed streamers' pictures and, while it runs, On now: who is streaming, like Home and the train cards (guide).
Streamer pictures on Home
Upcoming trains on Home now shows each train's confirmed streamers' pictures and, while it runs, On now: who is streaming, like the train cards (guide).
Trains open to members
When you create a train, you can now pick Train type › Open to members. Every member of your community sees it right away, without publishing, and takes an open slot with Take this slot: no invitation, no approval, first come, first served. It stays off your public pages (organizer guide, member guide).
See who is on the train at a glance
Train cards on Trains and the community's Overview now show the confirmed streamers' pictures and, while a train runs, On now: who is streaming. On the train page, the stop on air is highlighted with On now and the next one says Up next (guide).
Running trains stand out
On Trains and the community's Overview, a train that is running right now is highlighted in orange with Live now and the time it runs until, so you can jump straight into it (guide).
Watch the train on its page
While a train is running, its page plays the current stop's Twitch stream where the date and time usually are, says who is next, and switches streamer by itself. On phones it fills the width; it starts muted. Its public page plays it too, for anyone with the link (guide).
Clearer Invite streamers
One field, Who do you want to invite?, now finds people on Trainly and any Twitch name. A card says how the invite reaches them: On Trainly (a notification straight away, button Send invite) or Link only (you send the link, button Create invite link). Sent invites has a new Reached by column (guide).
An animated train for your stream
The Stream overlay box has a new Look: Animated train rolls your train across the stream, one car per streamer, with 15 themes to pick from. It's RaidTrainOverlay by GOPROSLOWYO (GitHub), hand-built by the brilliant GOPROSLOWYO (guide).
Message any member from Members
Moderators, Organizers and Owners now have a chat bubble (Send message) on each row of a community's Members tab. It opens the same window as on a train. The member gets a notification marked Message and reads it on a Messages card at the top of the community's Overview (guide).
The raid train survey
Tell us how your raid trains really go: 10 quick questions, about 3 minutes, no account needed. Open it with Take the survey on the front page or Raid train survey at the bottom of public pages. At the end you see what Trainly already does about the parts you find hardest (guide).
Fill the lineup from a list
Have your streamers in order already? On a train, press Fill from a list in Organizer tools, paste the names one per line and check the lineup Trainly made: each name on the next open slot, with arrows to reorder and an offer to add slots at the end when the list is longer. Then press Send … invitations or Reserve … slots once. Nobody is told until you do (guide).
Find a raid train
A new public page lists the public trains of every community, running ones first: search by train, streamer or community and pick Live now, Today, This week or Any time. Open it from the front page (Find a train to watch), the menu (Find a raid train) or any public page (guide).
Create your first train right away
Just created a community? Trainly now asks Create your 1st raid train? Press Create my first train to open the New train helper, or Not now to do it later; it asks only once. Until the community has a train, its Overview keeps a Create my first train button (guide).
Swipe from one train to the next
On a train page, swipe left or right on a phone, or press the ‹ or › arrow in the flyer's top corners, to move through the community's trains in date order without going back to the list (guide).
Cookies and privacy
Trainly doesn't use cookies, ads or tracking, and now says so: a one-time note at the bottom on your first visit, with Learn more and Got it, and a Cookies and privacy page linked from the front page and the sign-in page (guide).
Trainly speaks Portuguese
Every screen, button and message is now also in Brazilian Portuguese: pick Português from the language list (🌐) at the bottom of the menu, under Language on Account, or as your Preferred language in your streamer profile. Browsers set to Portuguese start in it, and this help center is in Portuguese too (guide).
Send a message to someone on a train
On a train's lineup, press ⋯ on someone's stop and choose Send message. They get a notification marked Message, and the train page shows a Messages card with everything sent to them about that train. Streamers on the train, its event moderators, Crew, and Moderators and up can send (guide).
Alerts on your phone or computer
On Account, Phone and browser alerts sends your notifications to this phone or computer, even when Trainly isn't open. Choose which kinds (invitations, your slots, messages, communities, feedback), see your devices and send a test. On iPhone, add Trainly to your Home Screen first (guide).
Ask for a feature or report a bug
New at the bottom of the menu: Send feedback. Pick Feature request, Bug or Something else, write a title and details, and it goes straight to the Trainly team. Your sends are listed on the same page with their status (New, Planned, Done or Declined) and our reply, and you get a notification when one changes (guide).
Pick your preferred language in your profile
In Streamer profile, Preferred language is now a list of Trainly's languages instead of a text box. Trainly opens in it on any phone or computer where you haven't picked a language (guide). A language from the old text box is kept but only takes over once you choose it in the list.
Trainly speaks French, German and Japanese
Besides English and Spanish, every screen, button and message is now in Français, Deutsch and 日本語. Pick yours from the language list (🌐) at the bottom of the menu or under Language on Account. Browsers set to one of these languages start in it, and this help center is in all five: see the top of the page (guide).
Trainly speaks Spanish
Every screen, button and message is now also in Spanish. Press Español at the bottom of the menu, or pick it under Language on Account. Browsers set to Spanish start in Spanish, and this help center has a Spanish version too: press Español at the top (guide).
Your chat bot can answer !train and !nextup
New under Tools: Chat commands. Chat sees shows each answer while you're live and while you're offline, and See a sample shows a made-up train in a sample chat. Switch on Answer chat commands, paste four lines into your Twitch chat, and your StreamElements bot answers !train, !nextup, !lineup and !schedule from your live Trainly schedule. Only public trains are shared, and Trainly never posts on its own (guide).
Trainly beta is here
Trainly is open in beta at www.trainlybynbhd.com. Sign in with Twitch, create or join a community, plan raid trains stop by stop, invite streamers, and share each train with a public page, a lineup image and a stream overlay. The BETA label next to the logo means Trainly is new and still changing (why it says BETA). New here? Start with Getting started or watch the how-to videos. From now on, every change shows up here.
Coming soon
These aren't available yet. Guides will appear here when they arrive.
Chat commands for your stream
Viewers type !train, !nextup, !lineup or !schedule in your Twitch chat, and your StreamElements chat bot answers from your Trainly schedule: which train you're on, who's next and when. Only public trains are shared.
Email alerts and invites, slot reminders
Your notifications by email, reminders before your slot, and community invite links sent straight to someone's email address.
Train invite links
Invite streamers to one specific train with a link. (Adding a train or your slot to your calendar is already here: see Add a train to your calendar.)
Live status everywhere and community colors
See on public pages who is live on Twitch, have live changes appear by themselves instead of pressing Check again, and give your community its own colors.
Phone apps and live tools
iPhone and Android apps, check-ins where streamers say they're ready, and a live dashboard for moderators.